What to Do with Old Kids' T-Shirts? Sew a Cozy Blanket
A detailed tutorial for sewing a blanket from old kids' T-shirts: choose the right knit fabric and cut it into blocks of the right size, trim the pieces to a template and lay out the print, sew the blocks into a top using one of three knit-sewing methods, assemble the blanket with batting and backing, quilt it, and finish the edge with binding.
Intermediate3 hrFree
Translated
Things you will learn
Any old T-shirts and turtlenecks will work for this blanket — thin ones or ones with a bit of insulation, printed, lettered, or solid-colored; the one requirement is that the fabric shouldn't stretch too much or bleed color.
The best block size is 15×15 to 30×30 cm; the blocks can all be different sizes depending on the size of each T-shirt, so there's no need to hit a perfect measurement.
Before cutting, wash and press the garments, trim off the seams and any damaged spots, then cut the printed part off the front of each T-shirt; trim the pieces to a template, filling in the top with scraps from other T-shirts if needed.
You can sew knit fabric on a regular home machine using one of three methods: pinning the pieces before sewing (for stable fabrics), paper piecing with strips of office paper under the fabric (removed only after the whole blanket is assembled), or sewing with a walking foot or a double knit needle.
After sewing the blocks into a top, assemble the blanket with a layer of batting and a backing, pin and baste it 5 cm apart, quilt it using whichever method suits you, and finish the edge with 5 cm binding folded in half.
What you'll get
You'll get a cozy patchwork blanket made from old printed T-shirts, quilted with batting and neatly finished around the edge.
Materials and tools
Materials
Old kids' T-shirts and turtlenecks, thin ones or ones with a bit of insulation work, printed or solid-colored — the fabric just shouldn't stretch too much or bleed color
Batting, used as insulation between the patchwork top and the backing
Backing fabric, used as the blanket's bottom layer
Strips of non-stretch fabric (such as cotton), used to keep the patchwork top's edges from warping during assembly
Binding (cut from the same T-shirts, or 5 cm-wide fabric), used to finish the edge of the finished blanket
Strips of office paper or newspaper, needed for the paper-piecing method when sewing knit fabric
Tools
Pins, for pinning the pieces together before sewing
Scissors, for cutting the T-shirts into pieces
Sewing machine, for sewing the blocks and the blanket together
Walking foot, recommended for sewing knit fabric and quilting — it fits every type of home sewing machine
Double knit needle, helps produce neat seams on knit fabric
Spray bottle, for dampening and easily removing the paper after paper piecing
Regular tape, for taping the backing down to the floor before layering
Preparation
Choose the right T-shirts
Any T-shirts and turtlenecks will work: thin ones or ones with a bit of insulation. The one requirement is that they shouldn't stretch too much or bleed color! You can pick pieces with prints, lettering, or solid colors, and mix them together.
Decide on your block size
This design is the most pleasant and easiest to sew precisely because you won't need to even out every piece or hit a perfect size. What's more, the blocks can all be different sizes, depending on the size of each T-shirt. The best pieces are 15×15 to 30×30 cm — you can put together a blanket from them fairly quickly.
Cut the patchwork blocks
The garments are prepared first, then cut and trimmed to a template.
Wash the garments and cut away any damaged spots
First, wash and press the garments, then trim off the seams and any parts with holes, pilling, or stains, if there are any. Next, cut the printed part off the front of each T-shirt.
Trimming a T-shirt
Trim the pieces to a template
Once every garment is cut into pieces, trim them to a template. If some pieces come out wider or narrower than the size you need, "build out" the piece using scraps from other T-shirts. Lay everything out on the floor or a couch and check how the print lines up and looks.
The assembled squares
Assemble the patchwork top
The blocks are paired up or grouped into a few at a time and sewn into larger sections, then joined together.
Pair up and pin the blocks
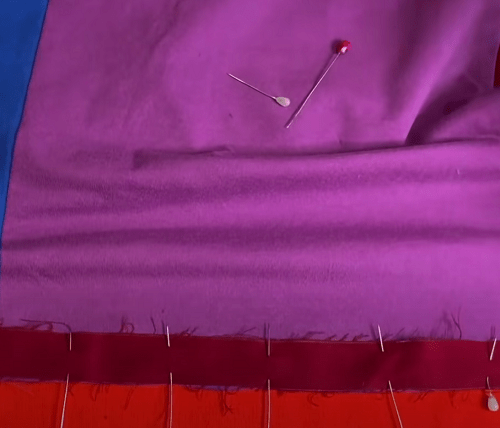
Take your pieces and pair them up 2 at a time, pinning them together. The easiest way is to sew the finished blanket together from vertically assembled blocks.
Pinning the layers together
Assemble larger sections if needed
As an alternative, you can baste or pin 4-9 blocks into separate sections to sew together later. If you're short on width or length anywhere, cut a strip of the right size from one of the remaining garments, pin it on, stitch it to the piece, and then trim it even.
Choose a method for sewing the knit fabric
Sewing knit fabric on a regular home machine is tricky — the fabric stretches, and you get ugly puckers or skipped stitches; there are three ways to solve this.
Method 1: pinning
Often, you'll pin the pieces before sewing. This option works for relatively stable fabrics.
Method 2: paper piecing
In this case, you place strips of regular office paper, or even newspaper, under the fabric before pinning it. Sewing over paper is easier — you only remove it ONCE the entire blanket has been assembled!
Method 3: using a walking foot
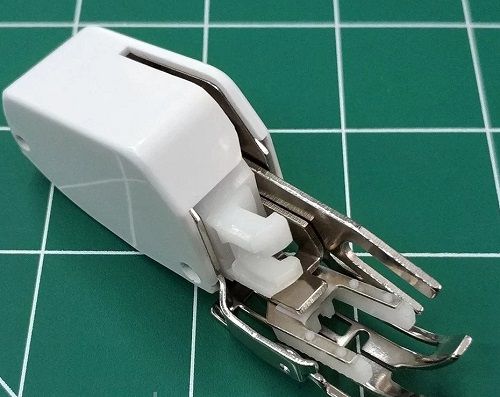
This option suits people who've been sewing for a while. With a device like this, the top and bottom fabric layers move together, so you don't get any puckers or folds. The foot is universal and fits every type of home sewing machine. You can also fit your machine with a double knit needle, which gives you perfect seams.
A walking foot for quilting
Assemble the blanket's layers
Once every section is sewn together, the top gets stabilized around the edge and then layered with batting and backing.
Stabilize the edges with non-stretch fabric
Once every section is sewn together, it's time to assemble the textile. To keep the edges from warping, there's a handy trick: stitch on strips of non-stretch fabric (like cotton). Stitch this fabric binding, 2-3 cm wide, along the sides, top, and bottom, and then press the blanket. If you sewed over paper, you'll need to remove it now by lightly misting it from the wrong side with a spray bottle — damp paper strips come off very easily!
Quilting along a marked line
Layer and baste the pieces
Next, tape the backing down to the floor with regular tape. Lay the batting on top of it, and on top of that, lay your patchwork top. Pin everything around the perimeter, then baste it 5 cm apart.
Quilt the blanket and finish the edge
Quilting secures all the layers, and binding around the edge finishes off the blanket.
Quilt the blanket
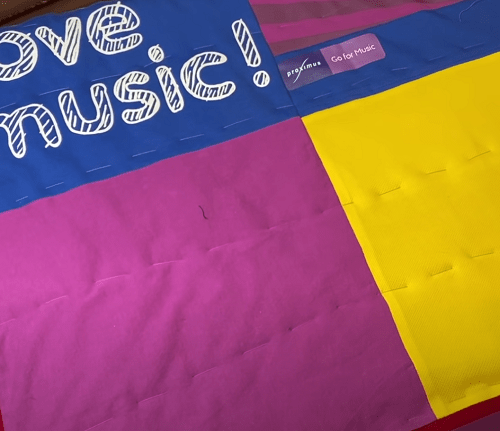
The next part of the work is quilting. Your options depend on how thick the blanket is and your skill level. If you have a free-motion foot, you can choose a decorative quilting design; otherwise, it's easy to quilt in stripes, diamonds, or circles — ideally with a walking foot. For larger blankets, you can use hand (bead) quilting: the needle goes in from the right side, making a very small stitch on the right side and a bigger one (up to 2 cm) on the wrong side.
A patchwork blanket of colorful squares
Finish the edge with binding
For this, use binding cut from the same T-shirts, or fabric that's 5 cm wide. Fold it in half and stitch it on from the wrong side, then fold it over to the right side and sew it down by hand or by machine.
Finish and variations
Finish
Sew blankets of any size
You can sew larger blankets the same way, for example, from men's T-shirts.
A note of thanks
Huge thanks to crafter Gella Chara for the tips and the idea.
Variations
Sew a blanket from adult T-shirts
You can sew larger blankets the same way, for example, from men's T-shirts.
Try hand (bead) quilting
For larger blankets, you can use hand (bead) quilting: the needle goes in from the right side, making a very small stitch on the right side and a bigger one (up to 2 cm) on the wrong side.
The knit fabric stretches and puckers while sewing
Problem
When sewing knit pieces on a regular home machine, the fabric stretches, and you get ugly puckers or skipped stitches.
Likely cause
The knit fabric was sewn the regular way, without pinning, paper piecing, or a walking foot.
How to fix it
Choose one of the three methods for working with knit fabric: pinning the pieces before sewing, paper piecing with strips of office paper under the fabric, or sewing with a walking foot and a double knit needle.
The patchwork top's edges warp before quilting
Problem
After all the blocks are sewn together, the finished top's edges skew or stretch out of shape.
Likely cause
The top's edges weren't reinforced with non-stretch fabric before further assembly.
How to fix it
Stitch a 2-3 cm-wide strip of non-stretch fabric, such as cotton, along the sides, top, and bottom of the top, then press the blanket.
The paper used for paper piecing is hard to remove
Problem
After the blanket is assembled, the paper strips used while sewing tear into little pieces and are hard to pull off the seams.
Likely cause
The paper was pulled off dry, without dampening it first.
How to fix it
Lightly mist the paper from the wrong side with a spray bottle — damp paper strips come off very easily.
?FAQ
What T-shirts work for a patchwork blanket?
Any thin ones or ones with a bit of insulation, printed, lettered, or solid-colored — the fabric just shouldn't stretch too much or bleed color.
What block size should I choose?
15×15 to 30×30 cm; the blocks can be different sizes depending on the size of each T-shirt.
How do I sew knit fabric on a regular sewing machine?
Using one of three methods: pinning the pieces before sewing, paper piecing with strips of office paper, or sewing with a walking foot and a double knit needle.
How do I keep the patchwork top's edges from warping?
Stitch a 2-3 cm-wide strip of non-stretch fabric, such as cotton, along the sides, top, and bottom of the top.
How do I finish the edge of the finished blanket?
With binding cut from the same T-shirts, or fabric that's 5 cm wide, folded in half and stitched on first from the wrong side, then sewn to the right side by hand or by machine.
Your project
Log in to track your project, attach photos, and publish your result into the shared feed.
Just "Wow!" And here's a question: can thin sweaters be used too, and if so, how do you finish the edges of the little squares so nothing frays and falls apart??
Yes, you can! In that case, sew with a knit stitch or a wide zigzag. You can also fit a double needle right away. And keep in mind that you'll be quilting everything anyway — you'll definitely go over each block with a stitch line at some point, so nothing will fray or tear!
Just "Wow!" And here's a question: can thin sweaters be used too, and if so, how do you finish the edges of the little squares so nothing frays and falls apart??

 Intermediate3 hrFree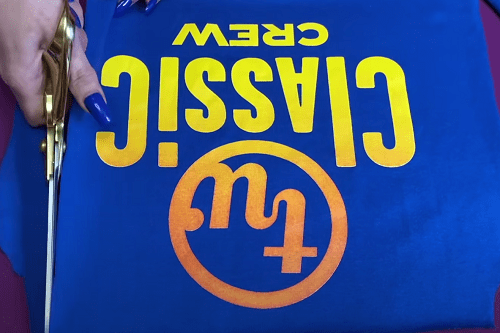



Yes, you can! In that case, sew with a knit stitch or a wide zigzag. You can also fit a double needle right away. And keep in mind that you'll be quilting everything anyway — you'll definitely go over each block with a stitch line at some point, so nothing will fray or tear!