How to Sew Gloves from a Pattern: Sizes and Assembly
Step-by-step master class on sewing gloves: measuring the palm without the thumb, sizes 5-9 for palm circumferences of 16-24 cm, full-size pattern sheets with a scale check, length adjustment, 1 mm tucks, 3 mm seams, the thumb, and side pieces A, B, C.
IntermediateFree
Translated
Things you will learn
Choose the size by measuring the palm circumference without the thumb.
The source lists sizes 5-9: 16, 17.5, 19, 22, and 24 cm.
Print the pattern sheets at actual size and check the 5x5 cm test square.
If you change the length, adjust not only the main pattern piece but also the side pieces.
The main seams and thumb are sewn 3 mm from the edge; the decorative tucks are sewn 1 mm from the edge.
What you will get
A pair of gloves made from stretchy faux suede. The knit-backed material stretches well and does not fray, so the tiny seams between the fingers are easier to sew neatly.
Materials and tools
Materials
Faux suede on a knit backing, This is the material used in the source tutorial: it stretches well and does not fray.
Matching thread, For stitching 1 mm and 3 mm from the edge.
Tools
Measuring tape, For measuring the palm without the thumb.
Printer, The pattern sheets need to be printed at actual size.
Water-soluble pen, For marking the decorative tuck lines.
Needles or pins for holding pieces, Fix the pieces first, then baste them.
Sewing machine, For stitching 1 mm and 3 mm from the edge.
Files and resources
Polina's video on sewing glovesThe source video for the master class; use it as a visual reference when assembling the fingers.Polina's video on sewing gloves
Preparation
Prepare for small-detail work
The discussion notes that the gloves are explained in detail, but the work itself is tiny. Do not skip basting: it helps hold the fingers and side pieces before machine stitching.
Choose the size and prepare the pattern sheets
Before sewing, measure the palm, print the pattern at actual size, and check whether the chosen size matches the hand.
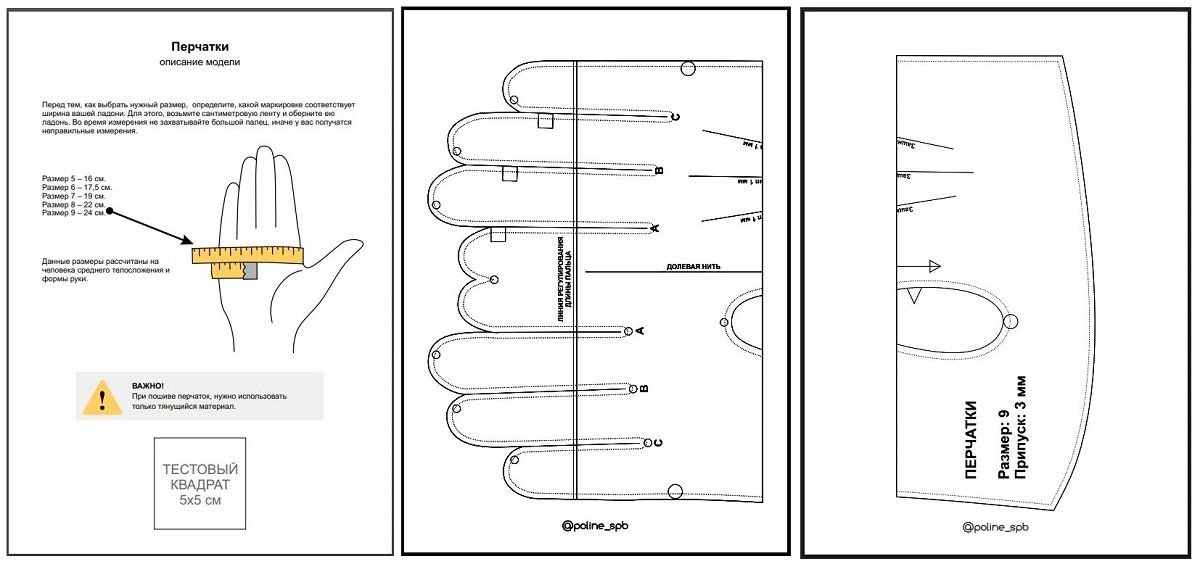
Measure the palm without the thumb
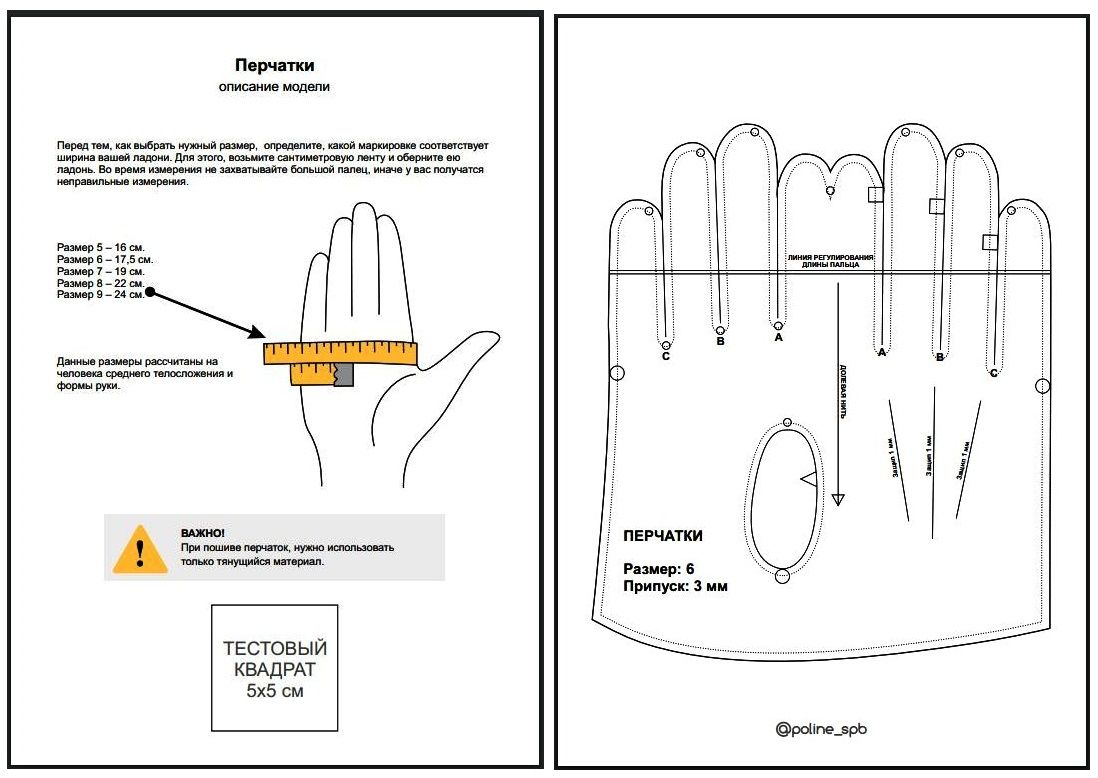
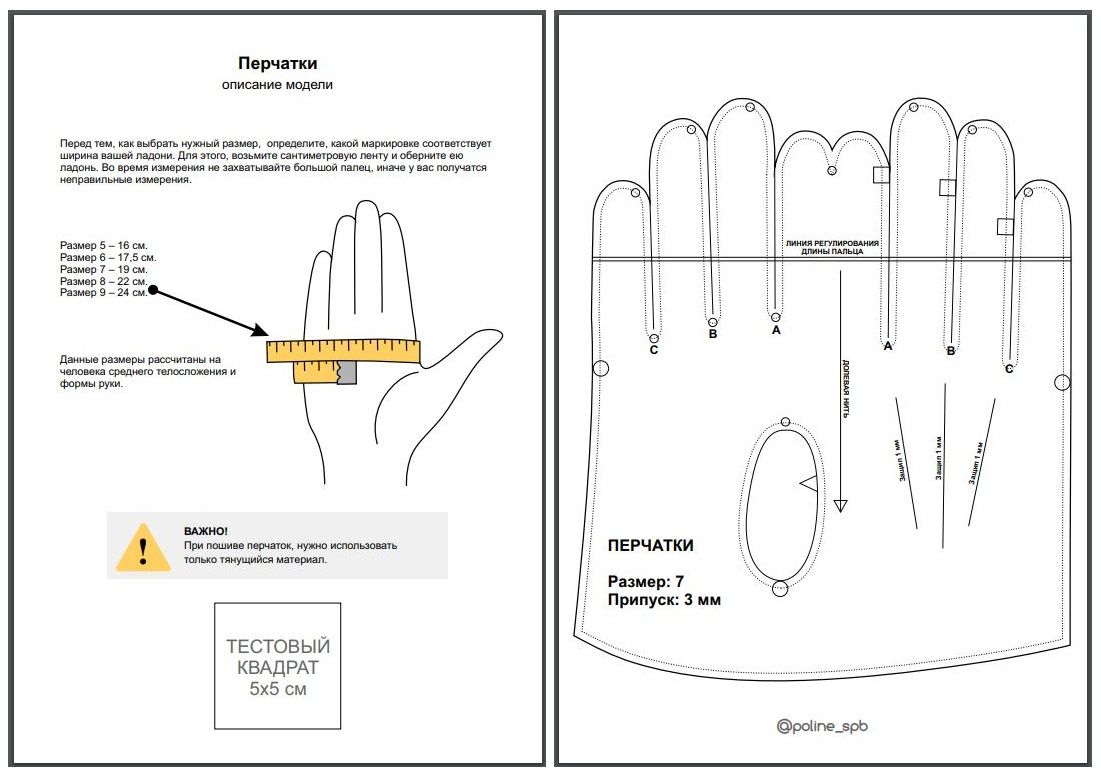
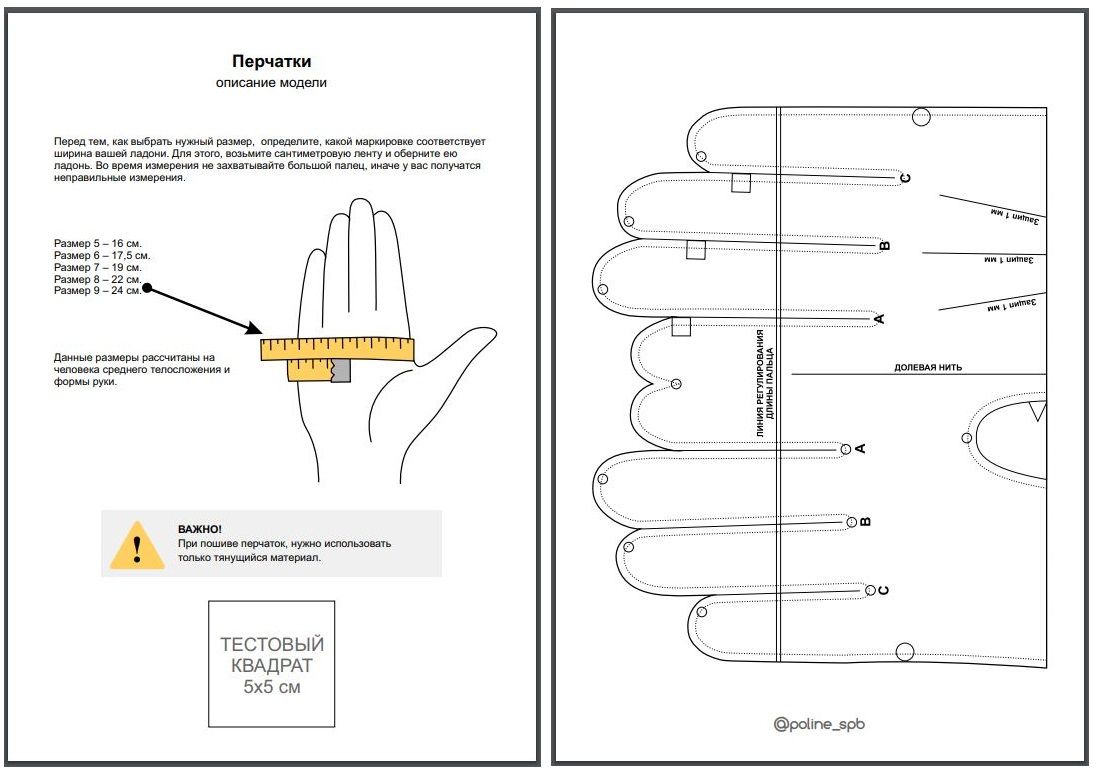
Wrap the measuring tape around the palm without including the thumb. In the source: size 5 is 16 cm, 6 is 17.5 cm, 7 is 19 cm, 8 is 22 cm, and 9 is 24 cm. These sizes are calculated for an average build and hand shape.
Final look of gloves made from stretchy faux suede.
Do not include the thumb
Measure the palm circumference for size selection without the thumb.
Print the pattern sheets at actual size
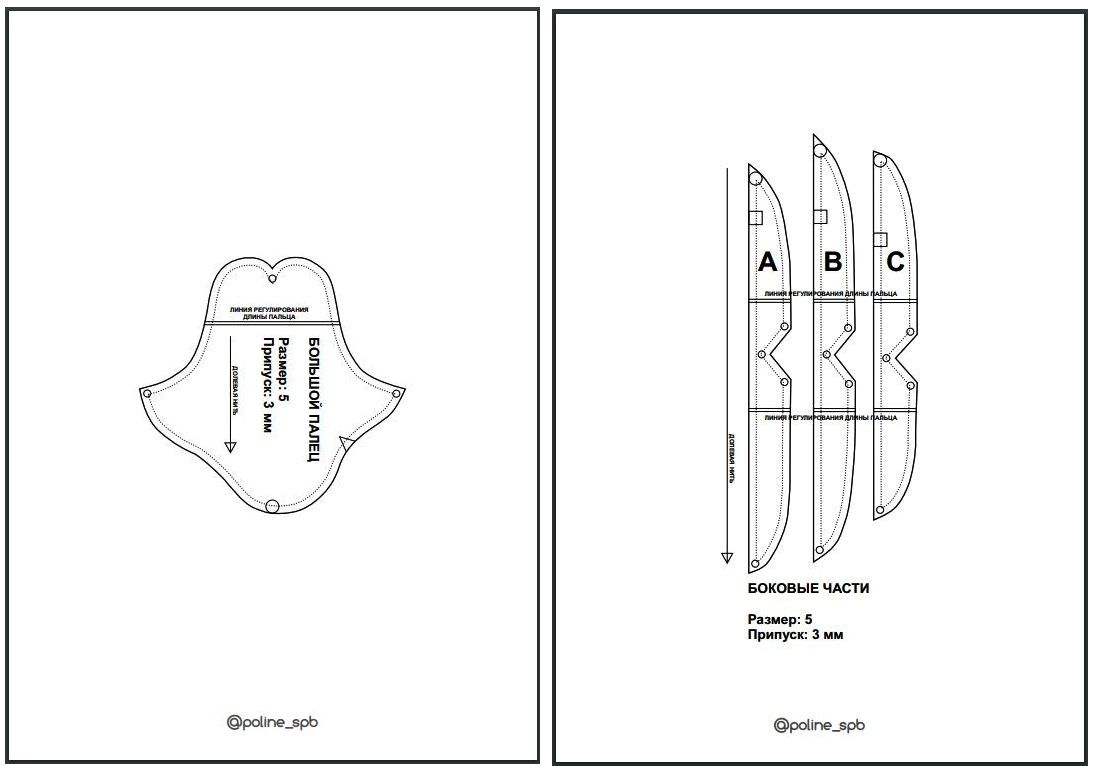
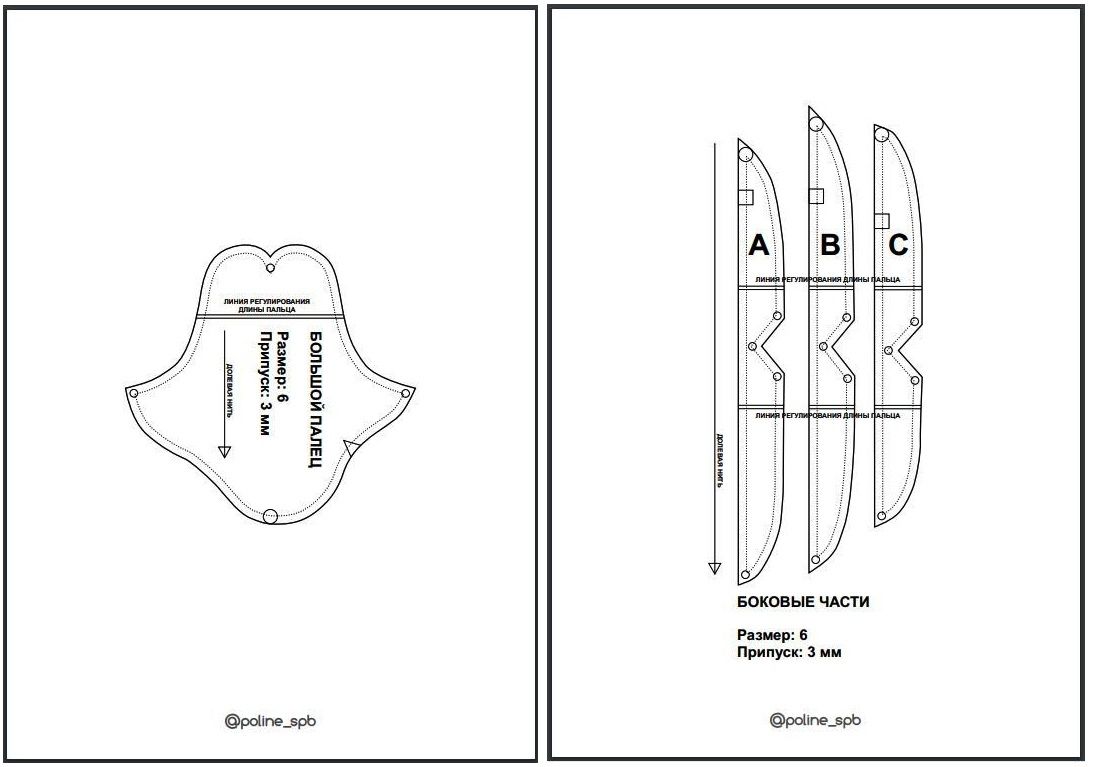
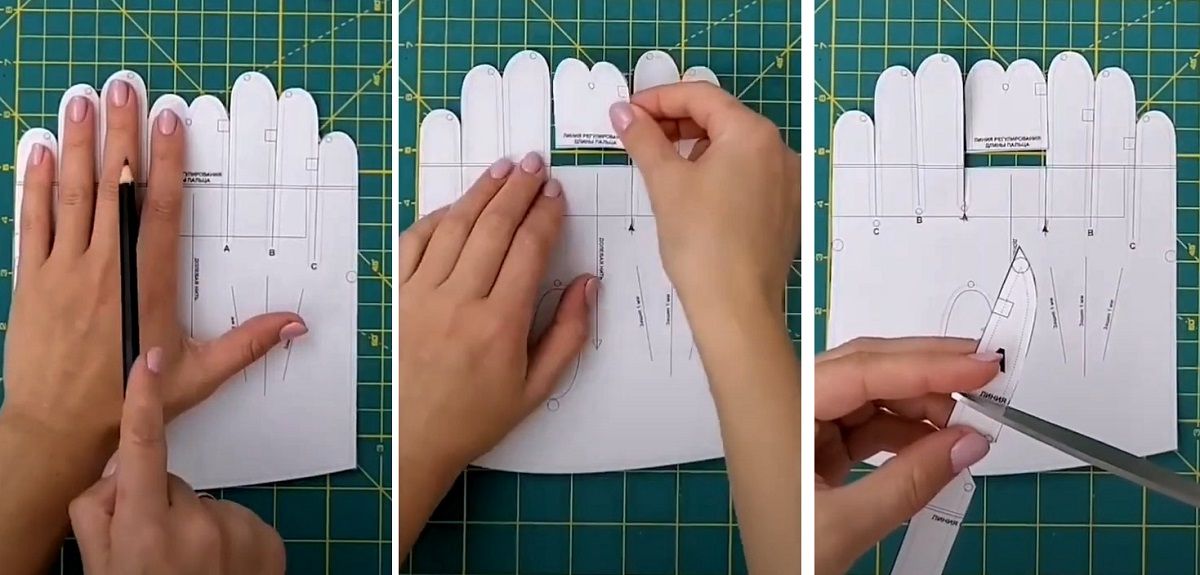
Choose the sheets for your size and print them at 1:1 scale. The pattern pages include a 5x5 cm test square: check it with a ruler so the printout is not reduced or stretched.
Print the sheets without scaling and check the 5x5 cm test square.Print the sheets without scaling and check the 5x5 cm test square.Print the sheets without scaling and check the 5x5 cm test square.Print the sheets without scaling and check the 5x5 cm test square.Print the sheets without scaling and check the 5x5 cm test square.Print the sheets without scaling and check the 5x5 cm test square.Print the sheets without scaling and check the 5x5 cm test square.Print the sheets without scaling and check the 5x5 cm test square.Print the sheets without scaling and check the 5x5 cm test square.Print the sheets without scaling and check the 5x5 cm test square.Print the sheets without scaling and check the 5x5 cm test square.Print the sheets without scaling and check the 5x5 cm test square.
Print scale
If the test square is not 5x5 cm, the glove size will be wrong.
Place the palm on the pattern and adjust the length
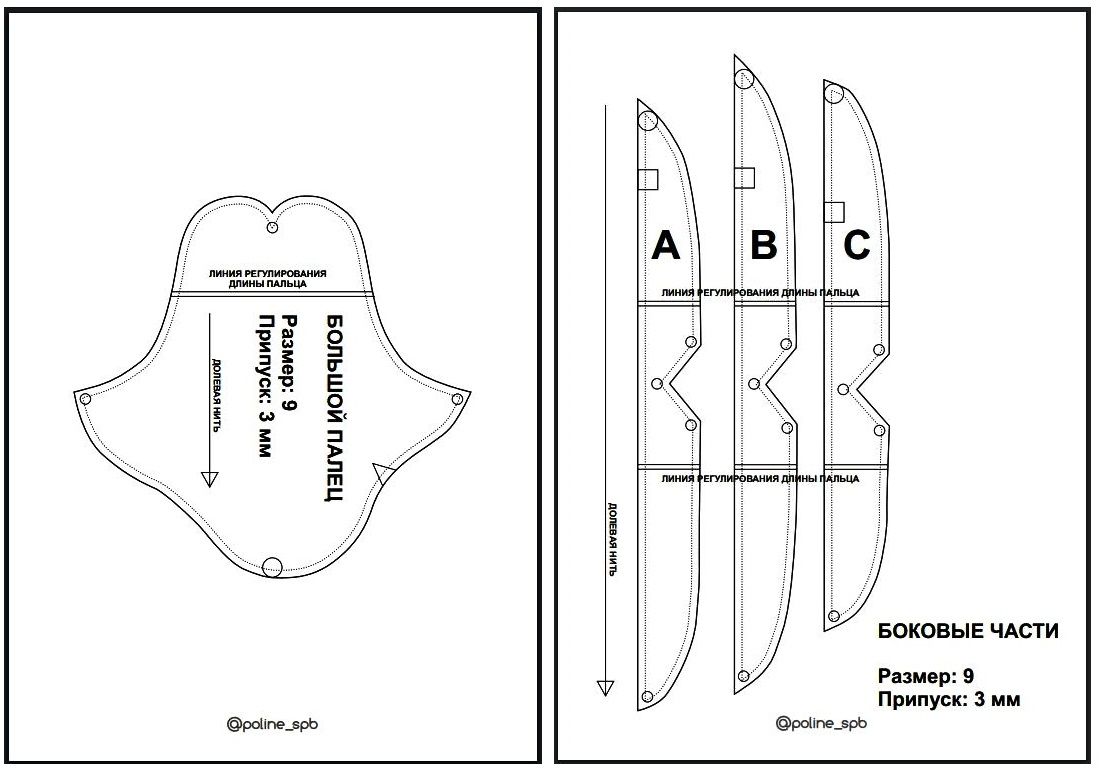
To check the size accuracy, place your palm on the pattern. If the length needs adjustment, cut the pattern along the marked line and model the needed length. Remember to adjust the side pieces as well.
After printing, place your palm on the pattern and adjust the length if needed.
Make the tucks and thumb
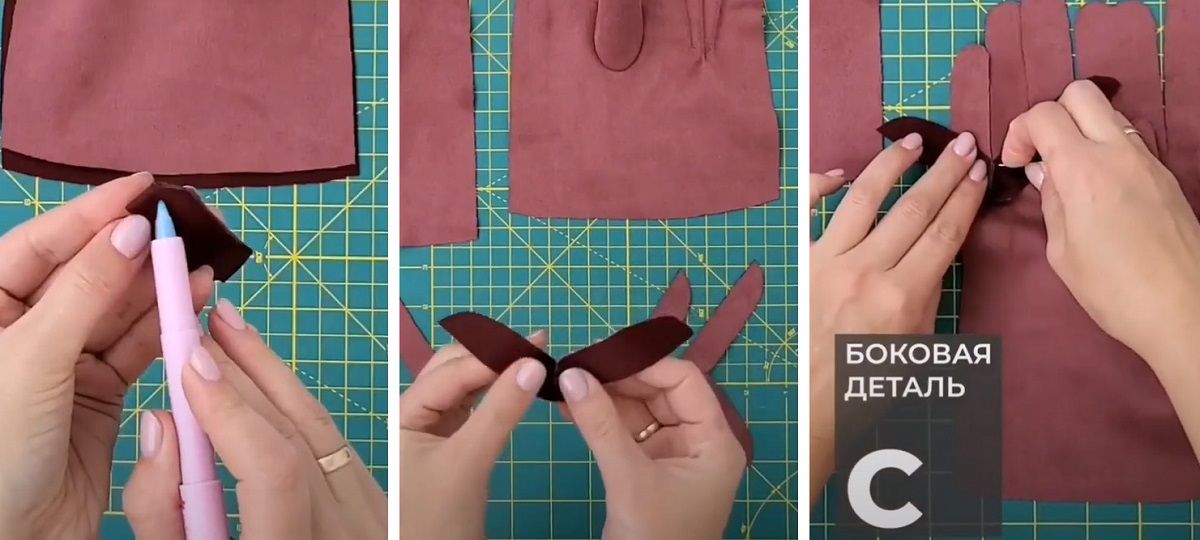
Start with the decorative lines and thumb piece while the main pieces are still separate.
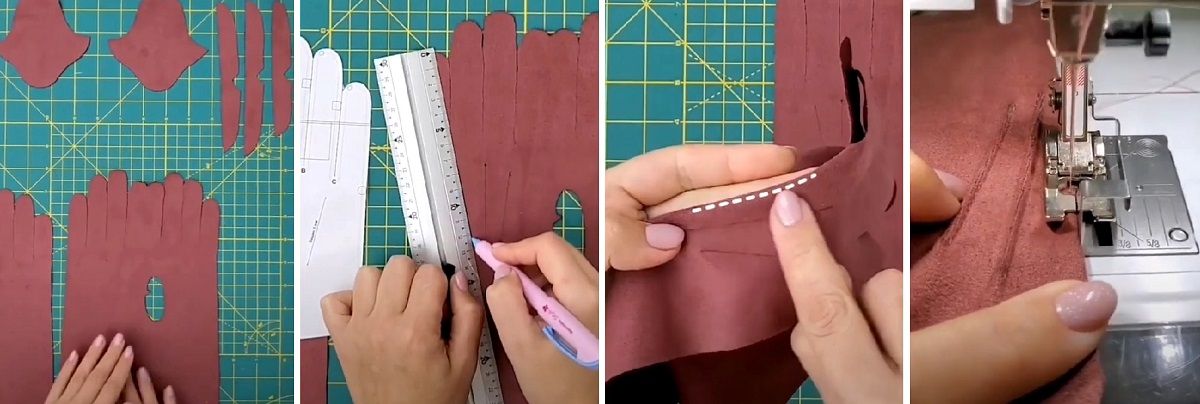
Mark and stitch the decorative tucks
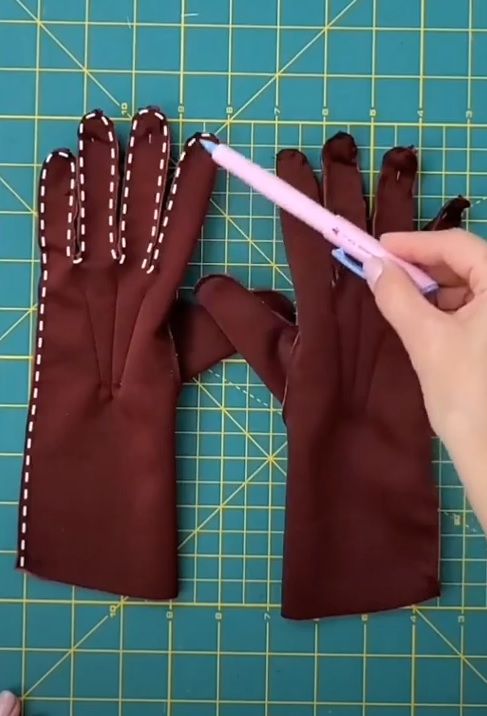
Use a water-soluble pen to mark the decorative tuck lines. Then stitch 1 mm from the edge.
Mark the tucks with a water-soluble pen and stitch them 1 mm from the edge.
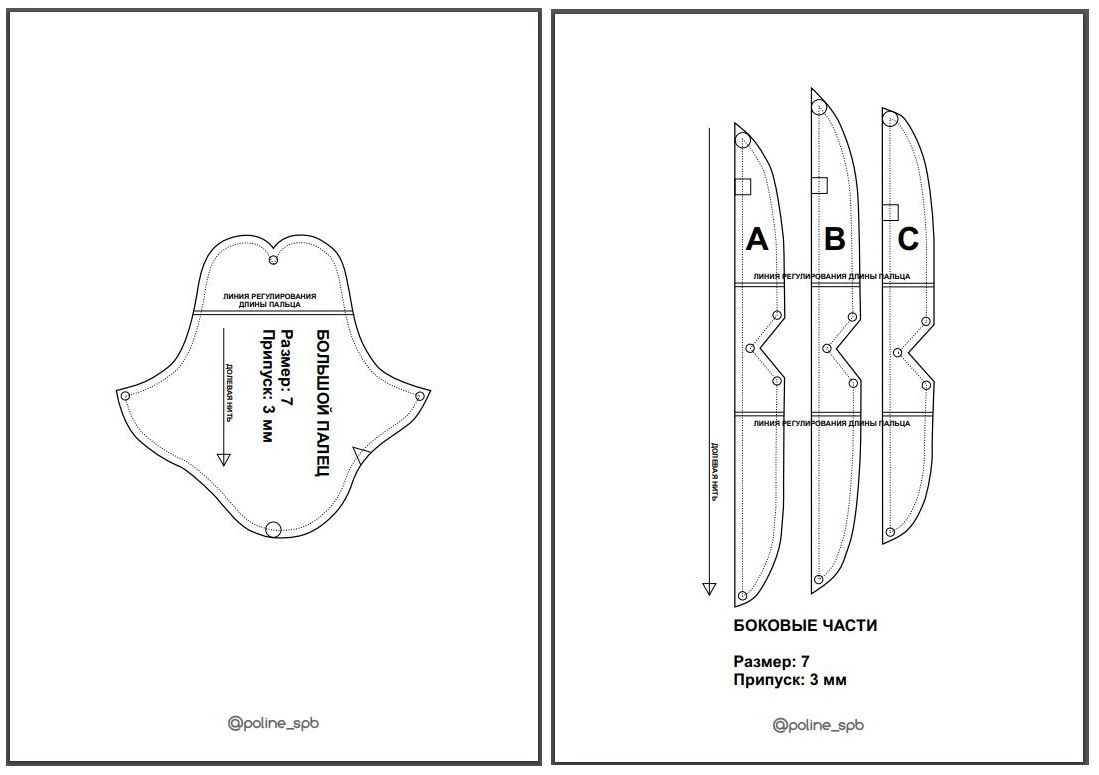
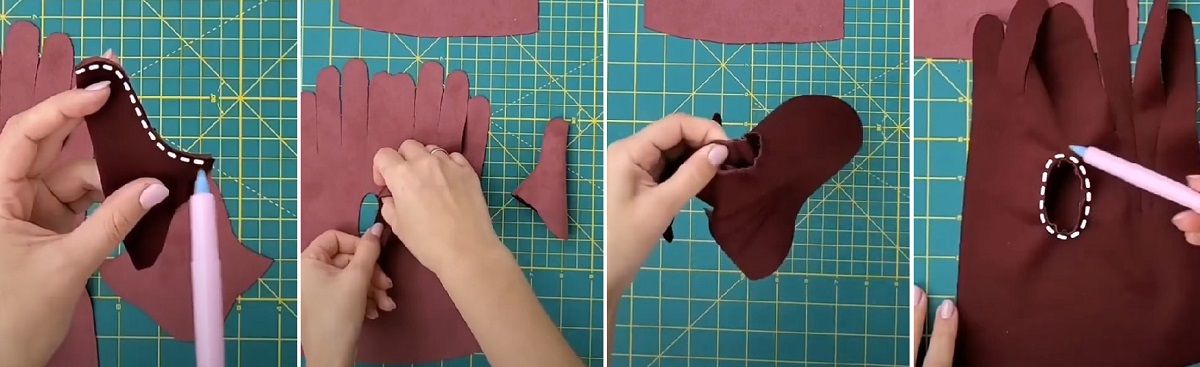
Sew the thumb piece
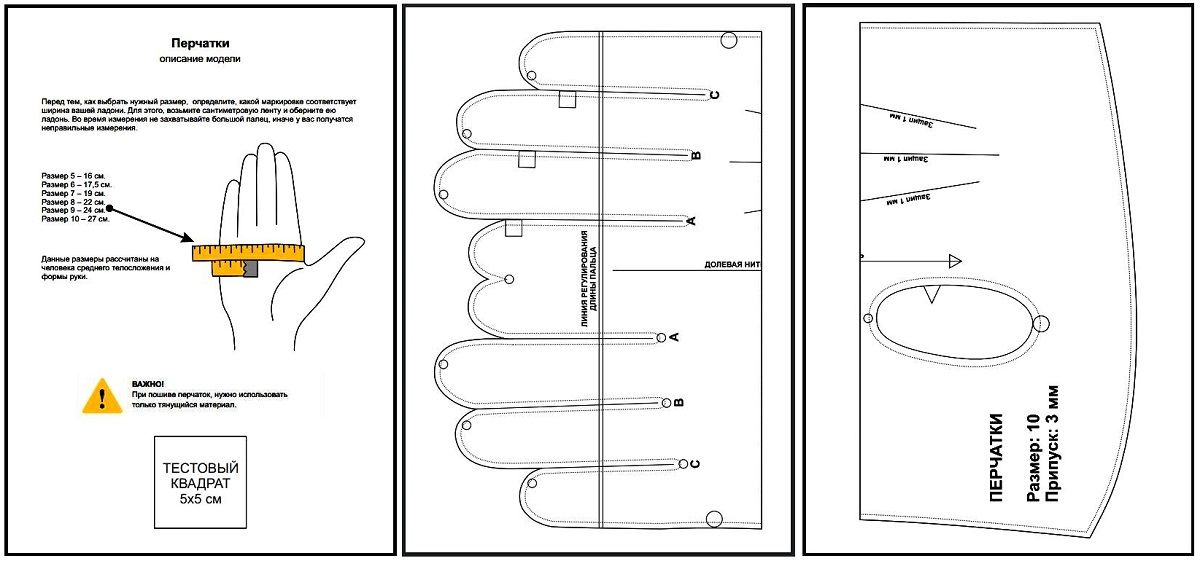
Fold the thumb piece in half and stitch 3 mm from the edge.
Baste the thumb into the palm piece
Turn the thumb piece right side out. Place it on the right side of the palm piece, match the markings, pin it, and baste.
Match the thumb piece to the marking on the right side of the palm piece.
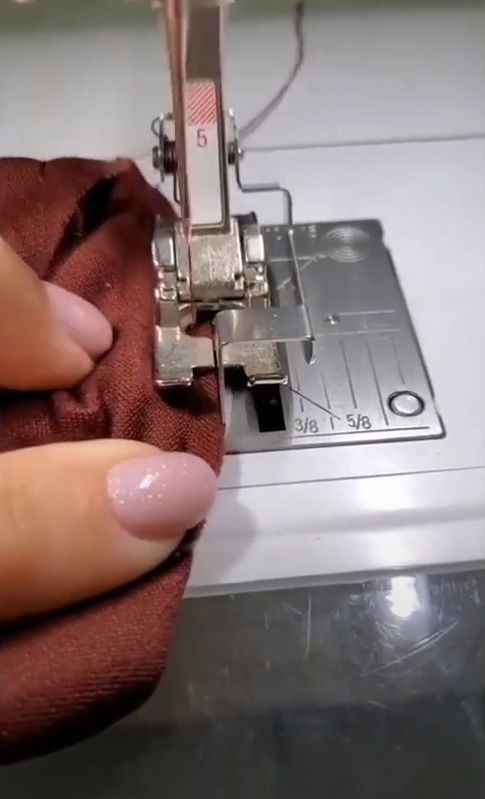
Stitch the thumb 3 mm from the edge
After basting, stitch 3 mm from the edge.
After basting, stitch the thumb 3 mm from the edge.
Assemble the side pieces between the fingers
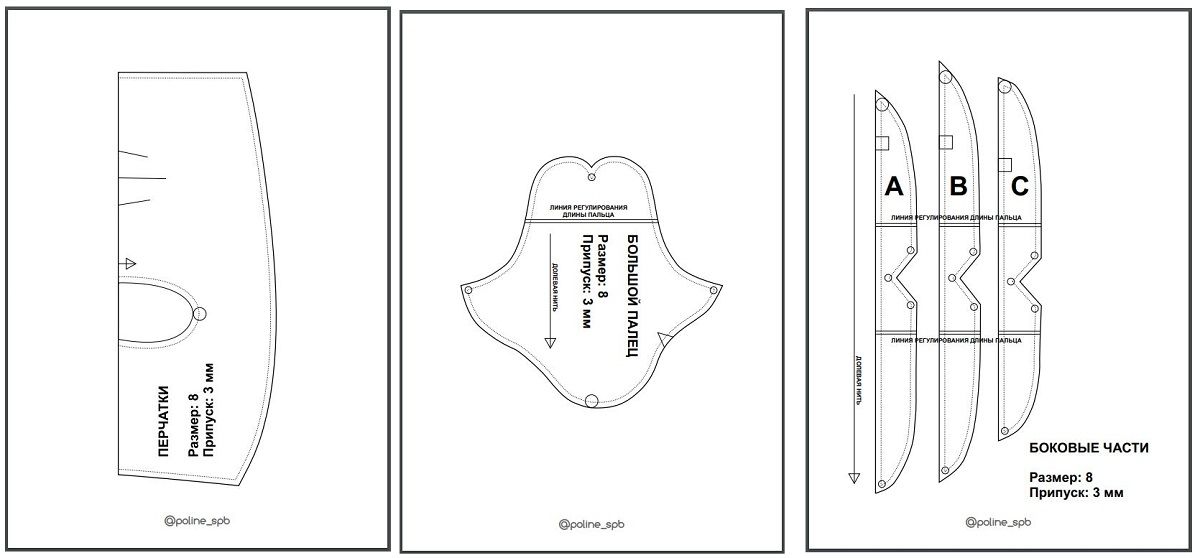
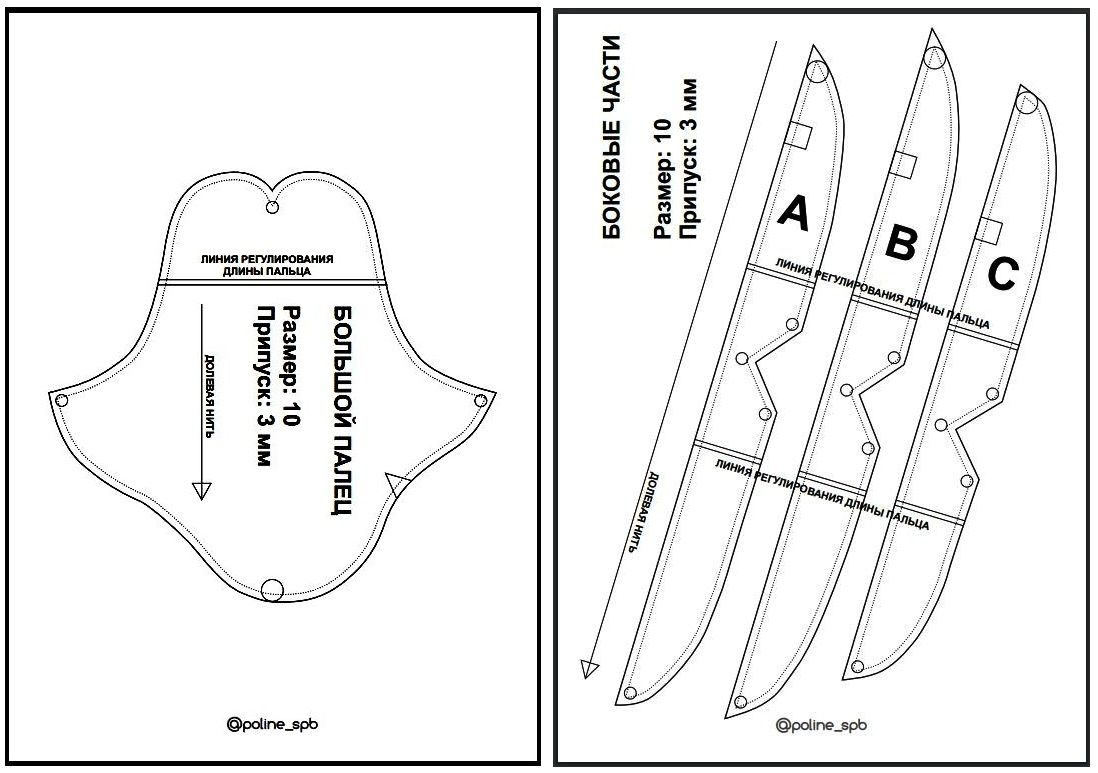
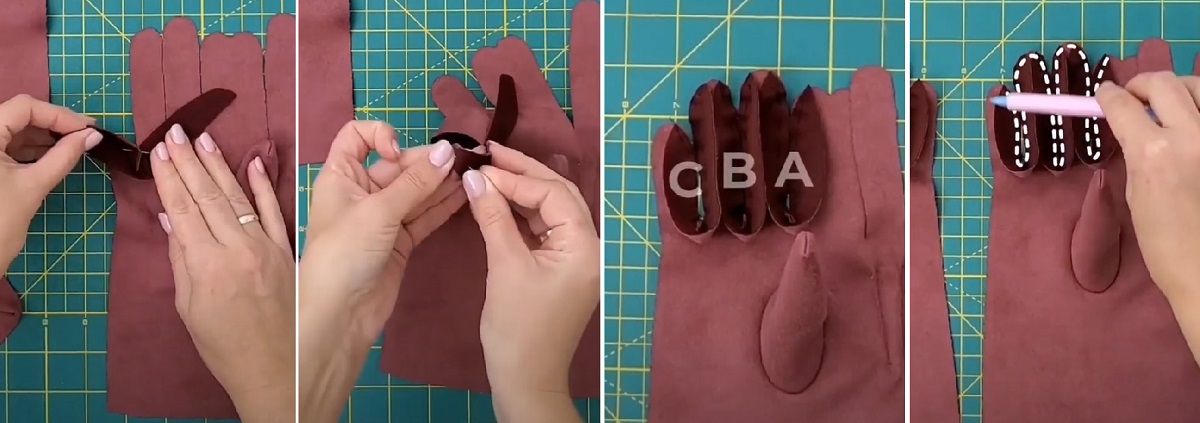
Side pieces A, B, and C form the spaces between the fingers, so they need to be fixed in sequence.
Sew the side pieces at the corner
Fold a side piece in half and stitch 3 mm along the corner. Sew all side pieces the same way.
Side pieces are sewn at the corner with a 3 mm seam.
Fix pieces C, B, and A between the fingers
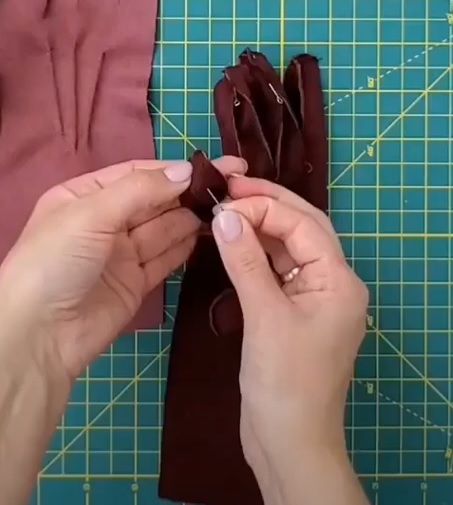
Place piece C from the palm side and fix it between the little finger and ring finger. Then work upward from the center, fixing the fingertips and basting. Repeat the same steps for pieces B and A.
Pieces C, B, and A are fixed between the fingers in sequence from the palm side.
Stitch between the fingers
Stitch 3 mm from the edge. Pay attention: there is a seam in the middle between the fingers.
Middle between the fingers
This is the smallest area, and it is easy to pull the seam too tight or shift it.
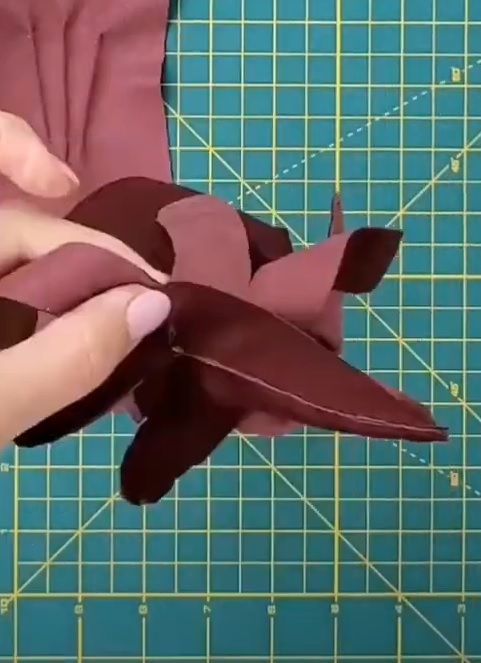
Close the glove and arrange the seams
Final assembly is done with the right side facing inward. It is important to lay the finger seams correctly so the right side looks neat.
Fold the glove right side in and baste
Fold the glove with the right side facing inward. First pin the areas between the fingers, then the fingertips, and after that baste.
First fix the areas between the fingers, then the fingertips.
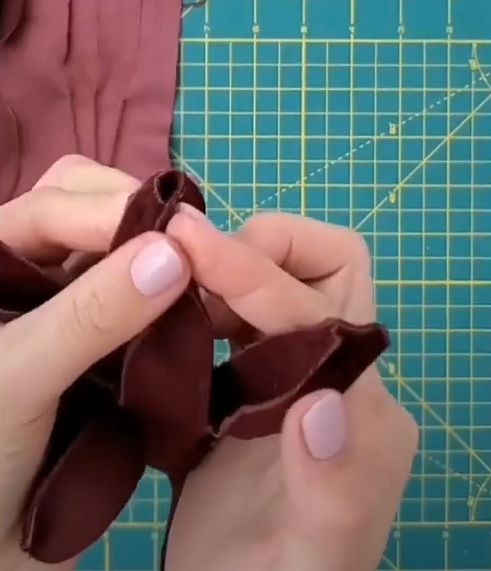
Lay the ring and middle finger seams toward each other
On the ring and middle fingers, the seam on the palm side should be laid toward the other seam so the right side of the glove looks neat.
This seam direction makes the right side of the glove neater.
Lay the little and index finger seams toward the center
On the little finger and index finger, lay the seam toward the center of the finger.
For the little and index fingers, direct the seam toward the center of the finger.
Sew the final seam at 3 mm
Sew the final seam 3 mm from the edge. After that, the glove is ready.
After the final seam, the glove is ready.
Finish and variations
Finish
Final check
Check the fit on the palm, finger length, tuck symmetry, neatness of the thumb, and seam direction between the fingers.
Variations
Length adjustment
If the finger length does not fit, use the adjustment line on the pattern and change the side pieces together with the main piece.
The glove turns out smaller or larger than expected.
Likely cause
The pattern was not printed at actual size.
How to fix it
Check the 5x5 cm test square on the pattern sheet. If it does not match, print again without scaling.
The palm size fits, but the finger length does not
Problem
The palm matches the pattern, but the fingers need to be lengthened or shortened.
Likely cause
The source sizes are calculated for an average build and hand shape.
How to fix it
Cut the pattern along the line, model the needed length, and make sure to adjust the side pieces too.
The material frays on tiny pieces
Problem
The edges of the side pieces and fingers fray during assembly.
Likely cause
The chosen material is different from the one used in the source tutorial.
How to fix it
Use faux suede on a knit backing: it stretches and does not fray.
The seams between the fingers look uneven
Problem
Skewed or bulky areas are visible on the right side between the fingers.
Likely cause
The side pieces shifted or the seams were laid in the wrong direction.
How to fix it
First hold the pieces with pins, then baste. On the ring and middle fingers, lay the seams toward each other; on the little and index fingers, lay them toward the center.
The small-detail work feels too difficult
Problem
Assembling the fingers requires more precision than expected.
Likely cause
Gloves consist of tiny pieces and 3 mm seams.
How to fix it
Do not sew directly over pins: baste each area and use the author's video as a reference. The discussion also notes that this kind of tiny work can be difficult for a beginner.
?FAQ
How do I choose the glove size?
Measure the palm circumference with a measuring tape, without the thumb. The text gives sizes: 5 — 16 cm, 6 — 17.5 cm, 7 — 19 cm, 8 — 22 cm, 9 — 24 cm.
How do I check that the pattern printed correctly?
Print at actual size and check the 5x5 cm test square on the pattern sheet.
What fabric is best for sewing gloves?
The source tutorial uses faux suede on a knit backing: it stretches well and does not fray.
How far from the edge should I stitch?
The decorative tucks are sewn 1 mm from the edge. The thumb, side pieces, and final seams are sewn 3 mm from the edge.
Is there a video for assembling the gloves?
Yes, the source includes Polina's video. It is useful to open it at the thumb and side-piece stages between the fingers.
Your project
Log in to track your project, attach photos, and publish your result into the shared feed.

 IntermediateFree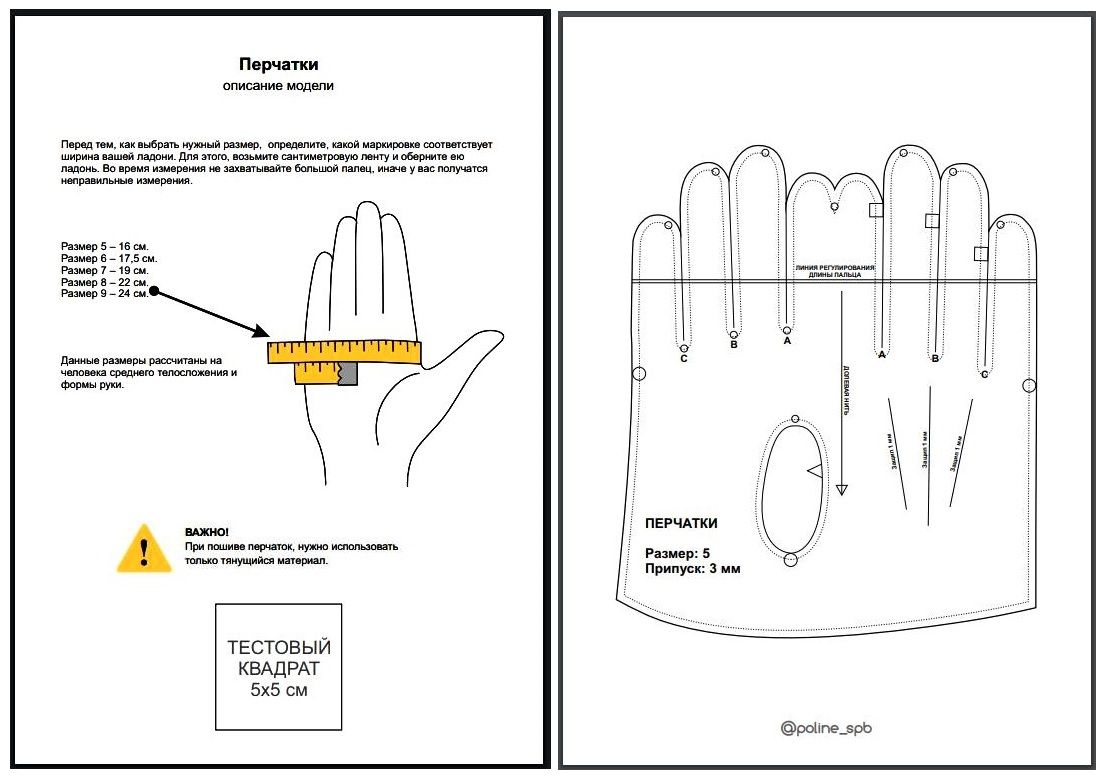


☺☺☺☺ you described everything in such detail, many thanks! I will try making my first gloves this week!