How to Sew a Bright Christmas Tree from Fabric Scraps
Hello everyone! 🙂 Autumn is rapidly approaching the finish line, which means snowy, frosty winter will be here very soon. Along with the snowfalls come the New Year holidays! If you love sewing and creating, then...
BeginnerFree
Translated
How to Sew a Bright Christmas Tree from Fabric Scraps
Hello everyone! 🙂 Autumn is rapidly approaching the finish line, which means snowy, frosty winter will be here very soon. Along with the snowfalls come the New Year holidays! If you love sewing and creating, then...
Main Steps
Step 1
Hello everyone! 🙂 Autumn is rapidly approaching the finish line, which means snowy, frosty winter will be here very soon. Along with the snowfalls come the New Year holidays! If you love sewing and creating, I suggest we sew the main guest of New Year in every home together: a Christmas tree! For the project, prepare: • pattern paper, from an A4 sheet upward depending on the desired tree size; • colorful fabric in three colorways; • sewing thread; • pins; • a pencil; • scissors; • a sewing machine; • holofiber or polyester batting to stuff the tree; • any decorations—beads, ornaments, small toys.
The fabric can be any kind: shiny or matte, dense or somewhat thinner, cotton, felt, or fleece… The main thing is that it is opaque and holds its shape well. If you wish, sew a plain green tree and decorate it afterward. Step-by-step instructions for making a New Year tree
Step 2
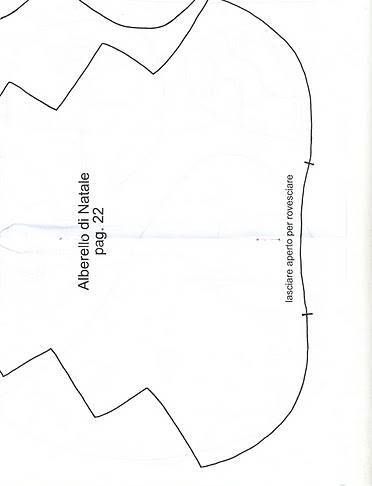
Draw a Christmas-tree template on paper in your chosen size, with three "branches" on the left and right. You can use this pattern as a base:
Step 3
Cut out the pattern, place it on the fabric, and trace it with a pencil. Add seam allowances of 5 mm to 1 cm, depending on how much the material frays. Cut the fabric pieces: two of each color, so each section consists of two halves, for a total of three pieces in different fabrics. Place the two pieces for each tree right sides together, pin them, and stitch from the lower right edge to the lower left edge. Leave the bottom seam open! Once all three trees are sewn, turn them right side out and stack them as shown in the photo. Stitch straight down the center with a vertical seam. Fill each section of the toy with holofiber and neatly sew all bottom openings closed with invisible stitches. Decorate the finished tree with beads, ornaments, and small toys. Your New Year beauty is ready!

 BeginnerFree