This tutorial shows how to build a vase form from a balloon and a plastic bottle, strengthen it with glued paper layers, wrap it with jute, and decorate it with burlap flowers and beads.
BeginnerFree
Translated
Things you will learn
The vase shape is built from a balloon and two plastic bottle pieces: the lower piece creates the base, and the upper piece forms the neck.
The plastic is cut into fringe and fixed thoroughly with masking tape; this is not the step to save tape.
The paper shell gives the vase its stiffness: the more even glued paper layers you add, the stronger the base becomes.
Start wrapping jute from the neck, securing the beginning and end of each strand with hot glue.
After wrapping, coat the jute with PVA glue and blot away the excess with a paper towel so the surface holds together neatly.
Finished result
The result is a decorative vase with jute stripes and light gaps, finished with burlap flowers. Use it for dried flowers, decorative branches, or as a stand-alone interior accent.
Materials and tools
Materials
Jute twine, large spool, Use one colour or alternate shades for stripes.
Burlap or coarse woven fabric, small piece, Used for the decorative flowers.
Beads, several, For the flower centres.
PVA glue, For the paper layers and the final jute coating.
Hot glue, For fixing the cardboard base, the beginning and end of jute strands, and the decorative flowers.
Plastic bottle, 1 piece, Used for the base and neck of the form.
Balloon, 1 piece, Creates the rounded body of the vase.
Newspaper or printer paper, The author notes that printer paper with clear glue makes a firmer piece.
Masking tape, Used to attach the fringed bottle pieces to the balloon.
Cardboard, small piece, For the bottom of the vase.
Tools
Marker, For marking lines on the plastic bottle.
Scissors or craft knife, For cutting the bottle, paper, and burlap. Be careful when cutting plastic.
Hot glue gun, For applying hot glue.
Brush, For applying PVA glue to paper and jute.
Paper towel, For blotting excess PVA after coating the jute.
Preparation
Protect the work surface
Glue, paper, and jute can get messy quickly, so cover the table with film or scrap paper. Keep a damp cloth and paper towel nearby.
Inflate the balloon to the right size
The balloon defines the body of the vase. Check the proportions right away: if the balloon is too round or too small, the finished vase will have a different shape.
Build the vase form
The frame is made from a balloon and two rings cut from a plastic bottle.
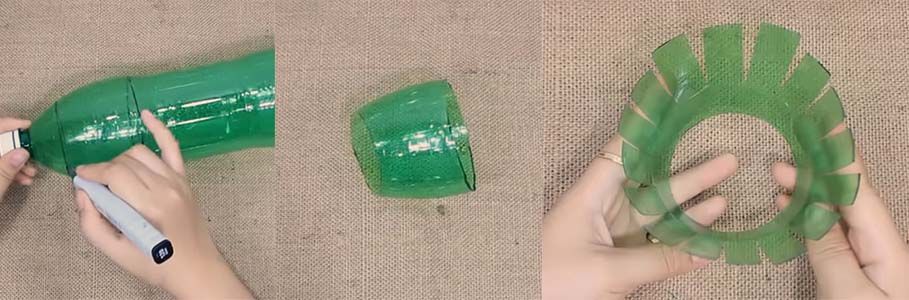
Cut the lower piece from the bottle
Cut a piece from the plastic bottle near the neck, as shown in the photo. Cut the edge into fringe and bend the strips outward so the piece can be attached to the balloon.
The lower bottle piece is prepared with a fringed edge.
Be careful with plastic
Bottle edges can be sharp. Cut slowly and keep your fingers away from the knife line.
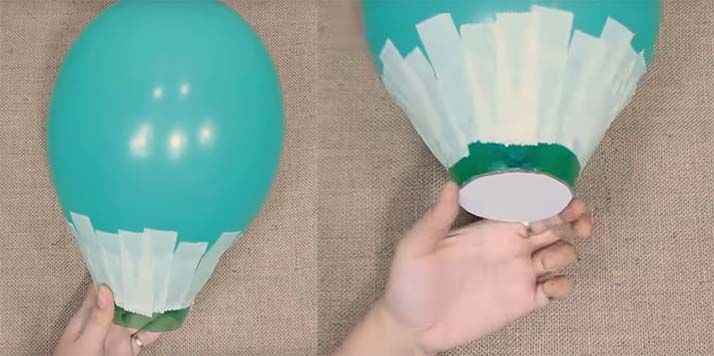
Attach the lower piece to the balloon
Place the fringed bottle piece against the lower part of the balloon and secure it well with masking tape. The author specifically notes that this is not the stage to save tape.
The fringe helps attach the plastic piece to the balloon.
Make a cardboard bottom
Glue a piece of cardboard to the lower edge of the plastic part with hot glue or PVA, then trim away the excess. This gives the vase a stable flat base.
The fringe helps attach the plastic piece to the balloon.
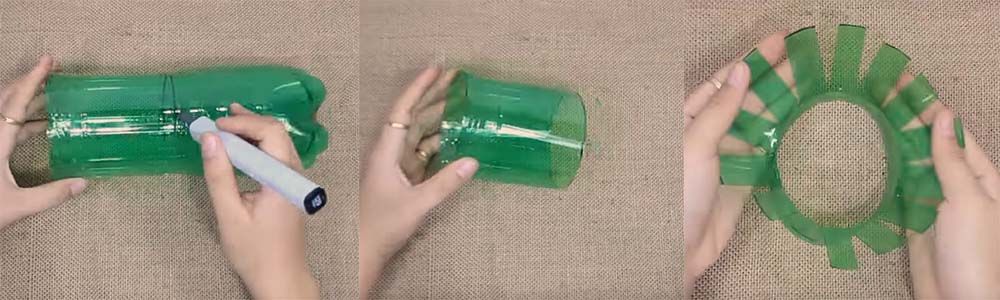
Cut and prepare the neck piece
Cut another ring from the middle of the bottle, make a fringe around the edge, and bend the strips outward. This piece will become the top of the vase.
The second plastic piece will become the vase neck.
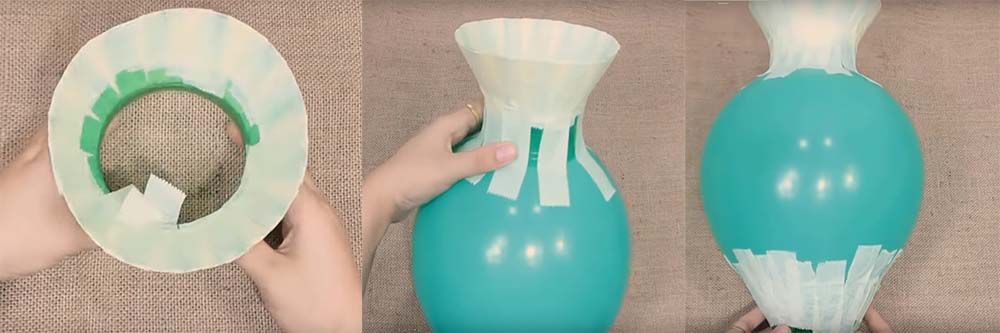
Shape the neck and attach it to the balloon
Use masking tape to gather the fringe into a neck, cover it thoroughly with tape, and attach the piece to the top of the balloon.
Check that the neck is straight before adding the paper layers.
Check the vertical line
Before adding the paper layers, make sure the neck stands straight. It will be much harder to correct a tilt after papier-mâché.
Strengthen the form with paper
Paper layers turn the balloon and plastic into a firm base for the jute.
Tear the paper into small pieces
Prepare newspaper or printer paper. Small pieces follow the rounded balloon and neck shape more easily than large sheets.
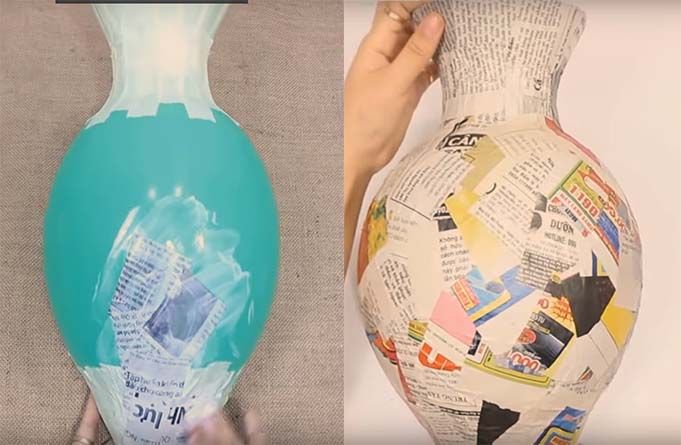
Glue on several paper layers
Soak the paper pieces with glue and apply them evenly over the entire balloon-and-bottle form. Add plenty of layers: this makes the piece firmer.
Several paper layers make the base firm.
Author’s option
The author prefers printer paper with clear glue: it makes a firmer shell, but newspaper with PVA also works.
Let the shell dry completely
Before wrapping with jute, the paper layer must be dry. If you start too early, the twine will shift the damp shell and the surface will stay soft.
Wrap the vase with jute
The jute wrapping creates the main look of the vase, so keep the strands tight and even.
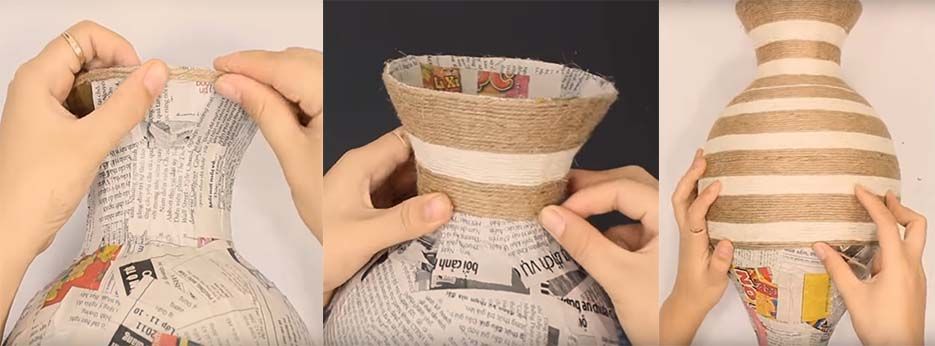
Start wrapping from the neck
Secure the end of the twine with hot glue near the neck and wrap the paper shell tightly. Each turn should sit close to the previous one without large gaps.
The jute wrapping starts at the neck and continues in tight turns.
Alternate stripes or use one colour
When one stripe is finished, secure the twine with hot glue and switch to the second colour. If you use solid-colour jute, tack the twine down from time to time so the wraps do not slide.
The jute wrapping starts at the neck and continues in tight turns.
Coat the jute with PVA glue
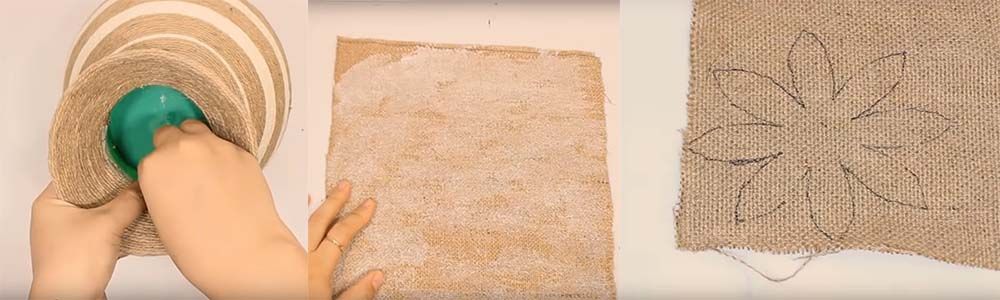
After wrapping, brush PVA glue over the jute and blot the excess with a paper towel. This helps the wraps hold and makes the surface neater.
Final neck finishing and preparation of the fabric decoration.
Finish the inside of the neck
Wrap the inside of the neck so the cut plastic and paper edges are hidden. This makes the top look more finished.
Final neck finishing and preparation of the fabric decoration.
Make the burlap decoration
The final decoration hides the simplicity of the materials and makes the vase look like a finished interior piece.
Cut flowers or leaves from burlap
Draw a flower outline on the burlap and cut out the pieces. To make the petals more dimensional, cut small slits between them.
Final neck finishing and preparation of the fabric decoration.
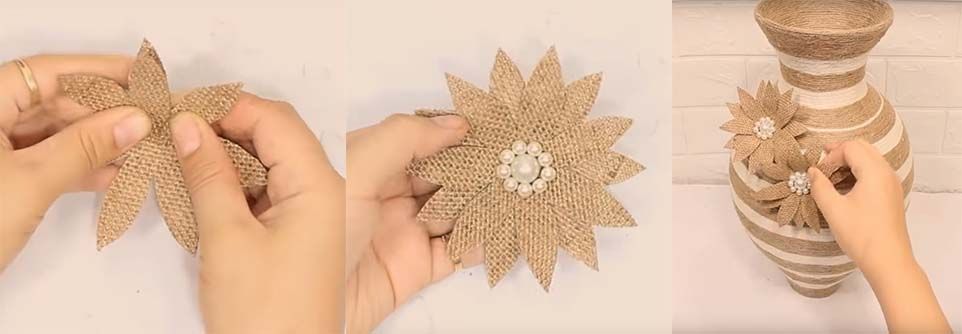
Give the petals volume
Glue neighbouring petals together slightly so the flat burlap becomes raised and sits better on the rounded vase.
Dimensional burlap flowers complete the vase decoration.
Add beads to the centres
Decorate the flowers with beads or flat-back half beads. They cover the centre and make the decoration look more complete.
Dimensional burlap flowers complete the vase decoration.
Glue the flowers to the vase
Arrange the flowers on the vase, choose the composition, and attach them with hot glue. Place all elements without glue first so one side does not become overloaded.
Dimensional burlap flowers complete the vase decoration.
Finish and variations
Finish
Let the vase dry fully
After using PVA and hot glue, leave the vase until it is completely dry. Only then add dried flowers or decorative branches.
How to change the look
Change the jute colour, stripe width, flower shape, and amount of decoration. For a calm interior, keep the wrapping in one colour; for a bolder piece, alternate contrasting stripes.
Variations
Single-colour vase
If you use one jute colour, the shape looks calmer. In this version, it is especially important to fix the twine with glue more often so the turns do not slide.
Different decoration instead of flowers
Replace burlap flowers with leaves, a bow, wooden beads, lace, or a minimal jute knot.
After drying, the vase dents easily or feels flimsy.
Likely cause
There are too few paper layers, or the glue has not dried completely.
How to fix it
Add several more layers of paper with glue and let the base dry thoroughly. For a firmer version, use printer paper and clear glue, as the author suggests.
The neck is crooked
Problem
The top of the vase leans to one side.
Likely cause
The plastic piece was not aligned well before the paper layer was added.
How to fix it
Check the neck’s vertical line as soon as it is fixed with masking tape. If the tilt is visible before the paper layers, remove part of the tape and set the piece again.
The jute slips or leaves gaps
Problem
The wraps sit unevenly, and the paper shell shows between them.
Likely cause
The twine is not pulled tightly enough or is not fixed with glue often enough.
How to fix it
Start from the neck, keep steady tension, and tack the twine down with hot glue from time to time. Fix the beginning, end, and colour-change points especially well.
PVA left stains or tackiness
Problem
After coating, the jute looks wet, shiny, or sticky.
Likely cause
Too much glue was applied, and the excess was not removed.
How to fix it
Brush on a thin layer of PVA and immediately blot the excess with a paper towel. A light coating is better than flooding the surface.
You cannot pour water into the vase
Problem
The base is made from paper, jute, and glue, so it is sensitive to moisture.
Likely cause
This is a decorative vase, not a waterproof vessel.
How to fix it
Use it for dried flowers or decorative branches. If you want fresh flowers, place a separate narrow waterproof container inside and keep water away from the paper shell.
?FAQ
Can I use newspaper instead of printer paper?
Yes. The original tutorial allows old newspaper, but the author notes that printer paper with clear glue makes the base firmer.
Why do I need a balloon?
The balloon creates the rounded body of the vase. The bottle pieces are attached to it, and then the whole form is strengthened with paper layers.
Can I use one jute colour?
Yes. The author specifically says solid-colour jute works, but in that case it is worth tacking the twine with glue from time to time so the wrapping stays even.
Can I pour water into this vase?
No, not directly: the base is paper and jute. Use dried flowers, or place a separate waterproof container inside.
Do I have to use a hot glue gun?
Hot glue is convenient where instant hold is needed: the cardboard bottom, the beginning and end of each jute stripe, and the flowers. Some steps can be done with PVA, but drying will take longer.
Your project
Log in to track your project, attach photos, and publish your result into the shared feed.

 BeginnerFree