DIY Beaded New Year's Pine Tree: The Complete Process from A to Z
New Year's is right around the corner, which means now is the perfect time to create holiday decor and plan dishes for the New Year's table. And while I'm sure every homemaker can handle the latter, making a holiday tree can be
BeginnerFree
Translated
DIY Beaded New Year's Pine Tree: The Complete Process from A to Z
New Year's is right around the corner, which means now is the perfect time to create holiday decor and plan dishes for the New Year's table. And while I'm sure every homemaker can handle the latter, making a holiday tree can be
Main Steps
Step 1
New Year's is right around the corner, which means now is the perfect time to create holiday decor and plan dishes for the New Year's table. And while I'm sure every homemaker can handle the latter, making a holiday tree can be challenging for crafting beginners. Today, I'll show and tell you how to make a lush beaded pine tree, 60 cm tall, all on your own!
Step 2
Here are the materials you will need: • small green seed beads – about 800 grams; • thick, medium, and thin wire; • wire cutters; • pliers; • plaster (can be replaced with alabaster); • foil; • toilet paper; • PVA glue; • paintbrush; • acrylic paints (rust and brown – for painting the trunk).
Tutorial
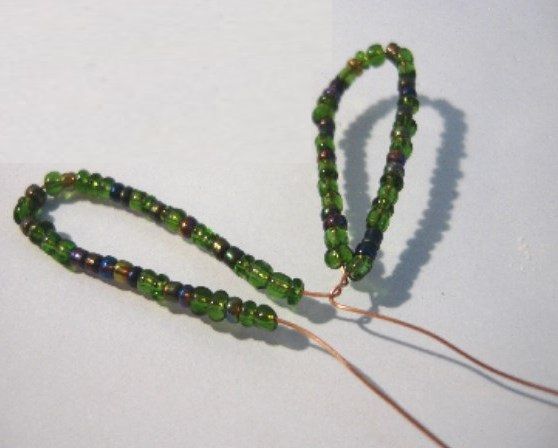
String the beads onto the thin wire (these will be the needle branches) to about halfway down its length. Leave a free wire end of about 6-7 cm to shape the branch later.
Measure out 7 cm of beaded wire. Form a loop with it, like this:
Step 3
Make a second loop the exact same way; here is what it will look like:
Step 4
Make 12 loops for one branch. Leave a little wire and trim the excess.
Step 5
Roll the loops into a roll. Twist the free ends of the wire together, shaping the branch.
Step 6
Make 15-20 more of these branches and set them aside.
Now you need to assemble the tree trunk and its stand. To do this, take some foil and place it into a deep bowl of the desired size. Fill it with plaster and insert the thick wire into the center. You can also substitute it with a twig—that works great, too. Off of the thick wire, twist pine branches using medium-thickness wire, like this:
Step 7
Join the needle branches in groups of three, as shown in the photo:
Step 8
Attach the branches to the tree, starting from the very top. Like this:
Step 9
Gradually work your way down, filling in all the branches in the round.
After that, wrap all the pine branches and trunk with toilet paper cut into long, thin strips. Start wrapping from the end of the branch and gradually move toward the trunk. Do the same with all the branches, and only then wrap the trunk. Coat all the toilet paper with PVA glue—this will make the branches a bit stiffer.
Step 10
Paint the branches and trunk.
Step 11
Next is the stand. Remove the foil from the plaster and coat it with PVA glue. Sprinkle beads over it to create a grass-like effect. Paint the sides and bottom of the plaster base with acrylic paints.
Step 12
And that's all—the pine tree is ready. Look at how lovely it turned out!

 BeginnerFree