We break down how to draft a kimono-style cut-on sleeve from a basic pattern: transfer darts, shape the back and front pieces, create a shoulder-dart version, and choose the grainline direction.
IntermediateFree
Translated
Things you will learn
You need a basic bodice pattern with extra bust ease: without ease, the sleeve will pull under the arm.
In the two-seam version, the back and front are drafted separately, and the lower side points must match.
For the back piece, the upper sleeve edge is drawn as an extension of the shoulder line after raising the lowest shoulder point by 6 mm.
In the one-seam version, the distance between the shoulder points becomes a shoulder dart: the source values — 2.5 cm and 6.4 cm — must be checked on your own block.
For the one-lower-seam version, you can leave a wide gathered lower edge or remove the extra width symmetrically.
What you will get
This is a pattern-drafting master class, not a sewing tutorial for a finished garment. By the end, you will have a set of bodice pieces with a cut-on sleeve that you can test in muslin and then use for a dress, blouse, robe, or light jacket.
Materials and tools
Materials
Basic bodice pattern, Drafted with extra ease around the bust.
Pattern-tracing paper, Needed for copies of the back and front so you do not damage the base pattern.
Thumbtack or pattern weight, Used as the pivot point for rotating the front piece at the shoulder point.
Muslin fabric, Recommended for checking the fit, especially if you are drafting this sleeve for the first time.
Tools
Pencil, For drafting lines and corrections.
Ruler, For straight lines and perpendiculars.
Pattern curve or French curve, For the lower sleeve edge and smooth curves.
Paper scissors, For cutting the copied front piece along the transfer line.
Tape measure, For sleeve length and lower-edge width.
A cut-on sleeve should not be drafted from a very tight base block. If the pattern has too little ease through the bust and back, the garment will restrict arm movement.
Work only on copied pattern pieces
Dart transfer, cutting the front piece, and rotating the pieces are best done on traced copies. Leave the base pattern untouched so you can return to the original shape.
Match the text to the diagrams first
In the source, all key operations are tied to figures 1–6. Before drafting, identify the shoulder points, armhole midpoint, and points A, B, and C on the diagrams.
Choose the sleeve option
A cut-on sleeve can be narrow, wide, long, or short. This material shows three constructions based on a kimono-style sleeve.
Understand the difference between the three constructions
The first option is a two-seam sleeve: the back and front are drafted separately. The second is a one-seam sleeve with a shoulder dart. The third is a sleeve with one lower seam, where the upper edge is formed from the joined shoulder edges.
The diagram shows the general principle of a cut-on sleeve, where the upper edge continues the shoulder line.
This is drafting, not sewing
At this stage you are drafting pattern pieces. Before cutting the final fabric, always check freedom of movement in a muslin.
Two-seam kimono sleeve
This option stays closest to the original block: the back and front remain separate pieces, and the sleeve is extended from the shoulder line.
Move the darts to the middle of the armhole
On the back piece, move the shoulder dart to the middle of the armhole. On the front piece, draw a line from the bust point to the midpoint of the armhole. This corresponds to figure 1 and sets the direction for opening the front piece.
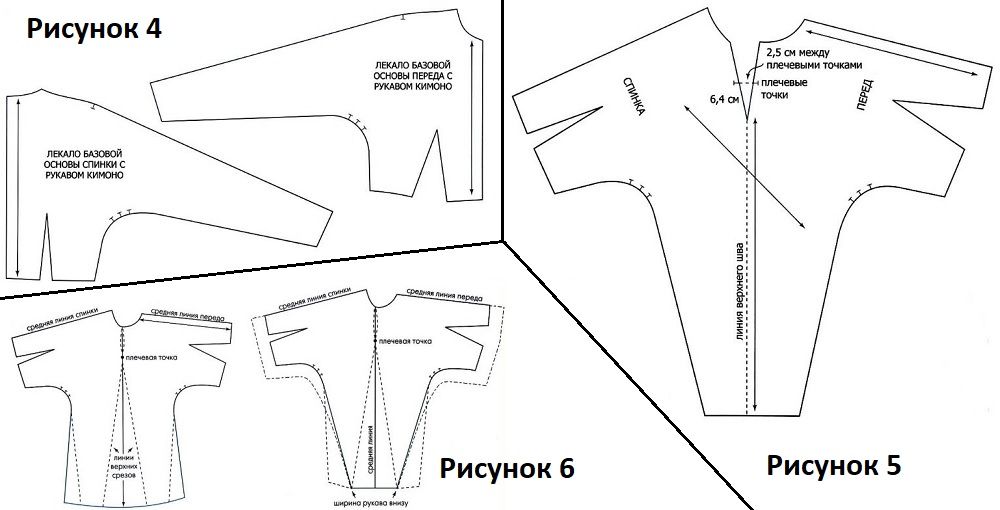
Figures 1–4: dart transfer and drafting the back and front pieces for a two-seam kimono sleeve.
Check the ease
If the base block was drafted without extra bust ease, adjust the block first instead of trying to compensate entirely through the sleeve.
Cut the copied front piece
Cut the copied front pattern along the drawn line from the bust point to the middle of the armhole. This lets you rotate the side part of the front and align it with the back while drafting the sleeve.
Do not cut the original
Cut only the copy. If the opening angle does not work, you can trace the front again.
Draft the upper sleeve edge on the back piece
On the back piece, raise the lowest shoulder point by 6 mm. Draw a straight line through the center of the shoulder line and this marked point. The A–B segment should equal your chosen sleeve length.
6 mm is the source adjustment
This value comes from the original material. For a different block or fit, test it in muslin.
Shape the lower sleeve edge on the back piece
From point B, draw a perpendicular down from the upper sleeve edge. Mark half of the lower sleeve width on it and place point C. Connect C to the lower armhole point and shape the lower edge with a smooth concave curve.
The line must be smooth
A sharp angle at the lower armhole point will create a fold and extra pulling under the arm.
Draft the front using the finished back piece
Trace the completed back piece onto a clean sheet and mark the original shoulder line. Place the front piece over the back, matching the shoulder lines, and pin the pieces at the shoulder point. Rotate the side part of the front until the lower side points match, then trace the front from the center of the shoulder through the middle line to the side line.
The main checkpoint
The lower side points of the back and front must match. If they do not, the side seam will not sew together smoothly.
One seam and a shoulder dart
This option joins the upper sleeve seams and takes the difference between the shoulder points into a dart.
Match the upper sleeve seams
Take the front and back patterns with the cut-on sleeves already drafted. Align them so the upper sleeve seams match, as shown in figure 5.
Figures 5–6: the shoulder-dart option and the cut-on sleeve option with one lower seam.
Do not align by a random line
Use the upper sleeve seams as your reference. If you align the pieces only by the shoulder or side line, the dart will shift to the wrong place.
Shape the shoulder dart
In the source example, the distance between the shoulder points is 2.5 cm. This distance becomes the dart intake. The dart point sits 6.4 cm below the shoulder points. Trace the pattern while preserving this dart in the shoulder area.
Do not copy the numbers blindly
2.5 cm and 6.4 cm are values from the author’s specific block. On another figure or with different ease, they may change.
One lower seam
In this option, the shoulder edges are joined, and the sleeve shape is resolved through the lower edge and the grainline direction.
Fold the back and front along the shoulder edges
Fold the back and front patterns so the shoulder edges match. Trace around the pattern pieces to create the base for a cut-on sleeve with one lower seam.
Label the outline right away
Mark where the center front, the back, and the sleeve hem are. After tracing, these references are easy to lose.
Decide what to do with the lower-edge width
Next, choose one of two options. You can leave a wide sleeve and gather the lower edge, or you can trim away the extra width symmetrically, as shown in figure 6. The choice depends on the garment silhouette and fabric.
Choose the silhouette first
Gathering creates soft volume; trimming the width creates a calmer sleeve without extra fullness.
Choose the grainline direction
For a cut-on sleeve with one lower seam, the grainline can run in different directions: along the upper line, parallel to the center front, or on the bias. Test in muslin how the chosen direction affects the fit and softness of the sleeve.
A muslin is required
A different grainline changes how the fabric behaves. For expensive fabric, first test with an inexpensive material of similar weight.
Finish and variations
Finish
Make a muslin
After drafting, transfer the pattern to muslin and check arm movement, the side seam, the shoulder area, and the sleeve hem. It is better to fix problems on paper before cutting the final fabric.
Label the pattern version
Mark the sleeve type, grainline direction, sleeve length, and chosen lower-edge width on the pattern. This will help you avoid mixing up the versions next time you sew.
Variations
Soft wide sleeve
Leave more width at the lower edge and gather it if the fabric is soft and the garment can handle volume.
Calmer sleeve without gathers
Trim the extra lower-edge width symmetrically if you want a cleaner silhouette.
Bias-cut option
Cutting on the bias can create a softer drape, but it is more demanding on the fabric and stretch control.
After drafting, there is too little room under the arm and the sleeve restricts movement.
Likely cause
The base had too little ease, or the lower sleeve edge was drawn too sharply.
How to fix it
Go back to the base pattern and check the bust ease. Shape the lower sleeve edge as a smooth concave curve, and test the fit in muslin.
The front and back side points do not meet
Problem
When aligning the pieces, the lower side points do not match.
Likely cause
The front piece was rotated too little or too much around the shoulder point.
How to fix it
Loosen the fixation and rotate the side part of the front again. Use not only the shoulder but also the matching lower side points as your reference.
The shoulder dart looks too sharp
Problem
In the one-seam version, a sharp point or fold appears in the shoulder area.
Likely cause
The dart size was copied from the source example without checking it on your own block.
How to fix it
Check the distance between the shoulder points on your own pattern. Adjust the dart length and intake in muslin, not only by the 2.5 cm and 6.4 cm numbers.
The sleeve hem is too wide
Problem
The sleeve looks heavier than intended or gathers into coarse folds.
Likely cause
You chose the gathered lower-edge option, but the fabric or silhouette does not suit that volume.
How to fix it
Use the second option from the source: remove the extra lower-edge width symmetrically. Before changing it, check that the arm still moves freely.
It is unclear how to choose the grainline
Problem
There are several possible grainline directions, and it is hard to choose one.
Likely cause
In a cut-on sleeve, the grainline affects not only cutting but also how softly the sleeve falls.
How to fix it
For a stable result, start with the grainline along the upper line or parallel to the center front. Use the bias option deliberately and always test it in muslin.
?FAQ
What base pattern do I need?
You need a basic bodice pattern with extra ease around the bust. A very close-fitting block is not suitable for a cut-on sleeve.
Is this a sewing guide or a drafting guide?
This is pattern drafting, not sewing the finished garment. Sewing starts after you test the drafted pieces in a muslin.
Why are there three sleeve options?
They create different shapes and looks: two seams are easier to control on separate pieces, the shoulder-dart version moves the extra volume into a dart, and the lower-seam version gives a more continuous shape.
Can I simply copy the 6 mm, 2.5 cm, and 6.4 cm from the example?
These numbers are kept from the source, but they belong to one specific block. Use them as a reference and check the fit on your own pattern.
Why watch the ARMALINI video?
The video complements the text: the source author specifically notes that Lina Frolova’s explanation helped clarify how to draft a bodice with a cut-on sleeve.
Your project
Log in to track your project, attach photos, and publish your result into the shared feed.

 IntermediateFree