Bias-Cut Satin Midi Skirt: Pattern and Sewing Tutorial
A step-by-step master class for sewing an elastic-waist satin midi skirt: choosing lightweight fabric, bias cutting with the Grasser pattern, steam-shrinking the waistline, sewing an enclosed seam without a serger, adding a double elastic waistband, and finishing the hem with a baby hem.
IntermediateFree
Translated
Things you will learn
The source includes two pattern options: a skirt with two side seams and a skirt with one seam at the center back.
The fabric is cut on the bias: the center line runs at a 45-degree angle, so it is important not to stretch the edges while cutting or sewing.
The waistline is first gathered with two basting rows and steam-shrunk to remove 10-15 cm of excess without bulky gathers.
You do not need a serger: the raw edge is enclosed with two rows of stitching, like a neat French/enclosed seam.
Two elastic bands form the waistband: the first holds the fit, and the second covers the zigzag stitch and helps keep the waistband from rolling outward.
What you will make
A midi skirt in lightweight satin or silk with an elastic waistband. The bias cut gives the skirt a soft, fluid drape, while the enclosed seam and baby hem let you finish thin fabric without a serger. The waistband looks neat thanks to waist shaping and a double elastic band.
Materials and tools
Materials
Lightweight flowing satin, silk, viscose, or synthetic fabric, according to the pattern, The fabric should not be transparent; the example uses slightly stretchy synthetic satin with shine.
Elastic band, 3-4 cm wide, 2 pieces, Each piece equals your comfortable waist measurement plus 2 cm for joining the short ends.
Fine sewing thread matching the fabric, For machine stitching on the fabric and waistband.
White basting thread, Needed for temporary waist basting and seam work.
Printed and assembled pattern sheets, 1 set, The source uses a free Grasser pattern.
Tools
Sewing machine, You will need straight stitch and zigzag.
Iron, For pre-shrinking, shaping, and careful pressing of thin fabric.
Sharp dressmaking scissors, Cut exactly along the marked line; seam allowances are already included in the pattern.
Measuring tape, For choosing the elastic length and checking the fit.
Dressmaking pins, For fixing the pattern, marks, edges, and waistband.
Chalk, soap, or fabric pencil, For tracing the pattern and transferring control marks.
Pressing block and pressing cloth, The source uses a block when working with the seam and a pressing cloth for the final check on the right side.
Curve ruler or long ruler, For drawing the new hemline after fitting.
Grasser video tutorial on YouTubeThe source thanks the Grasser channel; the video is useful for checking the thin-fabric steps.Grasser video tutorial on YouTube
Preparation
Prepare the pattern
Print, assemble, and cut the pattern pieces in your size. The sheets include two versions: one with two side seams and one with a single seam at the center back.
Pre-shrink the fabric
Dampen the fabric with water and press it from the wrong side to reduce the risk of shrinkage after washing. Then lay the fabric wrong side up on the table.
Choose the elastic length
Wrap the elastic around your waist: it should sit firmly without digging into the skin or hanging loose. Add 2 cm to the chosen length for joining the short ends.
Bias cutting
The main feature of this skirt is the bias layout. First choose the pattern version, then transfer the lines and marks without stretching the fabric.
Lay out the two-side-seam version
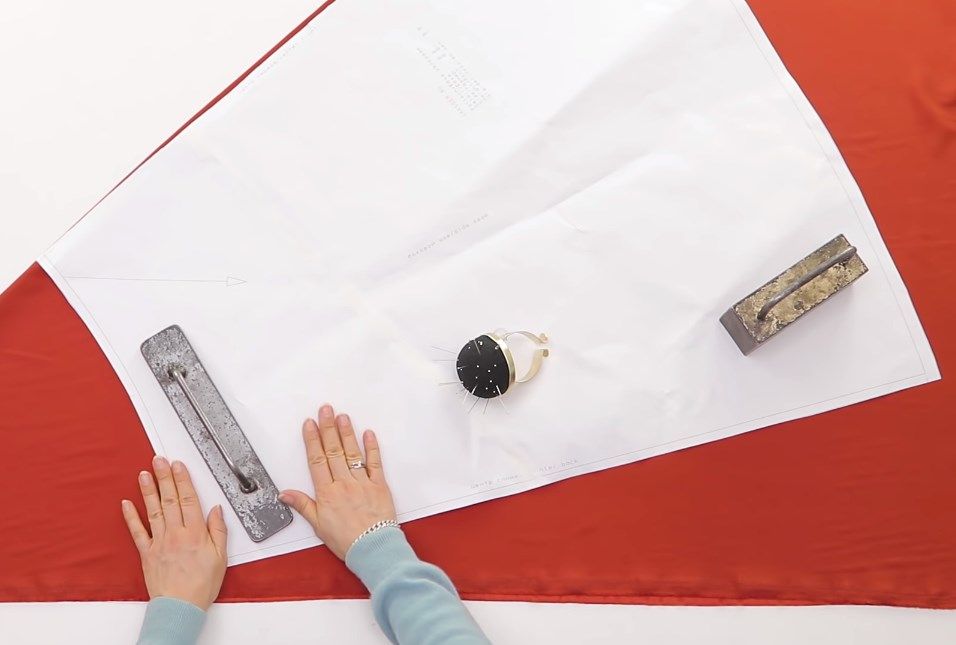
If you are sewing the skirt with two side seams, smooth out the fabric and place both pieces one after the other on the bias. The grainline must match the arrow on the pattern, and the skirt center line should run at a 45-degree angle to the fabric corner.
Pattern option with two side seams.
Lay out the one-seam version
For the one-seam version, fold the fabric cleanly on the diagonal with right sides together. Match the fold line on the pattern to the fabric fold and smooth the layer before cutting.
Layout for the one-seam version.
Trace, pin, and cut the piece
Carefully trace the pattern with chalk, pin the fabric, and cut exactly along the line with sharp dressmaking scissors. Do not add separate seam allowances: in the source pattern they are already included.
Hip, virtual side-seam, and skirt-center marks.
Do not stretch the bias edge
Thin fabric cut on the bias deforms easily, so do not pull it while cutting or transferring lines.
Transfer the three control marks
Mark the hip level, the virtual side-seam position, and the actual skirt center along the fold. Pin the marks, trace them with chalk, and duplicate the first two marks on the paired side.
Marks are pinned and duplicated with chalk.
What to check
The virtual side-seam mark from the cut edge to the fold along the waistline should be exactly centered.
Shape the waistline with pressing
The waistline has extra fabric for gathering. To keep the top soft rather than bulky, the source first shrinks the edge with basting and pressing.
Compare the elastic with the skirt waist
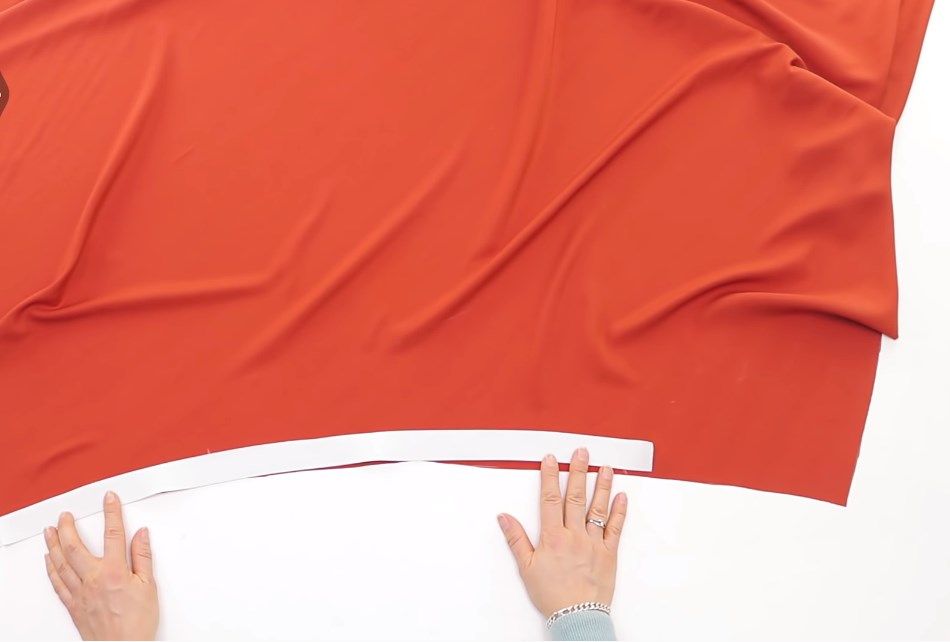
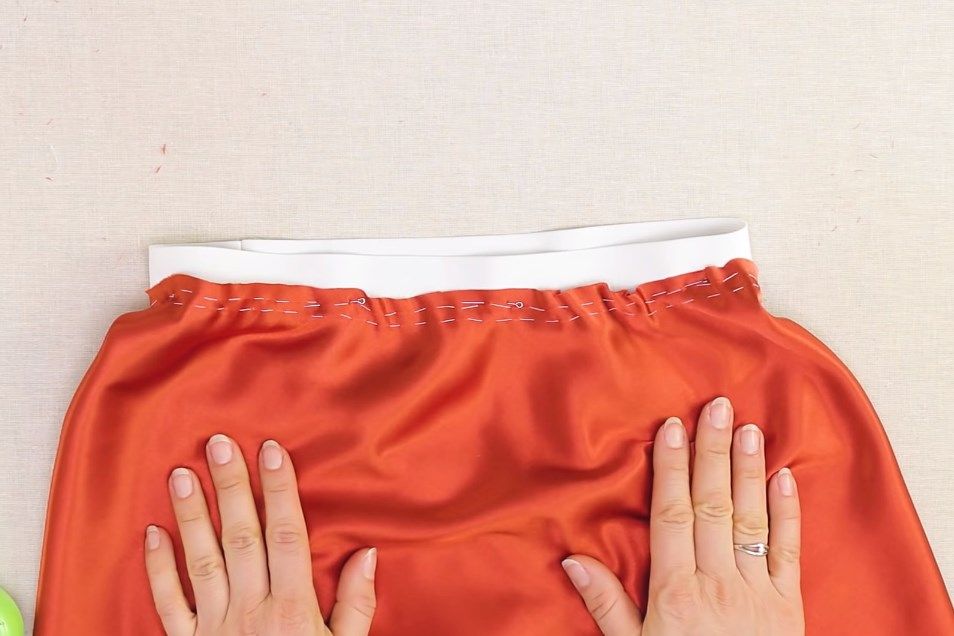
Lay the piece in one layer. Place one of the two prepared elastic bands along the waistline: the photo shows that the waist edge is longer than the elastic, so the edge needs to be reduced first.
The elastic is shorter than the waistline, so the edge needs shaping.
Sew two basting rows
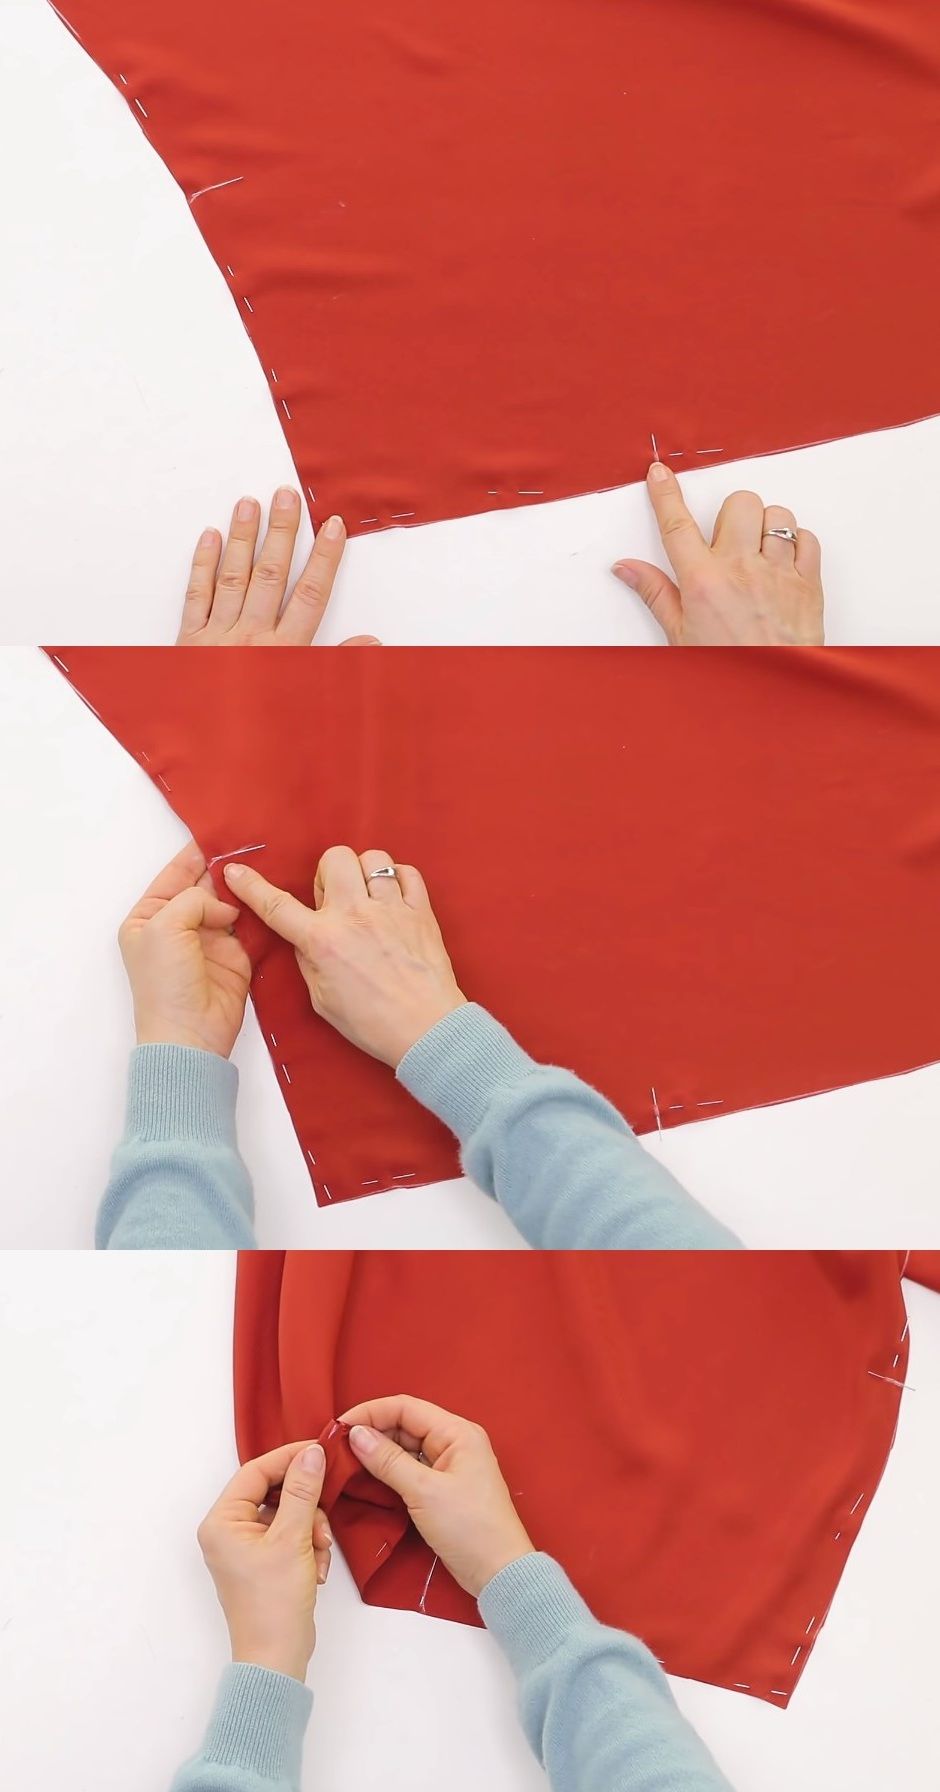
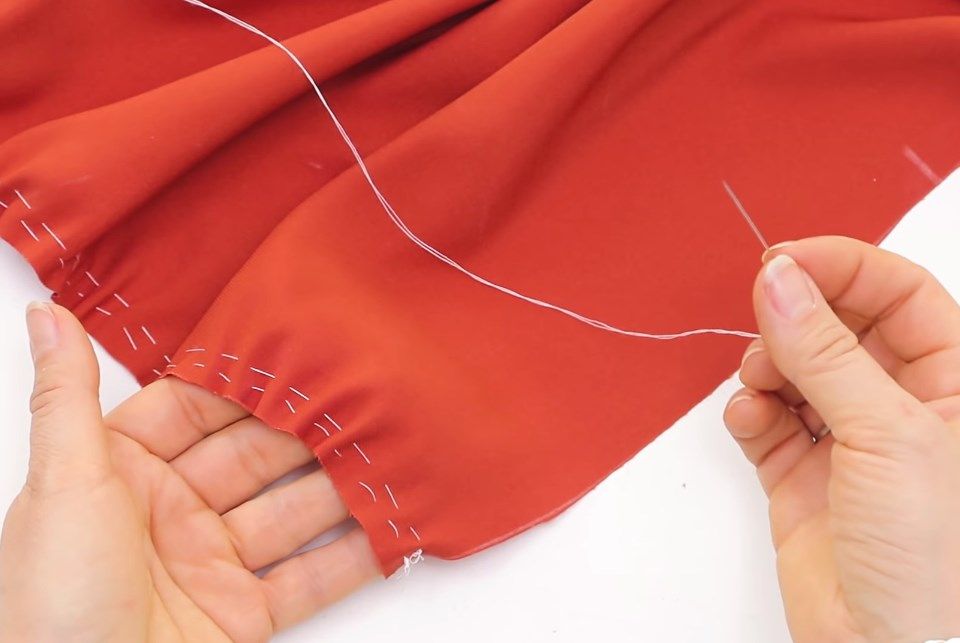
Along the waistline, make neat basting stitches no longer than 1 cm and pull the edge in until it equals the elastic length or is 2 cm shorter. Secure the ends, then sew a second similar basting row slightly below the first.
Two basting rows help pull in the waist neatly.
Steam-shrink the edge and let it cool
Press the iron down onto the fabric without sliding it across the surface. Leave the piece on the table until it has cooled completely. Because of the bias cut and pressing, the waist can be reduced by about 10-15 cm and the gathers become neater.
If you are sewing the two-seam version
Do not shrink the two pieces separately. First sew one side seam, then make the double basting and press the waist, and only after that close the second seam.
Enclosed seam without a serger
Thin satin can be finished with a neat enclosed seam: the raw edges stay inside, so you do not need a serger.
Sew the first seam at 3 mm
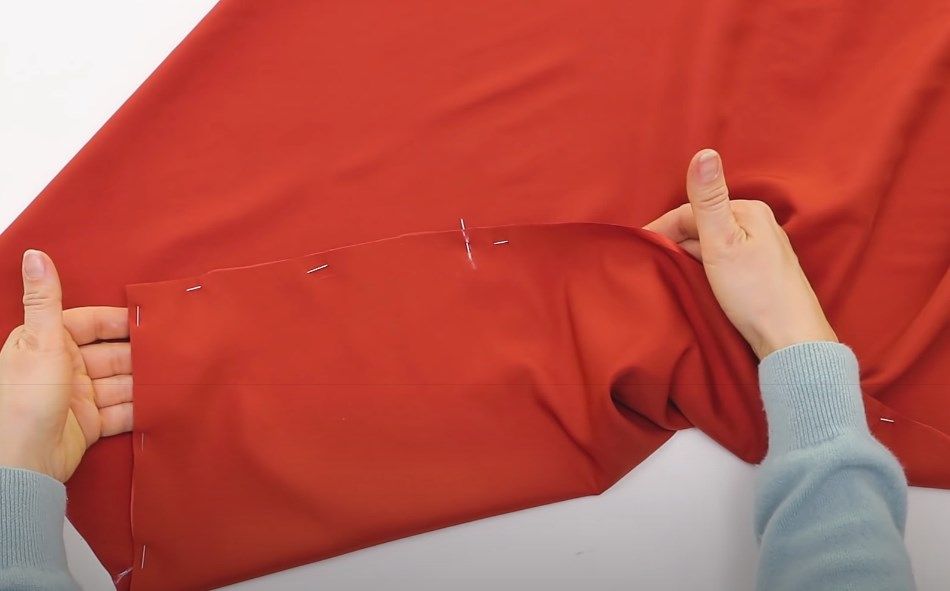
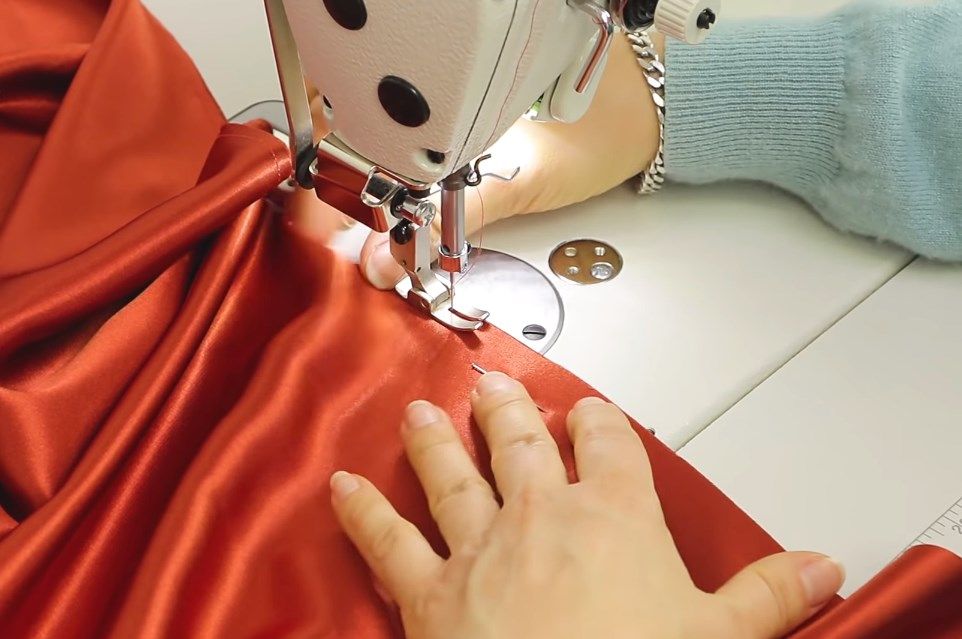
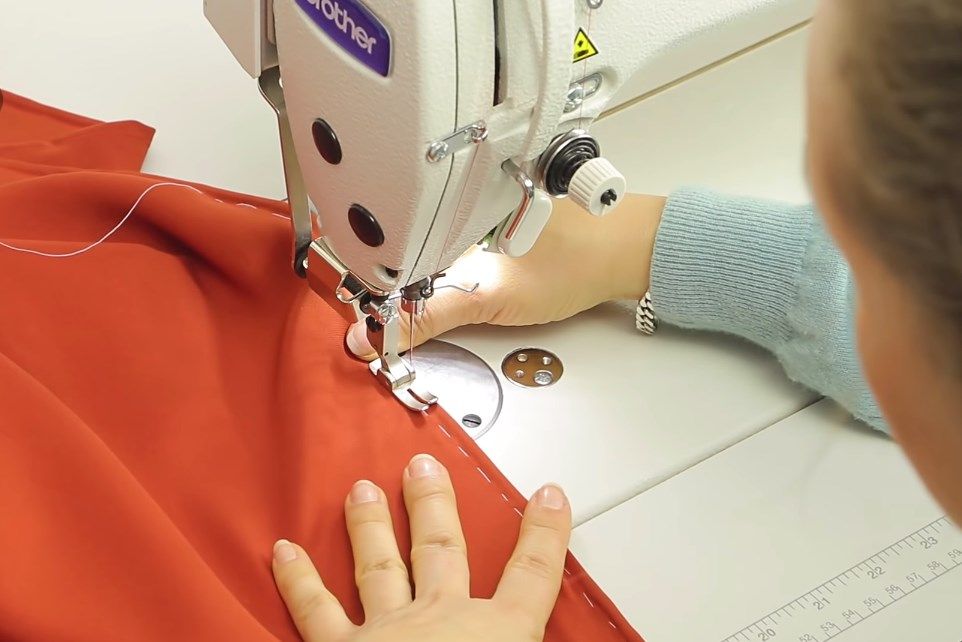
Fold the piece along the waistline in half with wrong sides together, match the hip marks, and pin or baste the edge. Sew a straight machine seam with small stitches, 0.3 cm from the raw edge. Backstitch at the beginning and end.
The first seam is sewn with small stitches 3 mm from the edge.
Do not pull the fabric
The source specifically warns not to stretch the fabric while sewing, or the bias edge will warp.
Press and set the seam on its edge
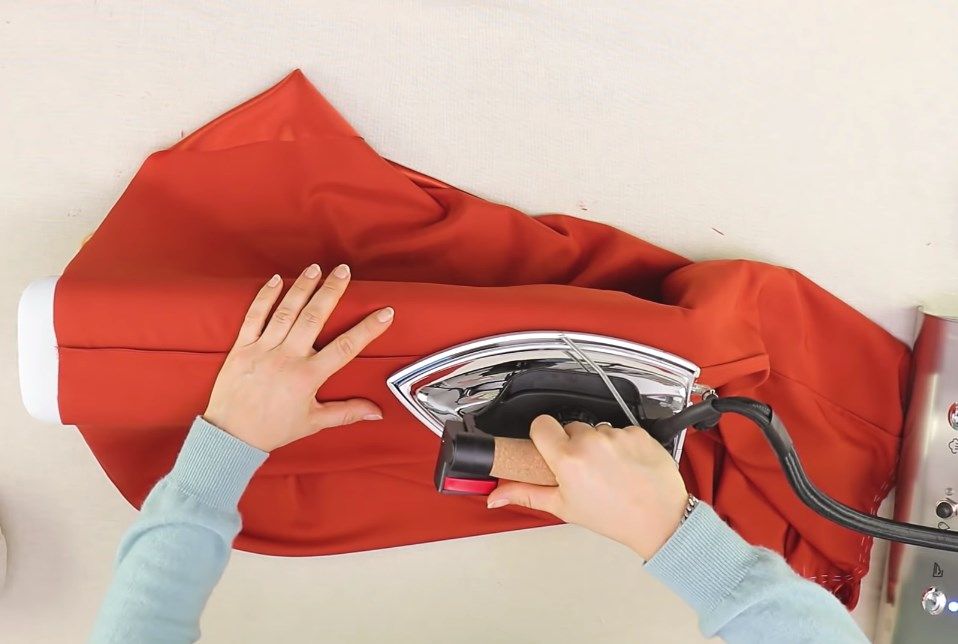
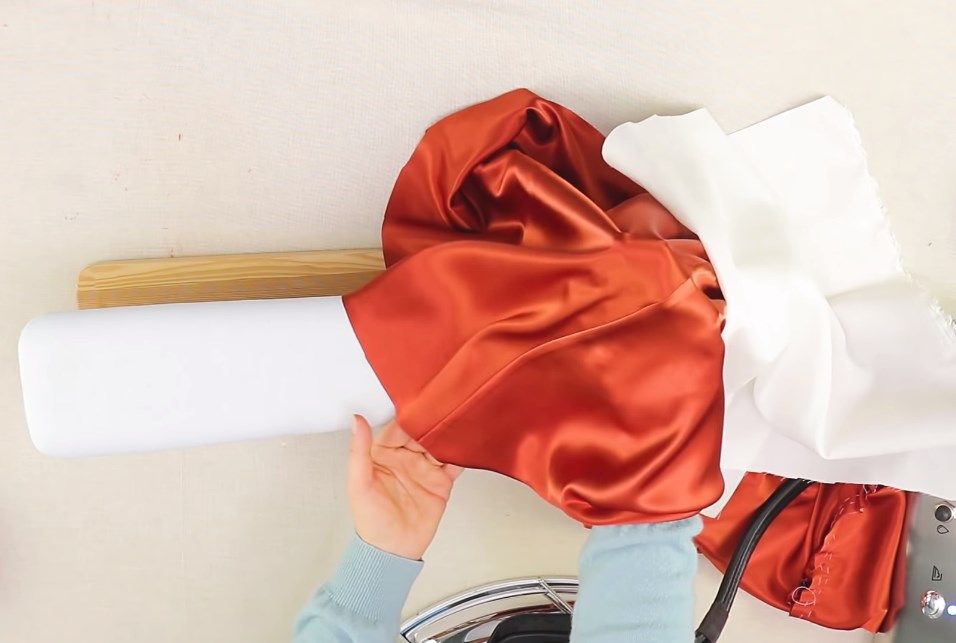
Press the seam allowances. If the first stitch line is farther than 3 mm from the edge, trim the excess carefully. Turn the skirt to the wrong side and press the allowances to one side or open if the width allows.
After turning, the seam is set exactly on the edge.
Thin fabric and steam
The source recommends working without steam: thin fabrics do not like it.
Baste and sew the second seam
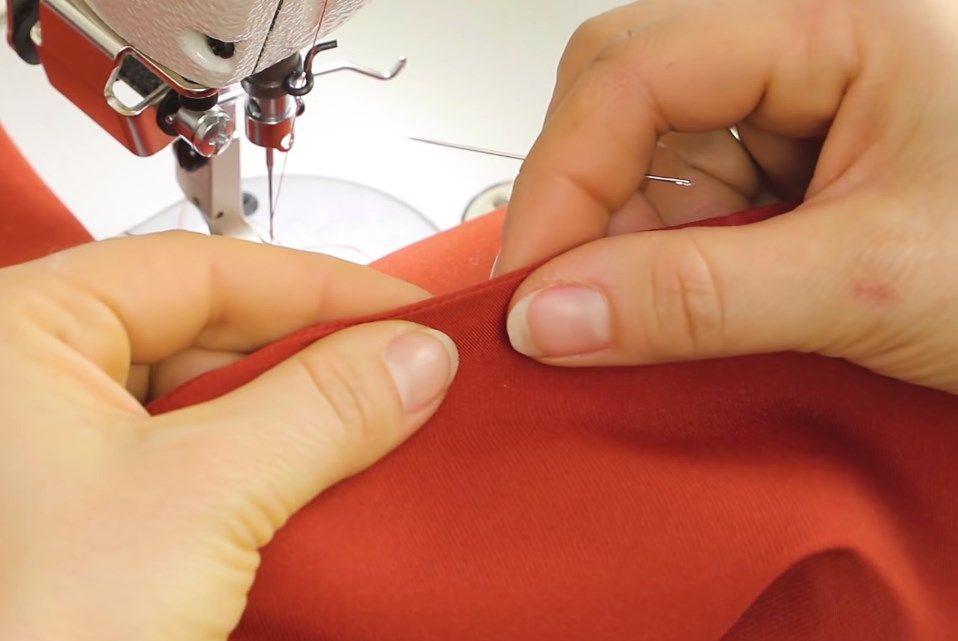
Pinch the fabric so the first seam lies exactly on the edge. Baste the seam and sew the second row 5-6 mm from the edge. The stitch length in the source is 2 mm; backstitch at the beginning and end.
The second seam encloses the raw edges inside.
Remove the basting and check the right side
Remove the basting, press the seam from the wrong side, and let the fabric cool. Then turn the piece right side out, check that the seam is even, and press through a pressing cloth.
Press the seam and let the fabric cool.The right side of the seam looks clean and neat.
Finished seam
On the right side you should see a clean line, with all raw edges enclosed inside.
Double elastic waistband
The waistband is made from two identical elastic rings. This method covers the first zigzag stitch and gives the skirt top more structure.
Sew two elastic rings
Thread the machine with thread matching the elastic. Join each elastic piece separately into a ring, press the seam allowances open, and let them dry.
Place the first elastic at the waist
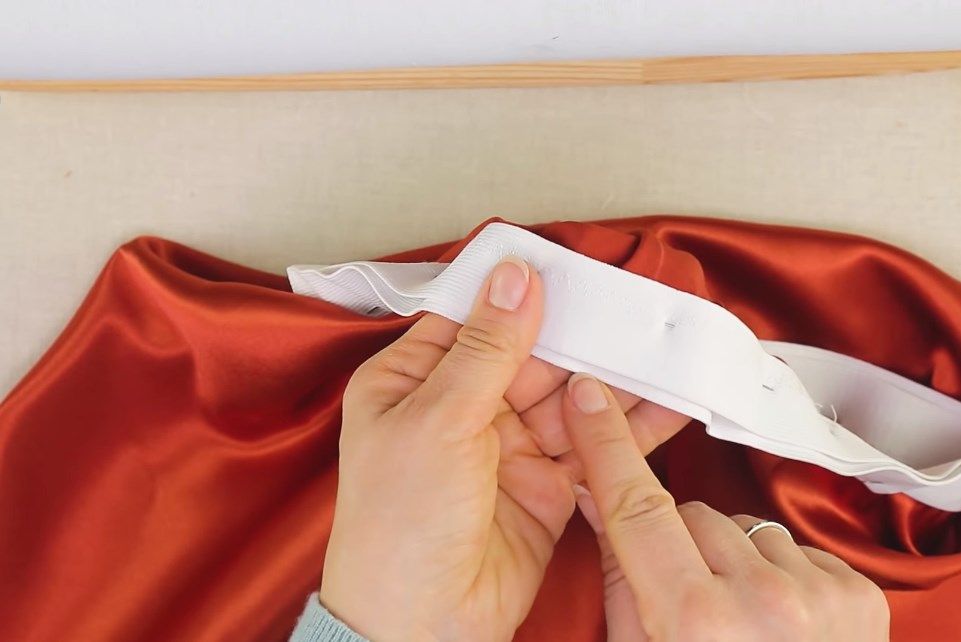
Set one elastic aside for now. Join the other to the skirt edge so the elastic seam matches the skirt seam. The elastic sits under the skirt by 1 cm: the fabric right side is on top, the wrong side below.
Match the elastic seam with the skirt seam.
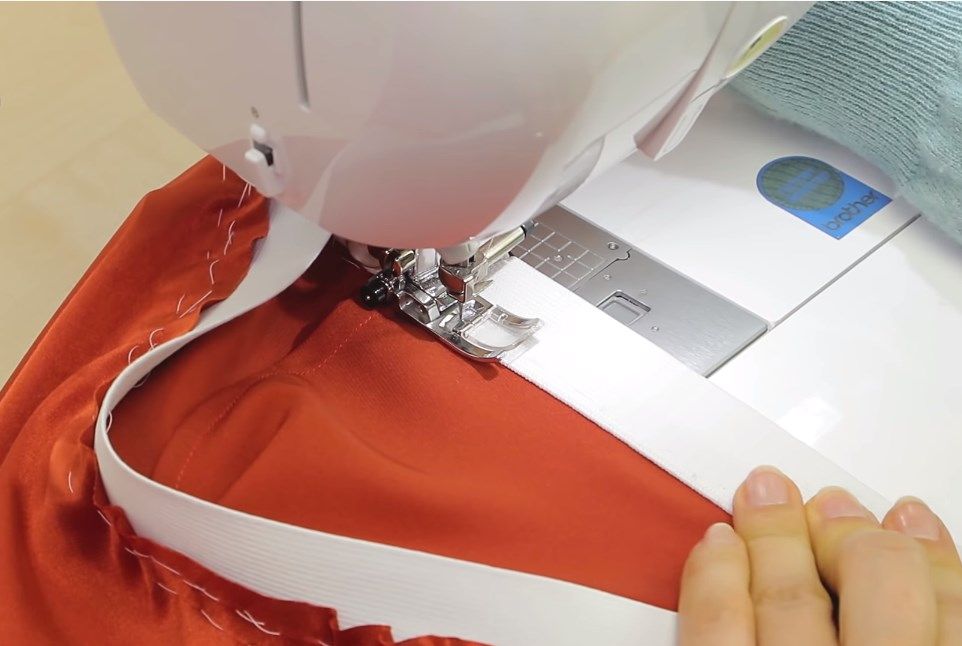
Attach the first elastic with zigzag
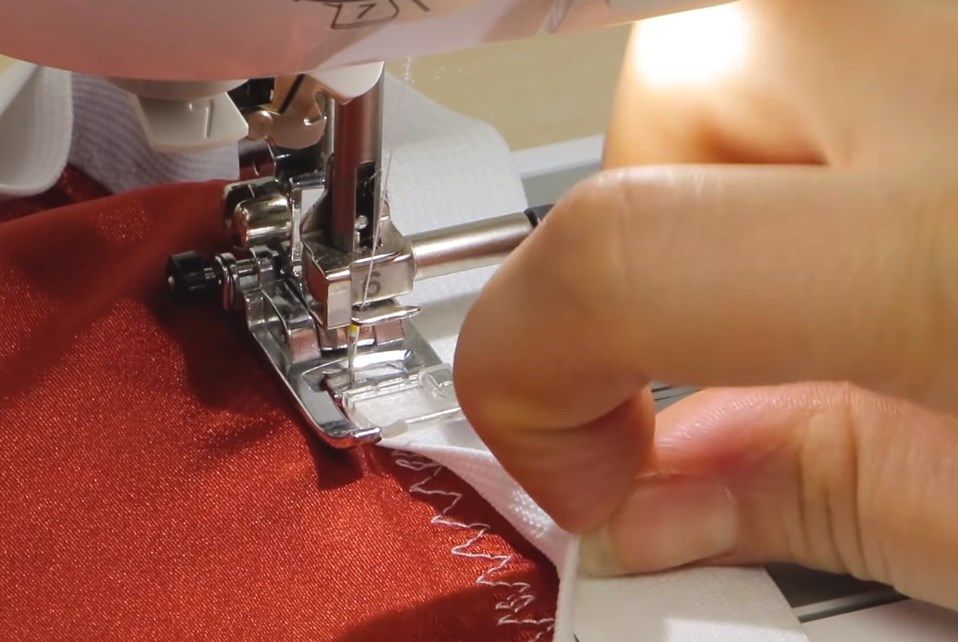
Baste the elastic to the fabric, stretching the elastic slightly. Under the machine, the elastic should be on top and the skirt underneath. Sew a zigzag along the lower part of the elastic, 3-5 mm from its edge.
Stretch the elastic slightly and sew with zigzag.
Remove the basting and turn the elastic inside
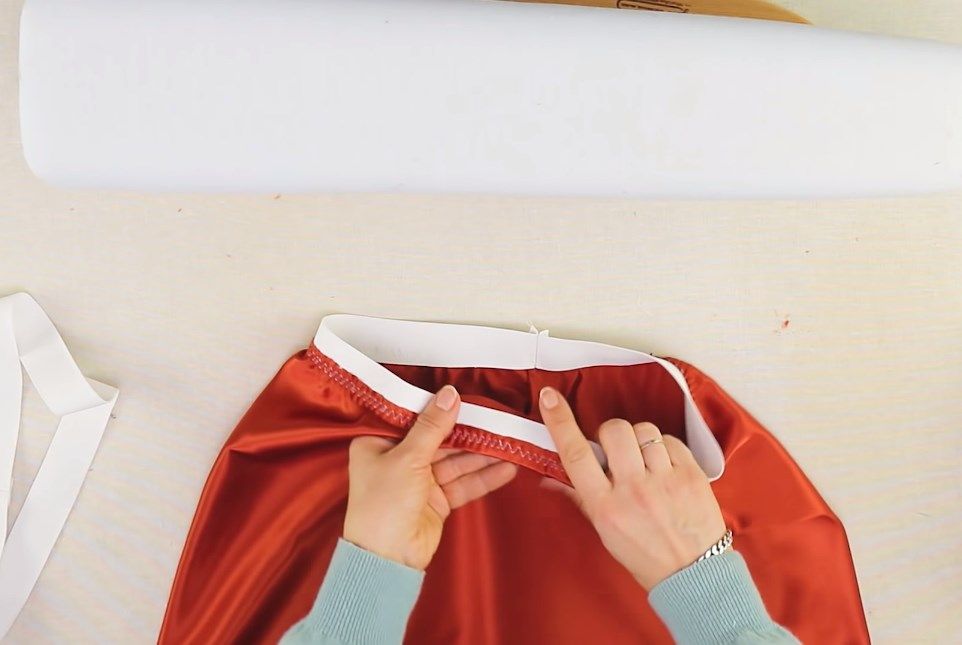
After the first machine seam, remove both waist basting rows. Turn the elastic to the inside of the skirt to form the top edge of the waistband.
Remove the temporary waist basting after attaching the first elastic.The turned elastic forms the top edge of the waistband.
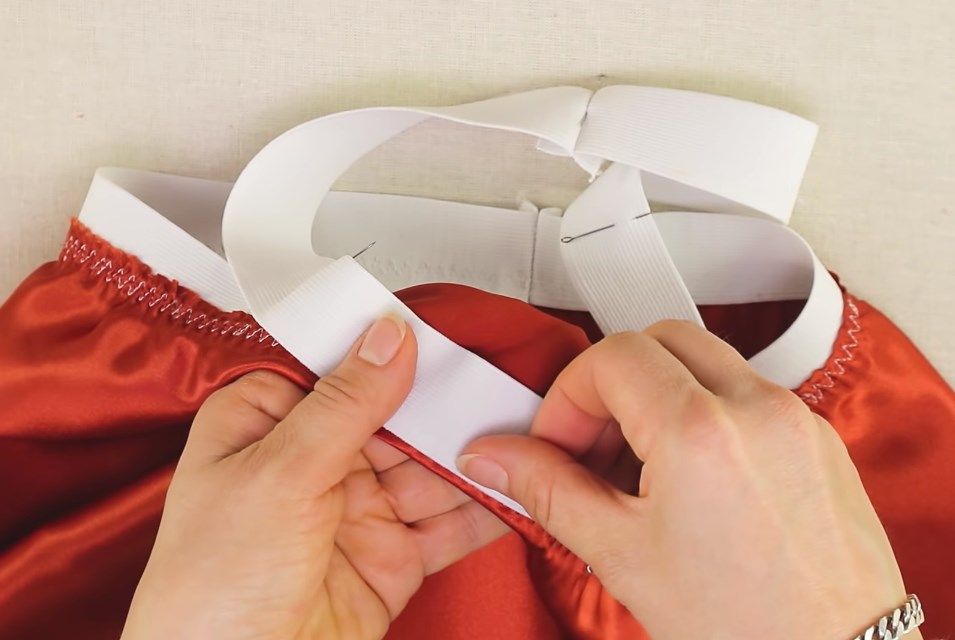
Mark and place the second elastic
On the second elastic, mark the section parallel to the seam and the side points so the four marks are equally spaced. Lay the second elastic over the turned first elastic, 2 mm from the edge, and match the joins.
Mark four equal sections on the second band.
Pin and attach the second elastic
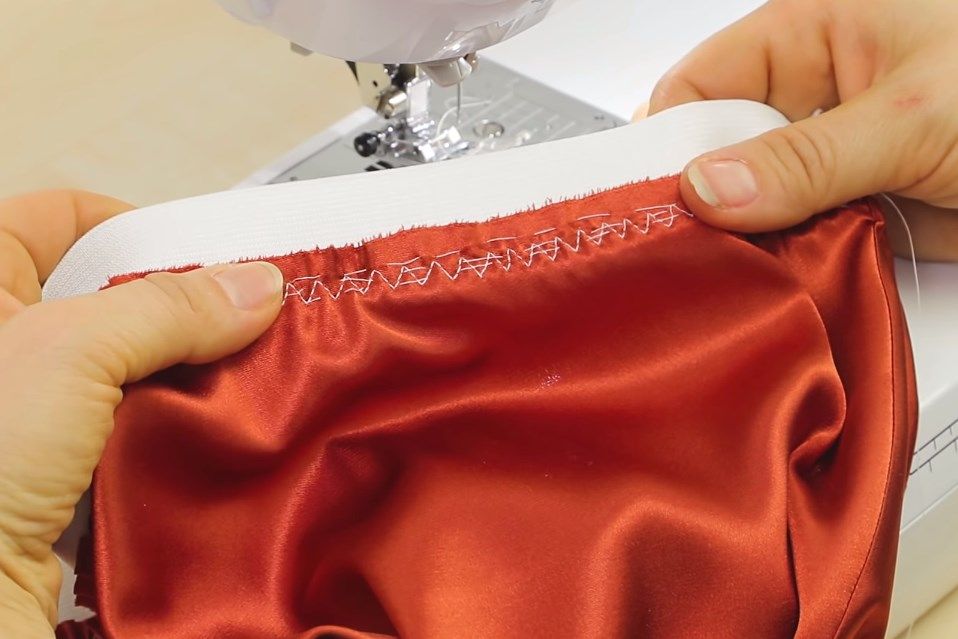
Pin the waistband and check that the marks on the elastic and fabric match. Attach the second elastic with a zigzag stitch right along the edge of the band: this covers the previous seam.
Check the marks on the band and skirt before stitching.The second elastic covers the previous seam.
Why two elastics
In the discussion, participants clarified that the double band helps firm up the waistband, hide the first zigzag, and reduce the risk of the waistband rolling outward during wear.
Join the top edges of the elastics
Join the top edges of the two elastics with zigzag, stretching them gently along the length. Press the seams from the right side, then turn the elastic inside the garment and press only the upper edge so you do not create shine marks on the satin.
Hem and final pressing
After bias work, it is better to level the hem on the body: thin fabric can hang differently at the front, sides, and back.
Try on and level the hem
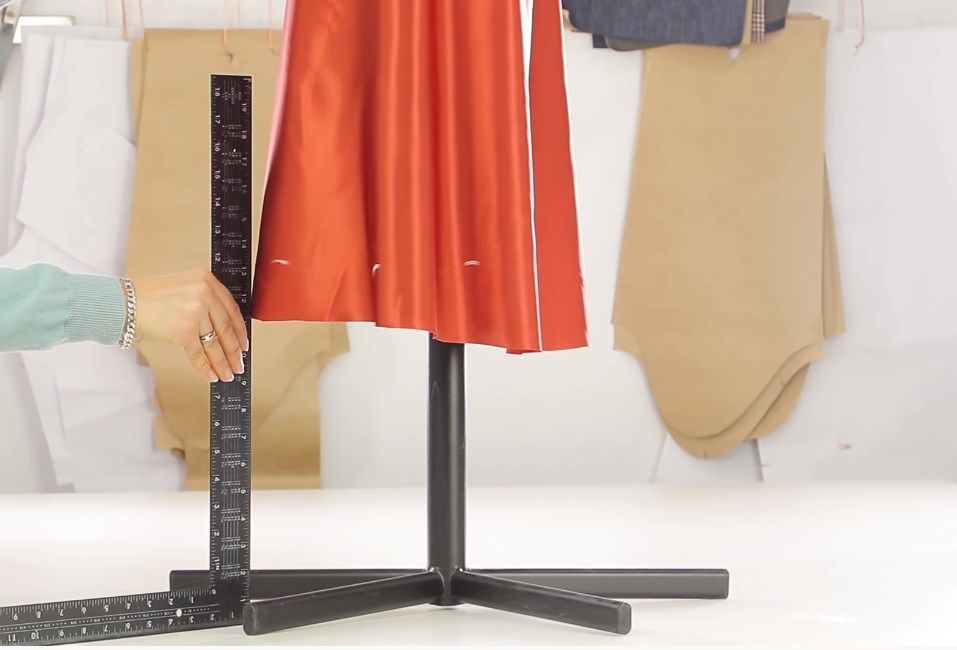
Try the skirt on a person. Mark the desired length and place marks around the hem from the floor. Then draw the new hemline with a ruler or curve: leave 0.5 cm for a baby hem or 1 cm for a regular straight stitch finish. Cut away the excess.
Mark the hem around the skirt after fitting.
Midi line
From the discussion: a length to mid-calf or lower visually lengthens the silhouette better than a random length near the knee.
Finish the hem with a baby hem
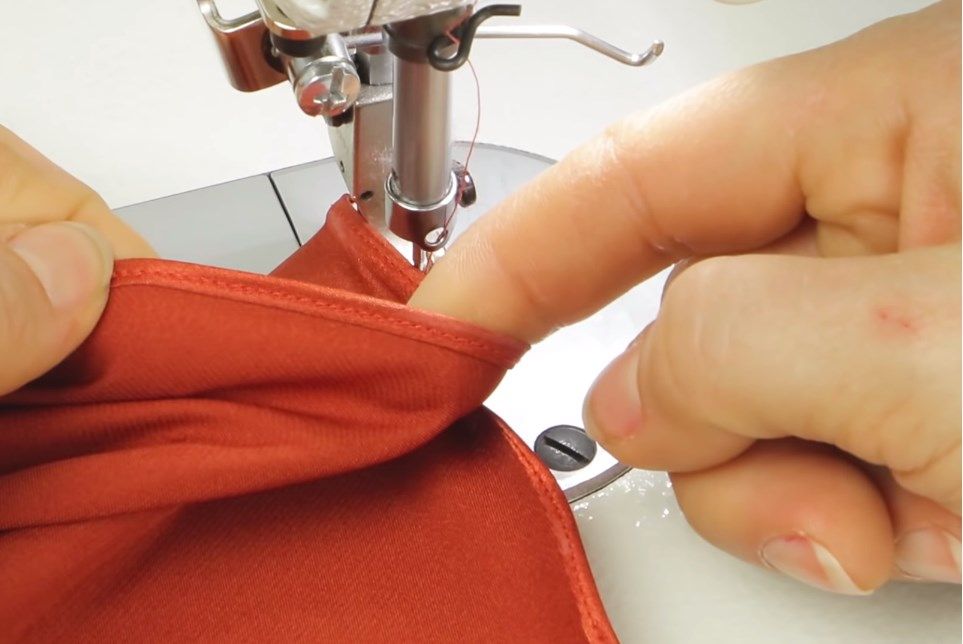
Turn the edge under by 2.5 mm and stitch. Then turn it under a second time and sew the second line exactly into the first row of stitches.
Turn the edge twice and stitch into the first row of stitches.
Do the final pressing
Carefully press the finished skirt, checking the waistband, seam, and hem. On shiny satin, work gently and avoid overheating areas visible from the right side.
Finish and variations
Finish
Check the fit
The waistband should sit firmly without pinching the waist. The enclosed seam should lie flat, with no raw edges or ripples.
Preserve the shape of thin fabric
After the final pressing, let the skirt cool completely on a flat surface or hanger. For shiny satin, avoid overheating the right side.
Variations
One seam at the center back
This version is shown in the main process: the fabric is folded diagonally, and the pattern fold line is matched to the fabric fold.
Two side seams
The source also includes a two-side-seam version. In that case, first close one side seam, then shape the waistline, and only after that close the second seam.
How to style it
From the discussion: the author suggests sandals, pumps, white canvas shoes or sneakers, and boots for transitional weather. For tops, try crop tops, matte camisoles, oversized sweaters, blouses, shirts, coats, and trench coats.
The skirt top looks messy even though the elastic length fits the waist.
Likely cause
The waistline was not pulled in with two basting rows or the fabric was not left to cool after pressing.
How to fix it
First reduce the waistline with basting until it equals the elastic length or is slightly shorter, then press down from above and leave the fabric flat until completely cool.
The seam ripples or the fabric stretches out
Problem
After stitching, the thin satin waves along the bias edge.
Likely cause
The fabric was pulled by hand or the first seam was sewn without stable basting or pinning.
How to fix it
Baste or pin the edge well, sew with small stitches, and do not tug the fabric under the presser foot. After stitching, press the seam instead of stretching it.
A raw edge shows in the enclosed seam
Problem
After the second row of stitching, the open edge peeks out on the right or wrong side.
Likely cause
The first seam was farther than 3 mm from the edge or the allowance was not trimmed before turning.
How to fix it
Check the first seam: if it is farther than 3 mm, trim the excess allowance. Sew the second seam 5-6 mm from the edge so the raw edge is fully enclosed.
The waistband rolls outward or the first zigzag shows
Problem
The elastic rolls to the outside, and the attaching stitch looks rough.
Likely cause
The second band did not cover the first seam or the top edges of the elastics were not joined.
How to fix it
Place the second elastic over the first with about a 2 mm offset, match the marks, and sew zigzag as close as possible to the band edge. Then join the top edges of the two elastics with zigzag.
The hem is uneven
Problem
After fitting, the skirt edge looks different in length at the front, side, or back.
Likely cause
The skirt is cut on the bias, so the hem cannot be reliably leveled on the table alone.
How to fix it
Level the length on a person from the floor, then draw the new hemline and leave the needed allowance: 0.5 cm for a baby hem or 1 cm for a regular stitch finish.
Shine marks appeared on the satin
Problem
Shiny iron marks are visible on the right side.
Likely cause
The fabric overheated, was pressed without a pressing cloth, or the iron was moved too actively across the surface.
How to fix it
When easing the fabric, press the iron straight down rather than rubbing. Check and press the right side through a pressing cloth, and when working on the waistband, press only the upper edge.
?FAQ
Can I sew this skirt without a serger?
Yes. In the source, the seam is finished as an enclosed seam: first a 0.3 cm seam with wrong sides together, then turning and a second 5-6 mm seam. The hem can be finished with a baby hem.
What fabric works for a satin midi skirt?
You need lightweight, flowing, non-transparent fabric: silk, viscose, or synthetic satin. It may be shiny or matte and may have a little stretch.
Why are there two elastics in the waistband?
The first elastic is attached to the waistline and holds the fit. The second covers the first zigzag, firms up the waistband, and helps keep it from rolling outward during wear. This point was also discussed in the comments.
Which should I choose: one back seam or two side seams?
Both versions are included in the pattern. One seam is convenient for a single diagonal layout; two side seams give a more familiar construction. The two-seam version needs a different order: first one seam, then waist shaping, then the second seam.
How do I reduce extra fullness at the waist?
Sew two basting rows with stitches up to 1 cm long, pull the waistline in until it equals the elastic length or is slightly shorter, then press-shrink the edge and let the fabric cool completely. In the source, this removes about 10-15 cm.
Where can I get the pattern?
The original material links to a free Grasser pattern. If the link changes, look for a silk midi skirt pattern with a bias-cut option and check whether seam allowances are included, or add them according to your chosen pattern instructions.
When should I level the skirt hem?
After assembly and fitting. Put the skirt on a person, mark the length all around from the floor, then draw the new hemline and only then trim the excess.
What can I wear with a satin midi skirt?
In the discussion, the author suggests sandals, pumps, white canvas shoes or sneakers, and boots for transitional weather. On top, try crop tops, matte camisoles, oversized sweaters, blouses, shirts, coats, and trench coats.
Your project
Log in to track your project, attach photos, and publish your result into the shared feed.
There are many ways to wear this kind of skirt. Here are a few examples for hot weather and a cool summer evening:
Length is critically important here. It should reach mid-calf or lower: that silhouette visually lengthens the outfit and makes the legs look slimmer.
Tell me, did I understand correctly that the double elastic is needed to keep the waistband shape, or is there another trick here?
I think it is for firmness, and also to hide the zigzag stitch used to attach the first elastic. A denser band will not roll to the right side while worn, and making a casing waistband on such delicate fabric would be almost sacrilege, in my opinion.
Excellent master class! And the description is just right for beginners. This skirt really calls for a top or a blouse. What would you recommend for a beginner? Special thanks for making this tutorial without using a serger.
Thank you! This skirt is a versatile wardrobe piece. For shoes, of course it works with sandals and pumps. For a bolder look, I recommend white canvas shoes and even chunky white sneakers; they are very fashionable now. In transitional weather it looks good with boots. The main thing is that it should feel close to your own style. And because of the skirt length, so the shoes do not visually cut the leg line, it is better to choose white or nude shades.
For the top: a crop top, a T-shirt or tank that shows the navel or upper stomach, matte-fabric tanks, oversized sweaters, cardigans, blouses, shirts. It also looks good with coats and trench coats. Very slimming!
Insanely beautiful, but very temperamental to wear ((
Why temperamental? If you mean the fabric, adding elastane to the composition gives an excellent fit. The skirt drapes well, does not wrinkle, and keeps that “floating” effect. If you mean sizing, then yes, it will not suit girls with a pronounced belly, but for other body types up to size 48-50 and average height it is a great option for warm weather, from spring to autumn.
 IntermediateFree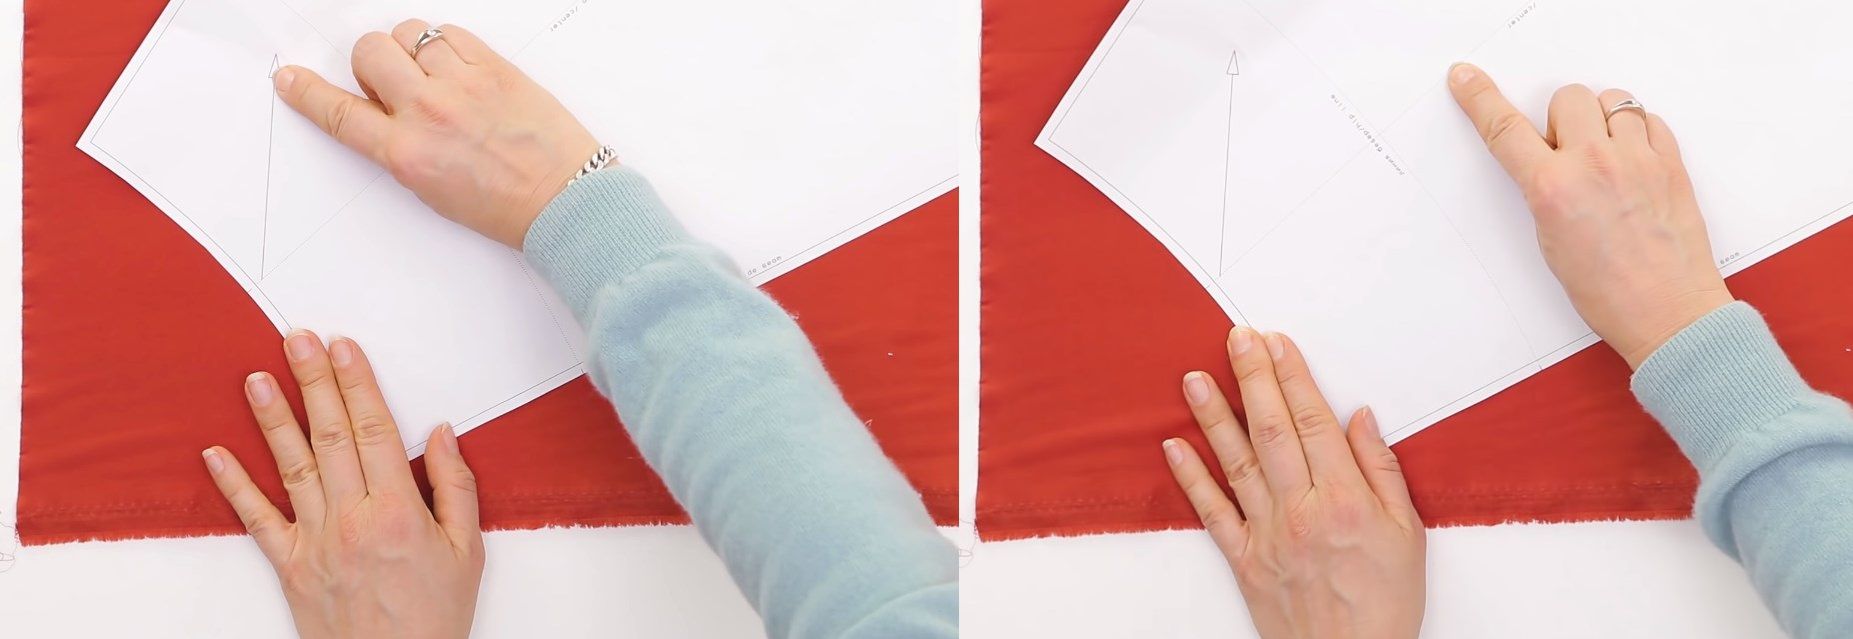


There are many ways to wear this kind of skirt. Here are a few examples for hot weather and a cool summer evening:
Length is critically important here. It should reach mid-calf or lower: that silhouette visually lengthens the outfit and makes the legs look slimmer.
I think it is for firmness, and also to hide the zigzag stitch used to attach the first elastic. A denser band will not roll to the right side while worn, and making a casing waistband on such delicate fabric would be almost sacrilege, in my opinion.