This master class shows how to embroider a wisteria branch with satin ribbons: prepare fabric, hoop, needles, scissors, lighter, white 10–12 mm ribbons, lilac-blue 6 mm ribbons, green 10 and 6 mm ribbons, watercolor or batik paints, and brushes. First mark the branches and leaves on the fabric, then embroider the leaves with 10 mm green ribbon using ribbon stitches, make twisted stems and branches with 6 mm green ribbon, embroider open flowers with white and lilac ribbon using straight and ribbon stitches, make buds with straight stitches, connect them with green ribbon, add a side branch, tint the flower with watercolor, and frame the finished work.
BeginnerFree
Translated
Things you will learn
Before embroidering, mark the branches and leaves on the fabric with a pencil or disappearing marker.
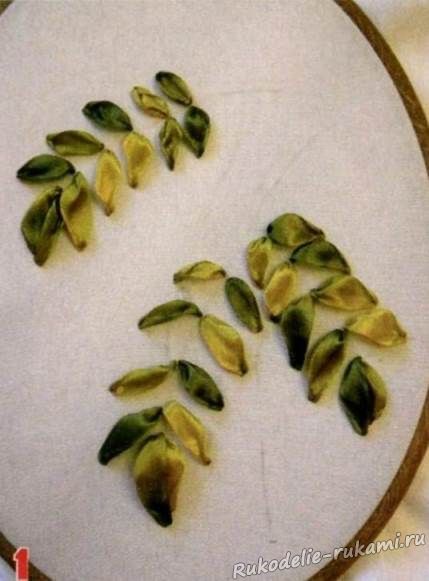
Leaves are made with 10 mm green ribbon, using ribbon stitches from the stem toward the edge.
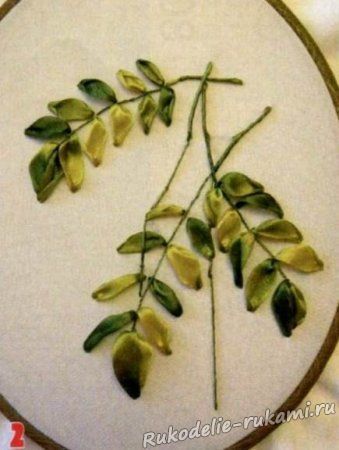
The stems are made with 6 mm green ribbon, twisted fairly tightly.
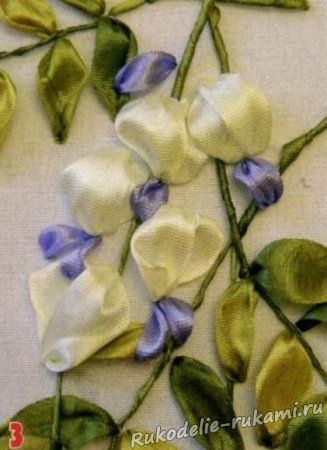
Open flowers combine a white upper part and a lilac-blue lower part.
Tinting is done with watercolor or batik paint on a lightly moistened white flower area.
Wisteria branch in satin ribbons
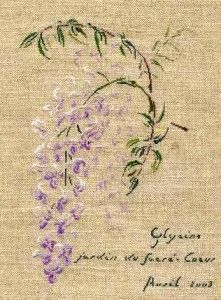
The finished piece is a dimensional floral embroidery with green leaves and stems, hanging wisteria clusters, and soft tinting, ready to be framed.
Materials and tools
Materials
Gabardine fabric, Can be replaced with another fabric suitable for ribbon embroidery.
White satin ribbon, 10–12 mm wide, for the upper part of the flowers.
Lilac-blue satin ribbon, 6 mm wide, for the lower part of the flowers.
Green satin ribbon, 10 mm for leaves and 6 mm for stems.
Watercolor paints, For tinting the background and flowers; batik paints can also be used.
Embroidery floss or monofilament, For tacking the ribbon in curved areas.
Embroidery hoop, Keeps the fabric taut while you embroider.
Frame, For finishing the completed embroidery.
Tools
Ribbon embroidery needles, Choose needles that match the ribbon width.
Scissors, For cutting ribbons and threads.
Lighter, For carefully sealing satin ribbon ends.
Pencil or disappearing marker, For marking the design on the fabric.
Brushes, For tinting the background, flowers, and fine veins.
Hair dryer, For drying the paint quickly so the colors do not run together.
Preparation
Hoop the fabric
Place the gabardine or another suitable fabric in the hoop so the surface is smooth.
Mark the drawing
Use a pencil or disappearing marker to draw the wisteria branches and leaves on the fabric.
Leaves and stems
First build the green structure of the branch: leaves, stems, and curves.
Embroider the leaves
Take 10 mm green ribbon. You can use two shades of plain green ribbon. With ribbon stitches, embroider each leaf from the stem toward the edge.
Make the stems
Use 6 mm green ribbon for the leaf stems and wisteria branches, twisting the ribbon fairly tightly.
Secure the curves
In curved areas, tack the ribbon with matching green embroidery floss or monofilament.
Do not pull the ribbon too tight
The stem should hold its shape without looking flat or strained.
Wisteria flowers and buds
The flowers are embroidered with two ribbons: white for the upper part and lilac-blue for the lower part.
Embroider the open flowers
Use straight stitches and ribbon stitches. For each flower, make two stitches with the white ribbon and two with the lilac ribbon.
Spread the lower stitches
Place the white upper stitches closer together, while the lilac lower stitches open slightly downward.
Embroider the buds
Make the wisteria buds with straight stitches, gradually shortening them toward the end of the cluster.
Connect buds and stems
With 6 mm green ribbon, connect the stems and buds using straight and twisted stitches. Add the branch on the left.
Tinting and finishing
Watercolor tinting makes the flower softer and more painterly.
Moisten the white flower area
Lightly moisten the white part of the flower with water using a brush.
Add color
Let yellow paint flow from the bottom of the white area and lilac-blue paint from the top. The colors should softly run toward the center.
Dry quickly
To keep the colors from blending too much, dry the work quickly with a regular hair dryer.
Paint fine veins
After the flowers and leaves dry, you can add fine veins with a thin brush and watercolor. There should be very little water on the brush.
Frame the work
The finished wisteria branch can be framed.
Finish and variations
Finish
Final check
Check the leaf shapes, stem volume, flower direction, clean tinting, and whether the work is ready for framing.
Variations
Other floral motifs
The same approach can be used for other branches and floral designs by changing the drawing and ribbon colors.
Batik paints
Instead of watercolor, you can use batik paints if they suit your fabric.
The ribbon is not twisted enough or is not tacked in curved areas.
How to fix it
Twist the green ribbon more firmly and tack curves with matching floss or monofilament.
The paints mixed into a muddy color
Problem
The tinting lost its clean color transitions.
Likely cause
The white area was too wet or the paint was not dried quickly enough.
How to fix it
Moisten the fabric only lightly, apply paint thinly, and dry it quickly with a hair dryer.
?FAQ
What ribbons are needed for wisteria?
Use white 10–12 mm ribbon for the upper flower parts, lilac-blue 6 mm ribbon for the lower parts, green 10 mm ribbon for leaves, and green 6 mm ribbon for stems.
How should I mark the design on the fabric?
Use a pencil or disappearing marker.
Why dry the tinting with a hair dryer?
A hair dryer quickly stops the paint from spreading so the yellow and lilac tones do not blend too much.
Your project
Log in to track your project, attach photos, and publish your result into the shared feed.
 BeginnerFree