How much time is even left until then?! Before we know it, here it is—New Year! The tree! Presents! Tigers!
So what does that mean? Let's sew a charming toy—a tiger cub!
This wonderful little guy has movable paws and a tail.
This wonderful little guy has movable paws and a tail.
To sew the toy, you will need:
polyester fiberfill;
a 20 DEN nylon sock or tights (we will use two layers);
sewing thread matching the nylon and a darker shade for the whiskers;
brushes—flat and round;
eyeshadow applicator;
eyeshadow—white and dark brown;
superglue;
half-beads for the eyes (2 mm diameter) and nose (5 mm diameter);
a sparkle for the highlight on the nose (1 mm diameter);
scissors, needle.
How to sew
Place the stuffing into two layers of nylon and shape a round piece for the head. It needs to be stuffed fairly firmly to produce a tight ball about 25–30 mm in diameter.
Wrap thread around the base of the ball, pulling it tight.
Wrap thread around the base of the ball, pulling it tight.
Trim away the excess fabric.
Trim away the excess fabric. Make an identical piece for the tiger cub's body.
Next, make the pieces for the muzzle and paws.
Next, make the pieces for the muzzle and paws. They should have an oblong shape and not be as dense as the pieces for the head and body. The dimensions of the muzzle piece are 1 cm by 2 cm; for the front paws, two pieces measuring 2.5 cm by 1.5 cm; for the hind paws, two pieces measuring 3 cm by 2 cm. For the ears, prepare two round pieces 1 cm in diameter. Try to trim as much excess fabric as possible from these parts; we will hide the remaining tails later. You also need to cut out a piece for the tail from two layers of nylon, measuring 2 cm by 4 cm.
Start with detailing the head.
Start with detailing the head. Fasten the thread to the gathered tail to begin forming the smile. Bring the needle out at one corner of the mouth, insert it again at the center of the smile, bring it out at the tail, then bring it out again at the other corner of the mouth, and pull tight. Continue this way, shaping the smile with needle sculpting. Fasten the thread at the tail; do not cut it, but bring it out at the bottom.
Sew on the body, positioning it with the gathered tail facing up.
Sew on the body, positioning it with the gathered tail facing up. Stitch around the body's tail and pull the fabric tight to conceal it.
Bring the needle out at the side of the head and sculpt indentations for the ears.
Bring the needle out at the side of the head and sculpt indentations for the ears. To do this, make several stitches in both directions, pulling the thread tight. Fasten off the thread and cut it.
Next, stitch the muzzle.
Next, stitch the muzzle. Secure the thread to the gathered tail, wrap it around the center of the muzzle several times, and fasten off the thread.
Sew the muzzle onto the head.
Sew the muzzle onto the head. Position it above the smile so that the nose (the tail left from gathering the nylon) peeks out slightly. Sew the muzzle on securely.
Stitch the bridge of the nose.
Stitch the bridge of the nose. Tigers have stripes there, and we will need to apply paint to a textured surface.
Bring the needle out at the ear.
Bring the needle out at the ear. Sew on the pre-made ear. Do this neatly so no thread ends or raw fabric edges are visible.
Bring the needle out on the other side of the head where the second ear will be attached, and secure it.
Bring the needle out on the other side of the head where the second ear will be attached, and secure it.
To shape the ear, secure the thread to the gathered tail of the round piece. Stitch a smaller concentric circle. This thins out the ear and creates a hollow that we will tint later. Sew on the second ear.
Next, work on the paws.
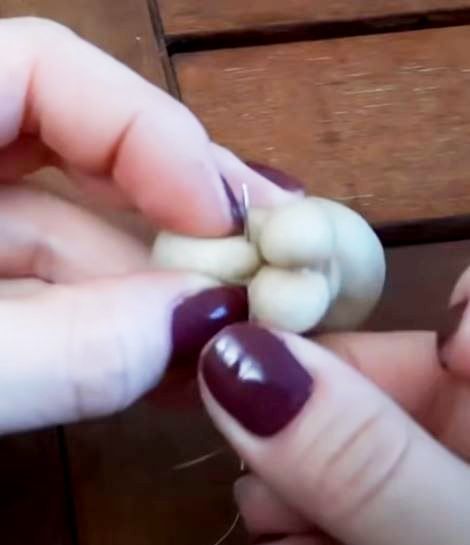
Next, work on the paws. Secure the thread to the gathered tail, press it into the center, and sew the edges of the paw closed. Keep your stitches very small. After stitching in one direction, stitch back in the other direction. Next, shape the tiger cub's toes. To do this, make three sculpted stitches by looping the thread over the edge of the paw. Then make side sculpted indents (note that they should be mirrored for the right and left paws). Also make another sculpted indent at the top of the paw to make it easier to attach to the body. Do not cut the thread.
Attach the upper paws to the body by passing the needle through both paws and the body.
Attach the upper paws to the body by passing the needle through both paws and the body. Pull the thread taut, fasten off, and trim.
Stitch the lower paws, shape the toes, and attach the paws to the body in the same way.
Stitch the lower paws, shape the toes, and attach the paws to the body in the same way.
Bring the needle out to attach the tail.
Bring the needle out to attach the tail.
Prepare the tail. To do this, fold both raw edges inward toward each other along the long side of the piece, then fold the piece in half lengthwise again. Bond the part together with superglue. Be sure to glue the short ends of the tail. Round off the corners at the tip with scissors to create a smooth semicircle.
Sew on the tail.
Sew on the tail.
Glue on the nose and eyes.
Glue on the nose and eyes.
Glue on the sparkle, placing it slightly off-center.
Glue on the sparkle, placing it slightly off-center.
Detail the muzzle and body with eyeshadow, tinting with dark and white shades.
Detail the muzzle and body with eyeshadow, tinting with dark and white shades.
To make the toy durable and washable, coat the tiger cub with clear nail polish or hairspray.
To make the toy durable and washable, coat the tiger cub with clear nail polish or hairspray. Keep in mind that hairspray washes off, while nail polish does not.
All that's left is to make the whiskers. Bring the needle out on both sides of the muzzle. Apply a drop of superglue where the thread enters the muzzle.
Step 23
For this master class, I used materials from Sava Vitalina (https://www.youtube.com/watch?v=H5_m0pgrv4c) Thank you to the author!
You can see the process of sewing the tiger cub in more detail in the author's video.
You can see the process of sewing the tiger cub in more detail in the author's video. YouTube video (https://youtu.be/H5_m0pgrv4c)

 BeginnerFree