How to Properly Sew a Welt Pocket: Photos and Tutorial
When sewing many knit tops, such as hoodies, you will definitely need pockets. Of course, you can sew on trapezoid patch pockets and end up with a kangaroo sweatshirt. But with a few simple steps, you can still make
BeginnerFree
Translated
Process
Step 1
When sewing many knit tops, such as hoodies, you will definitely need pockets. Of course, you can sew on trapezoid patch pockets and end up with a kangaroo sweatshirt. But with a few simple steps, you can still make a welt pocket with a knit welt.
Illustration 2
Step 3
To sew these pockets, you will need: • front piece of the knit garment; • lining (for knit pockets, you can use a lightweight fabric like single jersey); • rib knit for the welts (any knit, both 2/2 and 1/1); • fine thread for knits (No. 50 is optimal); • sewing supplies.
First, cut out all the pieces: • rib knit rectangles (it is important that the ribs run across the pocket opening); • two pieces each for the back and front pocket bags.
Illustration 4
Step 5
On the front piece of the garment, mark the placement of the future pockets with soap or a pencil. To do this, draw long rectangles. It is important that these outlines are strictly the same size and positioned as symmetrically as possible.
Illustration 6
Step 7
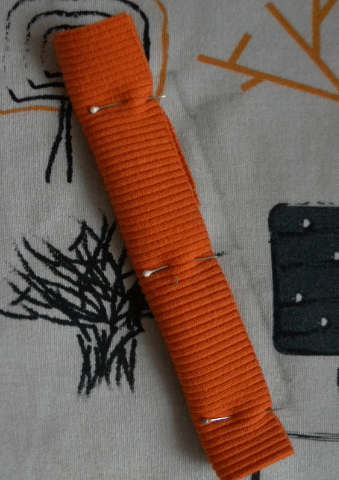
Fold the rib knit strip that will serve as our welt in half, right side facing out. Pin the piece onto the drawn rectangle so that the fold of the welt faces toward the center of the garment and the raw edges face toward the side seams.
Illustration 8
Step 9
Sew with a straight machine stitch as close to the edge of the welt as possible. It is important that the machine stitching aligns with the line of the rectangle.
Illustration 10
Step 11
Without changing the position of the welt, place the front piece of the pocket bag right side down. Secure with pins.
Illustration 12
Step 13
Stitch through the resulting "sandwich" so that both lines of stitching match not only in seam allowance from the raw edge, but also in the length of the seam itself.
Illustration 14
Step 15
Now, pin the other half of the pocket bag along the other (opposite) line. Ideally, at the finished stage, the completed pocket will face right side out, so secure the pocket bag wrong side facing up.
Illustration 16
Step 17
Stitch the pocket bag strictly along the drawn line, without extending beyond its boundaries.
Illustration 18
Step 19
Cut along the center of the drawn rectangle, stopping about 1 cm from the bottom and top edges. At these points, make diagonal cuts toward the corners of the rectangle. Through the resulting opening, bring all the pieces to the right side of the garment.
Illustration 20
Step 21
Secure the welt seam allowance to the base fabric. Topstitch the edge from the right side, 2-3 mm from the seam where the two fabrics meet.
Illustration 22
Illustration 23
Step 24
Bring the little triangles formed when slashing the fabric to the wrong side and stitch across them. Trim the excess welt fabric so the pocket is not bulky.
Illustration 25
Step 26
Turn our garment over and pin the pocket bag pieces together. Stitch the pieces and finish the raw edges.
Illustration 27
Illustration 28
Step 29
Turn back to the right side and topstitch the pocket edges along the remaining three sides. Our welt pocket is ready. As you can see, there are no difficulties in the process—the main things are patience and diligence. It is worth noting that all stages of sewing the two pockets should be done simultaneously. That way, you can immediately spot any mistakes and quickly fix them.

 BeginnerFree