Doing Without Eyelets – 3 Ways to Finish a Drawstring Casing
Doing Without Eyelets – 3 Ways to Finish a Drawstring Casing
BeginnerFree
Translated
Doing Without Eyelets – 3 Ways to Finish a Drawstring Casing
I once created a thread about repairing a buttonhole where an eyelet had fallen out: https://komok.me/threads/chinim-trikotazh-obrabotka-otverstija-dlja-shnura.3482/#post-13110 But now for something a bit different – what if you don't have an eyelet at all? 😕 There are 3
Doing Without Eyelets – 3 Ways to Finish a Drawstring Casing
Drawstring Casing Without Eyelets
I once created a thread about repairing a buttonhole where an eyelet had fallen out:
But now for something a bit different – what if you don't have an eyelet at all? 😕 There are 3 alternative options for finishing a drawstring casing.
Option 1: Simply make machine-stitched buttonholes in place of eyelets.
From the wrong side, interface the area where the buttonholes will be located with any fusible interfacing.
Stitching the Future Buttonholes
Set your sewing machine to the required stitch size and work the future buttonholes using a special buttonhole foot. After pressing, cut open the buttonholes and thread the drawstring through. It's that simple )
Second Drawstring Casing Option
Option 2: Conceal the cord openings in vertical seams.
Mark lines on the waistband piece for an additional insert. Determine the desired width of the openings and the height at which they should be positioned. After that, you can stitch the insert into the waistband piece, leaving the openings for entering the drawstring casing unstitched – it's best to reinforce the top and bottom edges of the openings and additionally secure them with bartacks. After pressing open the seam allowances, topstitch on the right side 1-2 mm away from the seamline. Thread the cord through – and once again, you can easily do without eyelets 👌
Round Bound Buttonholes
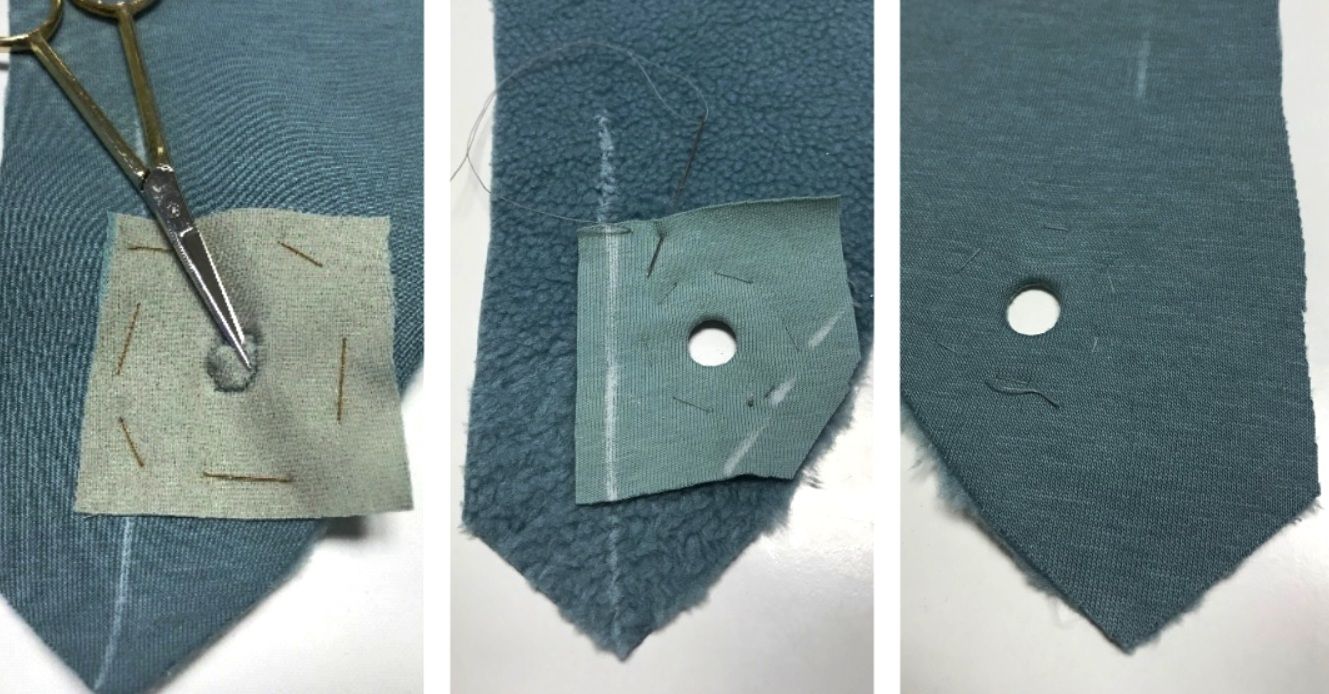
Option 3: Make round bound buttonholes.
A more labor-intensive option than the previous two, but it looks neat and is ideal if you have a bulky round cord rather than flat tape.
Mark the placement of the future buttonhole and mirror its placement onto the facing – place the facing right sides together with the main fabric. Stitch with the smallest stitch length along the marked circular outline.
Turning the Facing
Cut inside the circle, leaving a 2 mm seam allowance. Turn the facing to the wrong side with a 1 mm roll of the main fabric to the inside – baste and press. Trim the facing in visible areas and secure the edges by hand using a blind stitch.
Pressing the Finished Buttonhole
Press the finished buttonhole once more – a thick cord slips through it perfectly 👍
Photo Materials from vikisews.com
I hope someone finds these methods helpful )
Special thanks to vikisews.com for the photo materials!

 BeginnerFree