DIY Antoshka Baby Doll: A Tutorial with Patterns for the Doll and Its Clothes
A step-by-step tutorial for sewing the Antoshka baby doll: cut and sew the body pieces, stuff and cinch the arms, legs, and torso, reinforce the neck with a cardboard tube, attach the limbs with a hidden button-joint method, sew on the head with blind stitches, and sew the clothes from separate patterns with no seam allowances.
IntermediateFree
Translated
Things you will learn
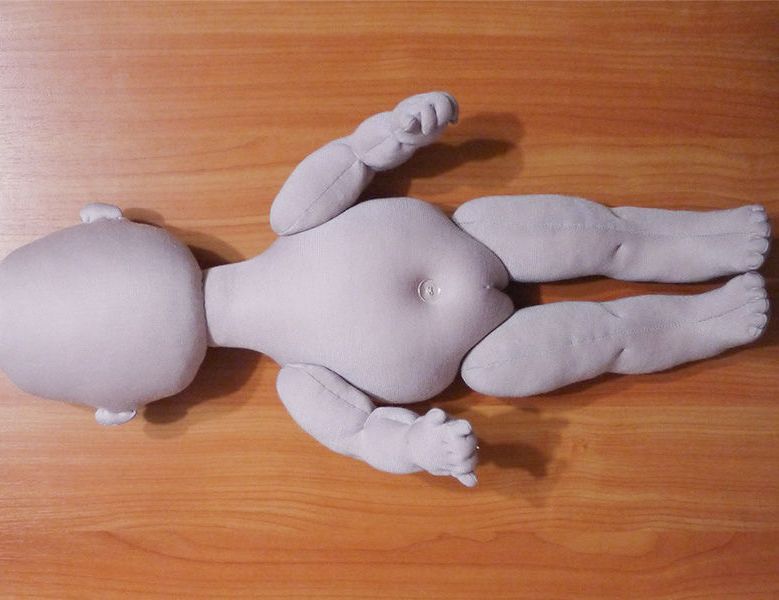
A doll sewn from these patterns stands 50 cm tall; in this example it's sewn from knit fabric, but the author recommends a non-stretch fabric instead, since knit stretches a lot and makes stuffing and stability harder.
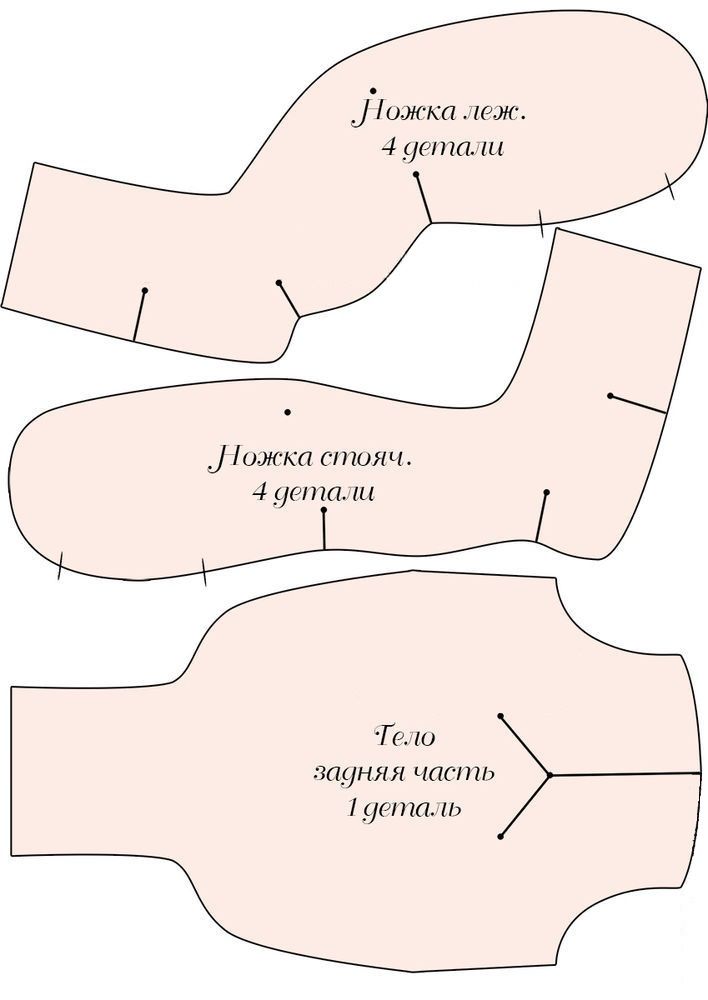
The pattern sheets offer two leg options — for a sitting doll and for a standing one; print the patterns on A4 paper at 100% scale.
Sew the pieces, leaving openings for turning and stuffing, clip the seam allowances at concave curves, and turn right side out; for knit fabric, finish the raw edges with a narrow zigzag or a serger.
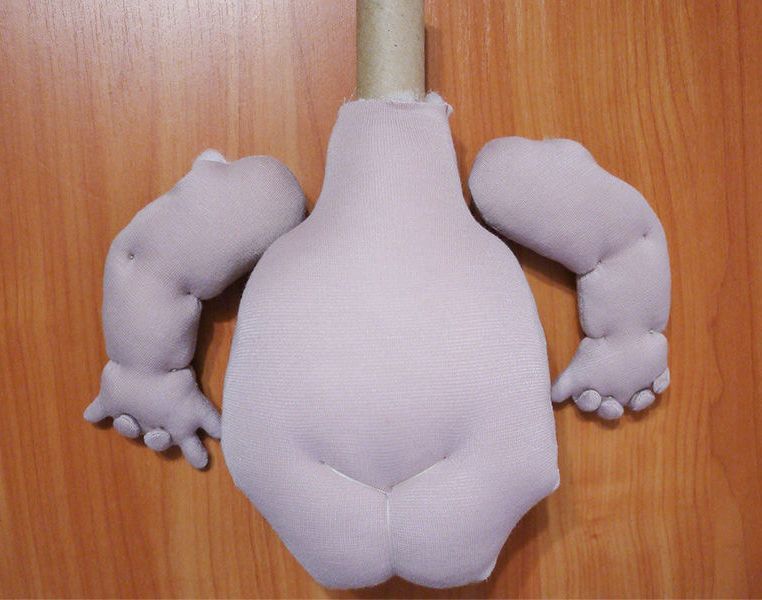
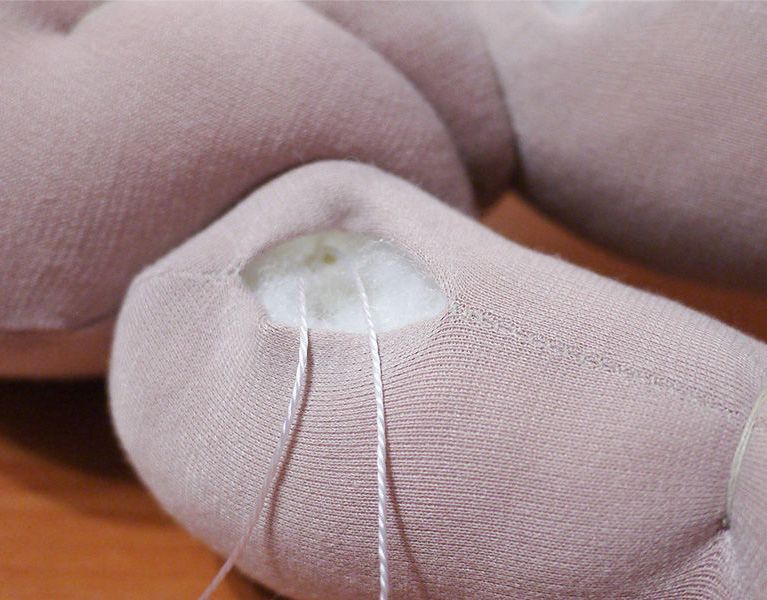
After stuffing, cinch the arms, legs, and torso at the points marked on the pattern; insert a cardboard tube into the neck for head stability.
The arms and legs attach with a hidden button-joint method (cotter pins work even better), the head is sewn on with blind stitches, and Antoshka's outfit is a knit undershirt and turtleneck, a corduroy jacket with a cotton chintz lining, and denim pants.
What you'll get
You'll get a 50 cm fabric baby doll with movable arms and legs on a hidden button joint, plus a complete outfit: underwear, a turtleneck, a jacket, and pants.
Materials and tools
Materials
Beige fabric, with a hint of pink or gray; a non-stretch fabric works better than knit
Needle and thread, needed for sewing the pieces together and attaching the limbs
Pins, needed to pin matching pairs of pieces together before cutting
Buttons, used for the hidden joint that attaches the arms and legs, and as a base for the eyes
Scissors, needed to cut out the pieces
Sewing machine, needed to sew the pieces
Polyester fiberfill or hollow-fiber stuffing, filling for stuffing the toy
Two small beads for the eyes, used for the doll's face
Tools
Cardboard tube, inserted into the neck for head stability
Cotter pins (optional), recommended for a more secure joint on the arms and legs, instead of a simple button attachment
Super glue, needed to secure the thread knot after attaching the limbs
Preparation
Gather the doll-making materials
Gather the beige fabric, needle, thread, pins, buttons, scissors, sewing machine, polyester fiberfill or hollow-fiber stuffing, two small beads for the eyes, and the materials for the clothes.
Print the pattern
Print the patterns on a regular printer, on A4 paper, at 100% scale. Note: the pattern sheets offer two leg options — for a sitting doll and for a standing one.
Cut and sew the body pieces
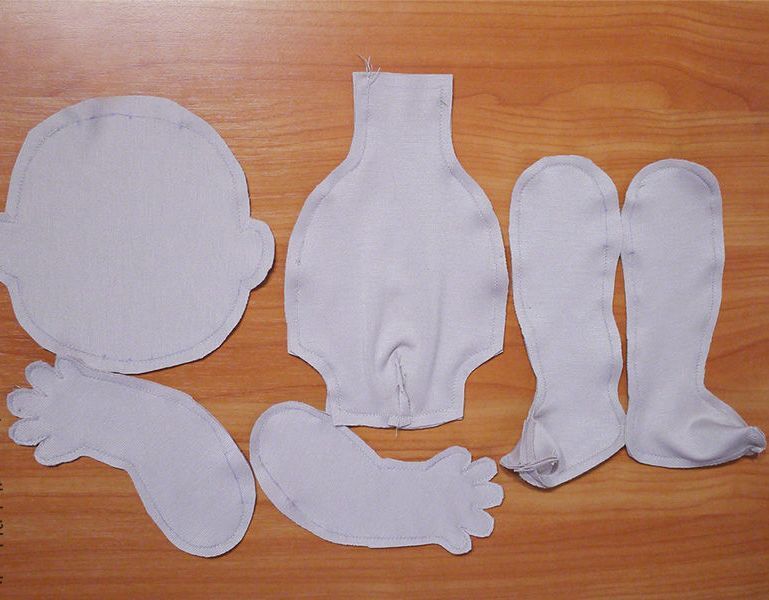
Trace the pieces onto fabric, sew them in matching pairs, and turn them right side out.
Trace the pieces and pin them in pairs
Trace the pieces from the pattern onto the fabric, and mark the seam allowances. Pin them together in matching pairs and cut them out.
Sew and turn the pieces
Sew the pieces, leaving small openings for turning and stuffing. For knit fabric, finish the raw edges with a narrow zigzag stitch or a serger. Clip the seam allowances at concave curves if needed. Turn the pieces right side out.
Stuff the pieces and add cinch stitches
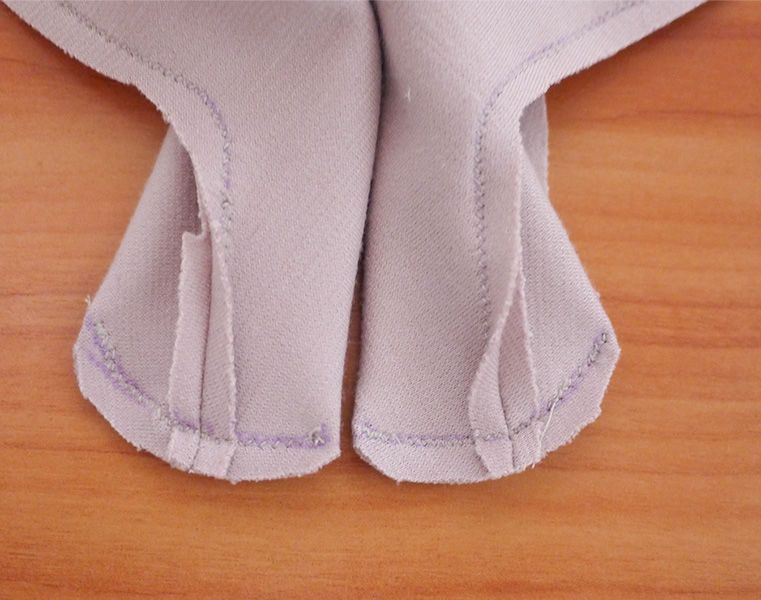
After stuffing, cinch stitches shape the joints at the arms, legs, and torso.
Stuff the pieces
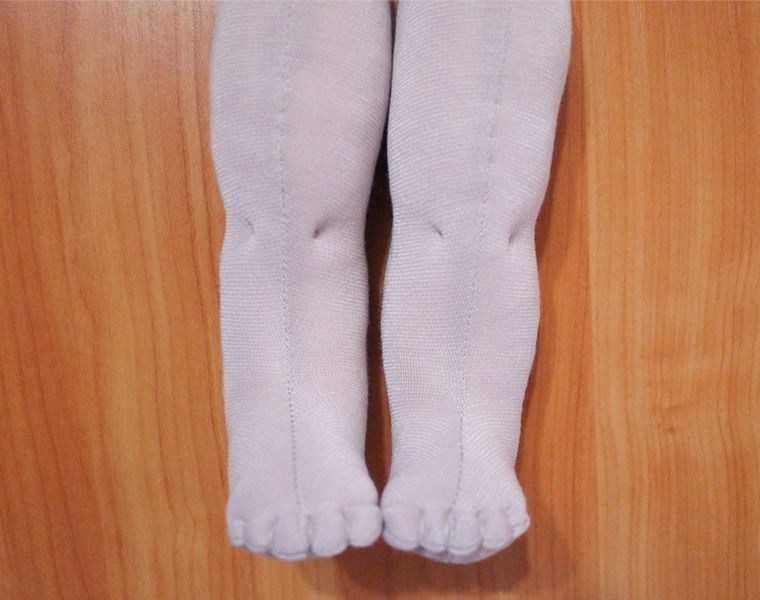
Stuff the pieces with polyester fiberfill or hollow-fiber stuffing, and add cinch stitches at the arms, legs, and torso — the cinching points are marked on the pattern.
Insert the tube into the neck
For head stability, insert a cardboard tube into the neck.
Attach the arms and legs
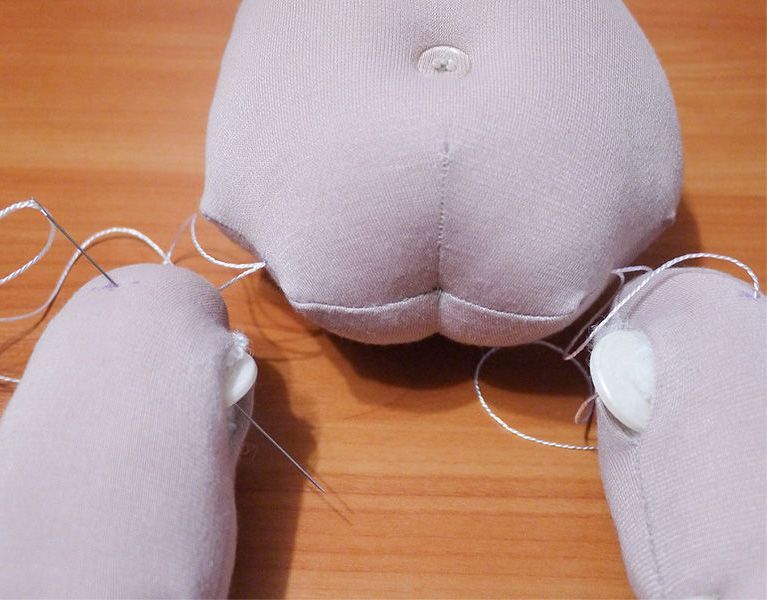
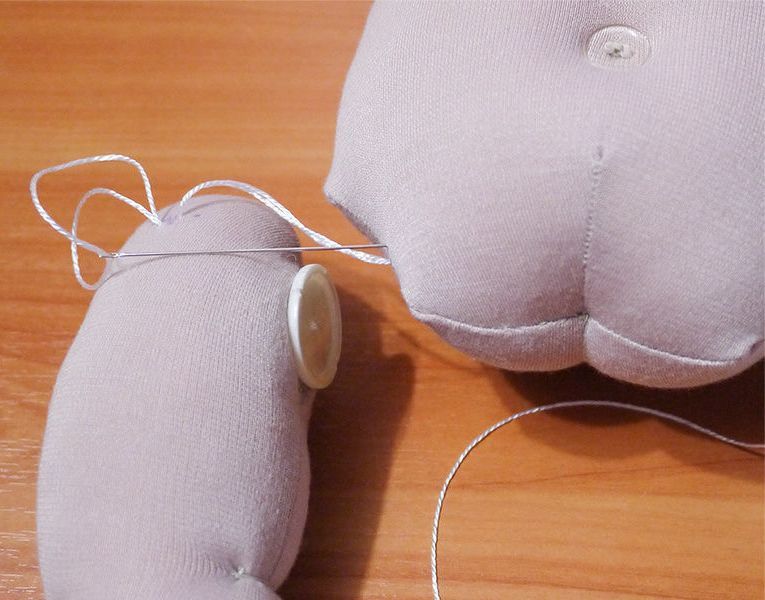
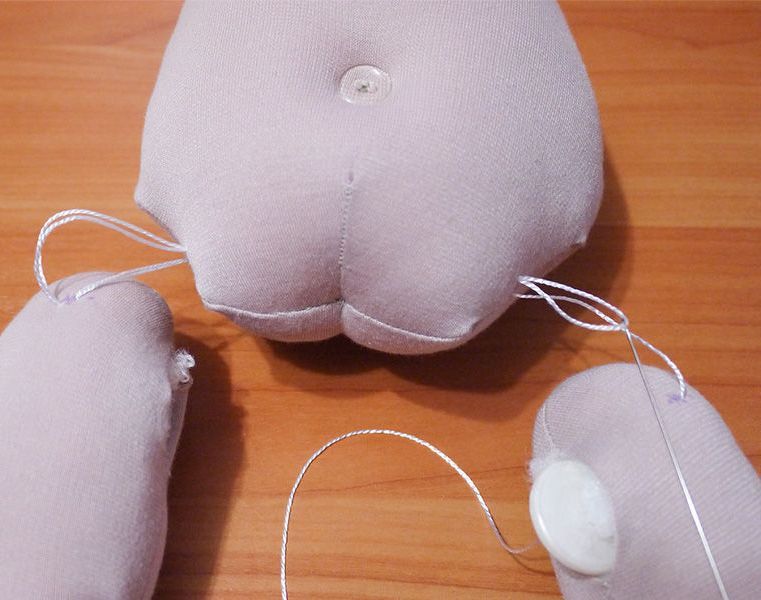
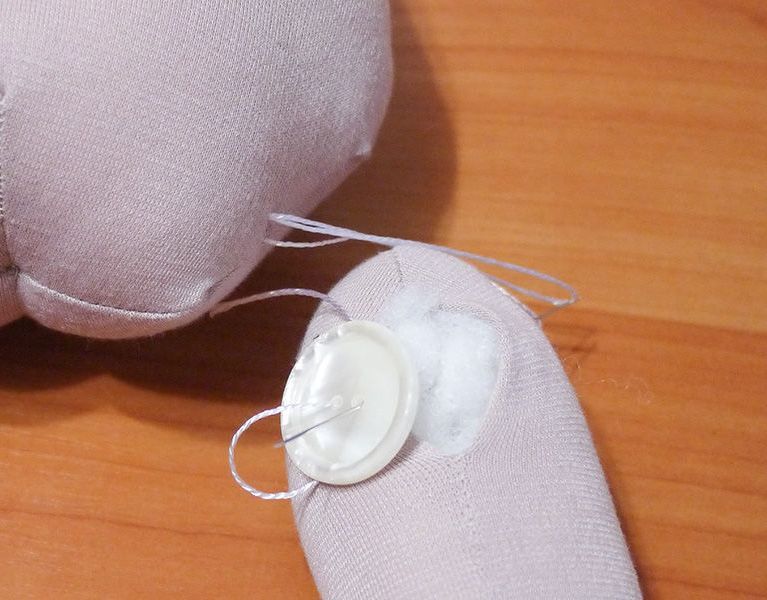
The limbs attach with a hidden button-joint method, ideally reinforced with cotter pins.
Attach the legs with a button joint
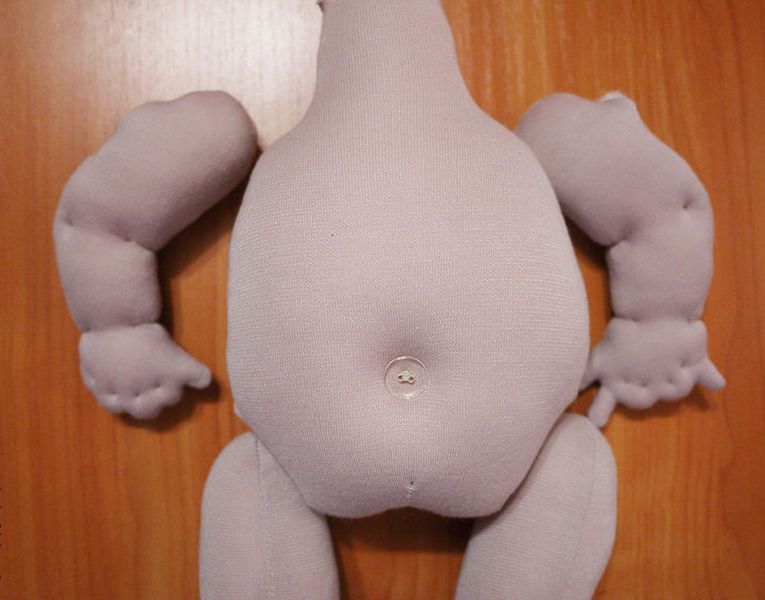
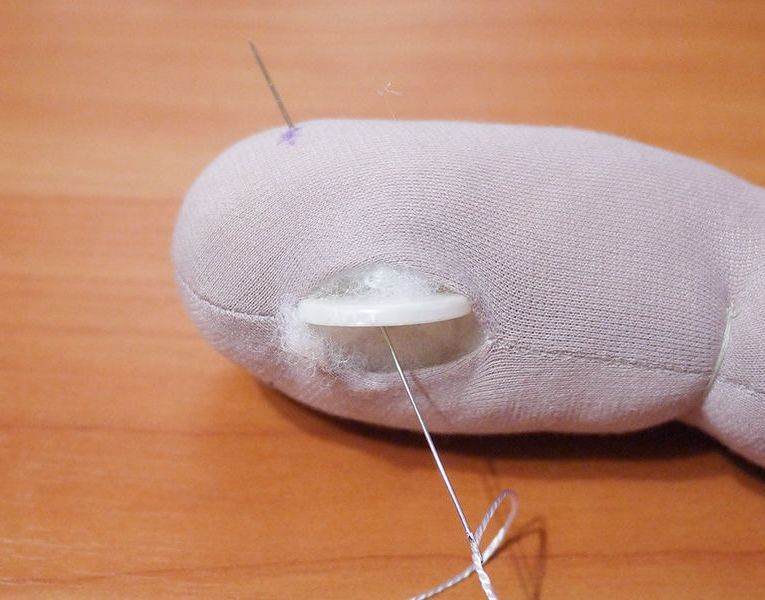
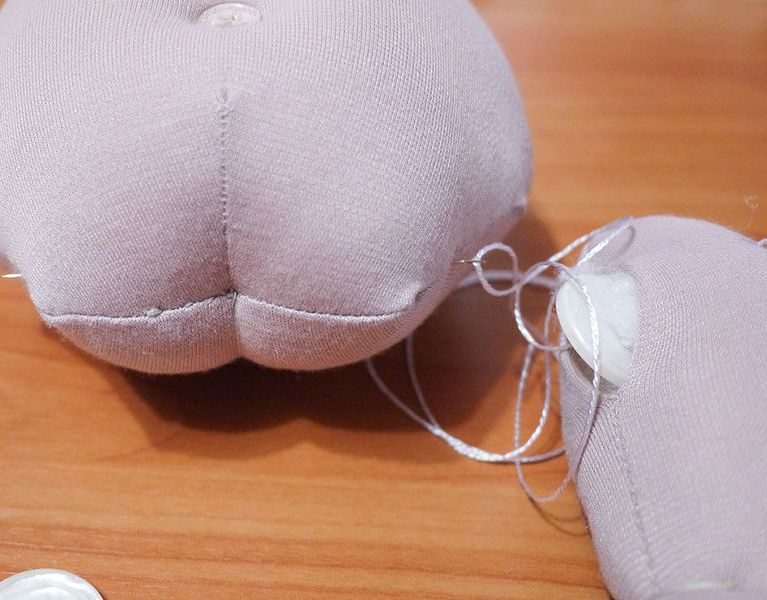
Place a button inside the leg and pass the needle through it from the inside. Bring the needle out through the body to the opposite side. Pass the needle into the second leg from the outside, catch the button, and bring the thread out from the inside. Bring the needle back to the first leg, and pass it through the outside into the button's second hole. Pull tight, tie off the thread inside, and secure the knot with super glue for extra durability.
Attach the arms the same way
Attach the arms using the same method. Tuck the thread ends inside and close the openings with blind stitches.
Sew on the head
The final stage in assembling the doll is attaching the head.
Cinch the ears and sew on the head
Cinch the ears, fit the head onto the neck with its tube, and sew it on with blind stitches.
Finish the doll's face
Just a few final touches give the doll its finished look.
Sew on the eyes and add blush
Sew on the button eyes and add some blush — and the baby doll is done.
Sew Antoshka's clothes
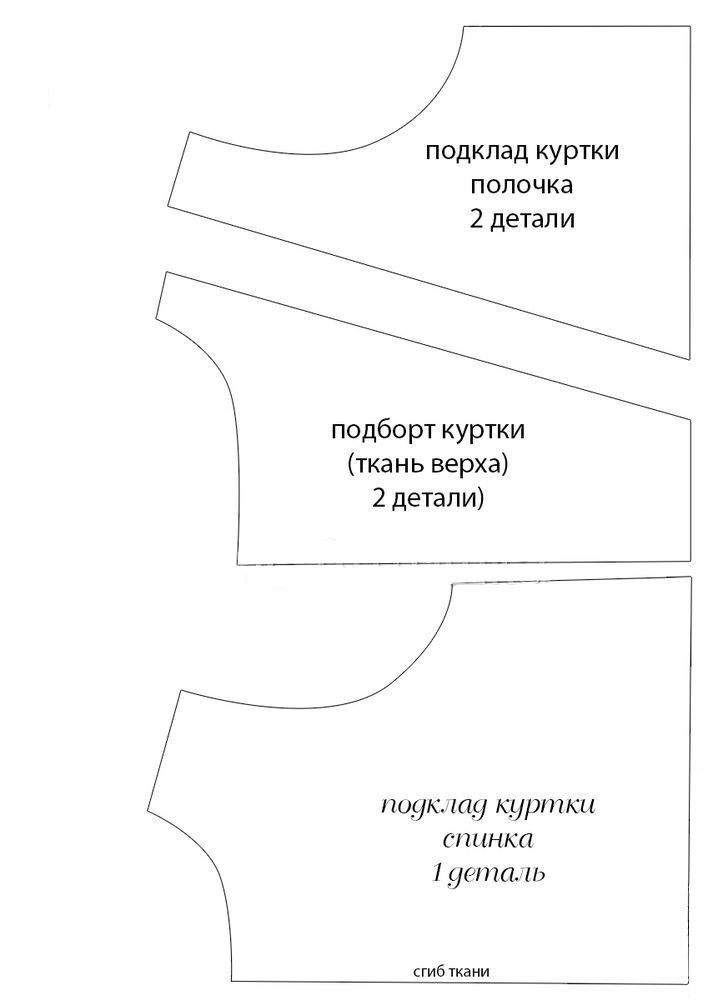
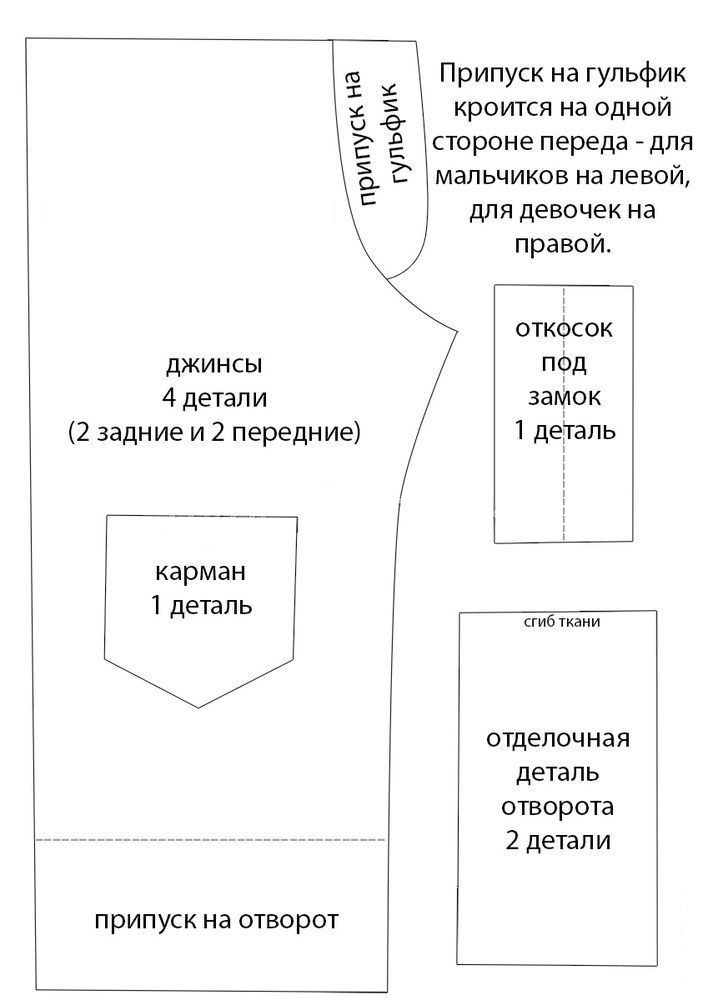
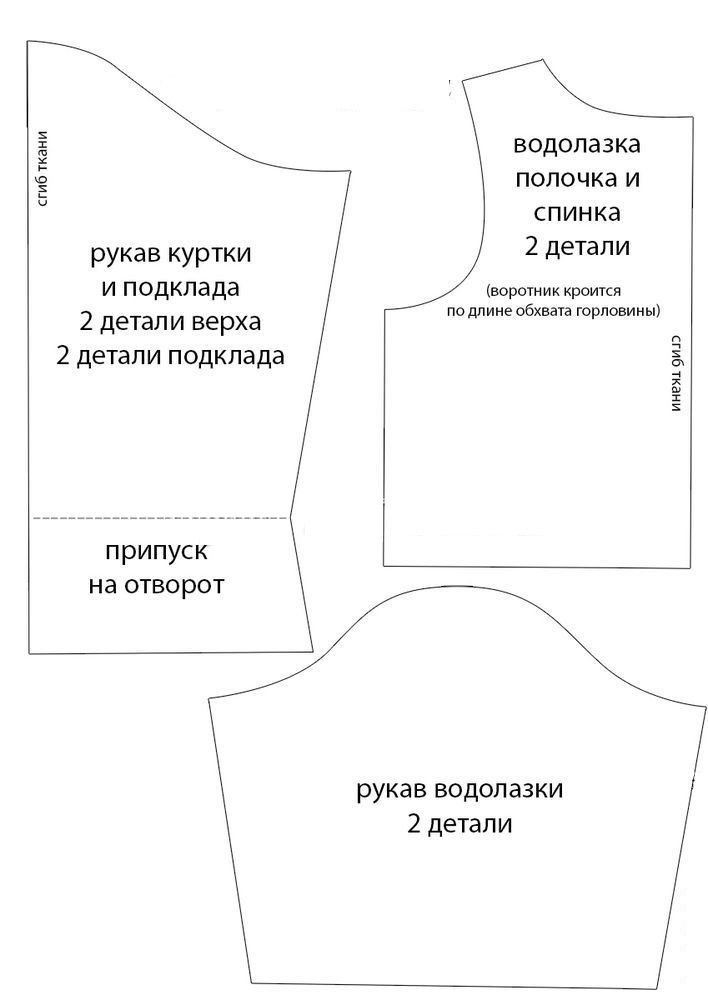
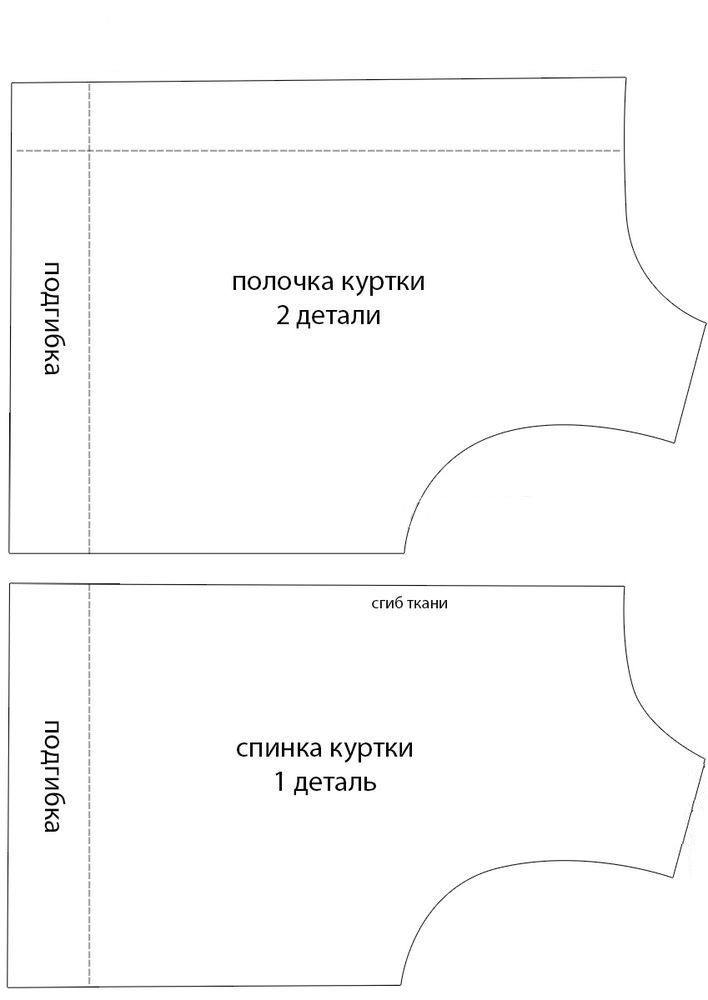
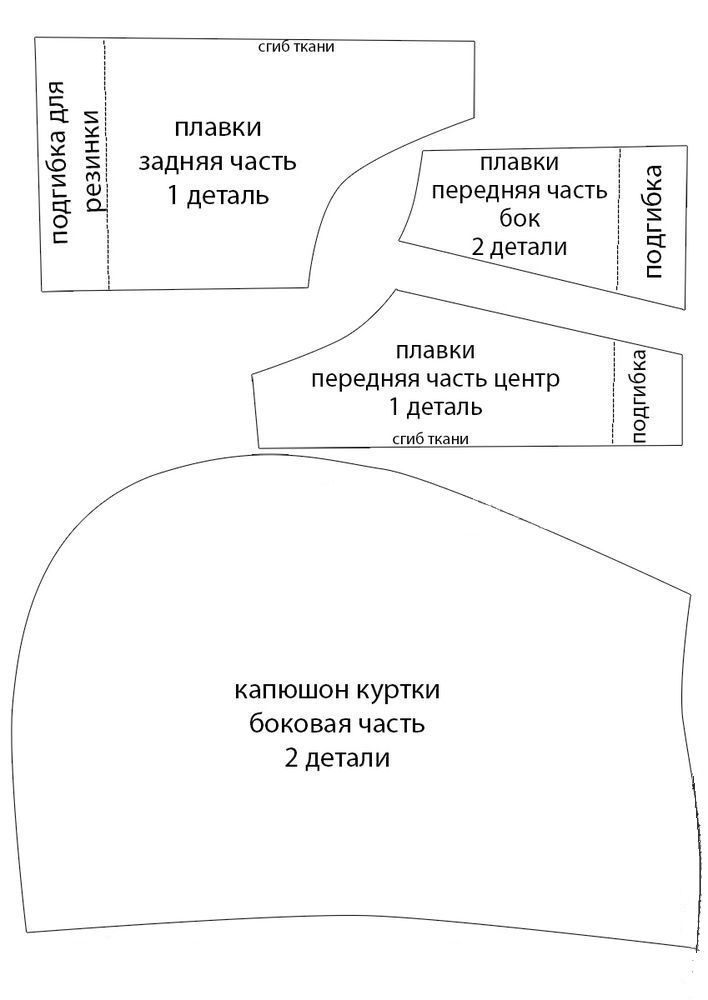
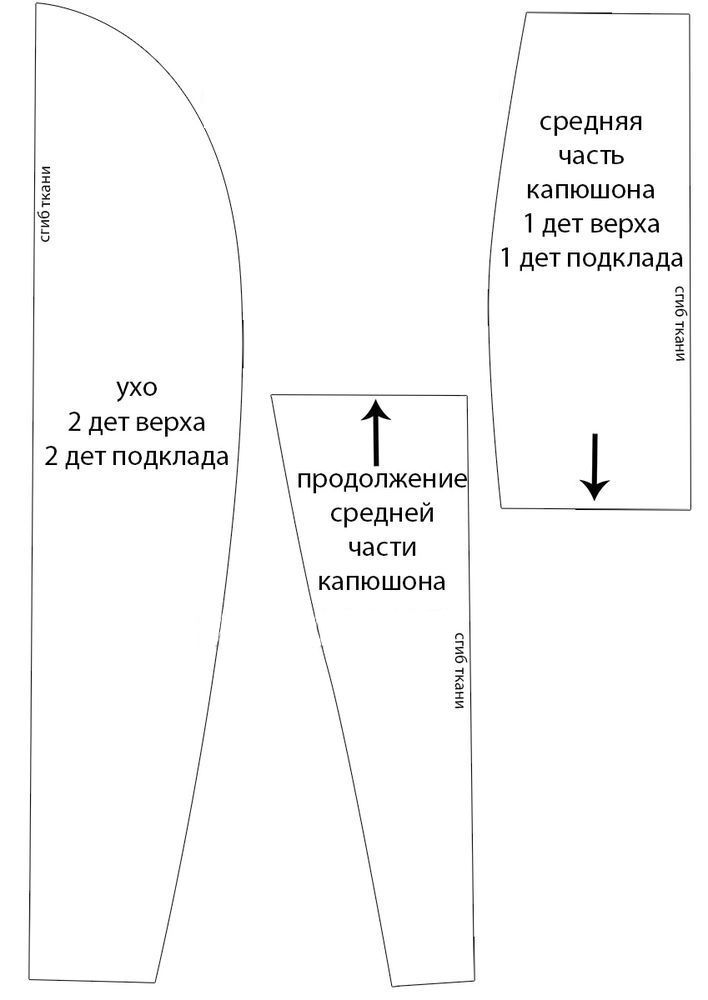
Antoshka wears underwear, a turtleneck, a jacket, and pants — each cut from its own pattern with no seam allowances.
Sew the underwear and turtleneck
Sew the underwear and turtleneck from knit fabric, following the included patterns.
Sew the jacket and pants
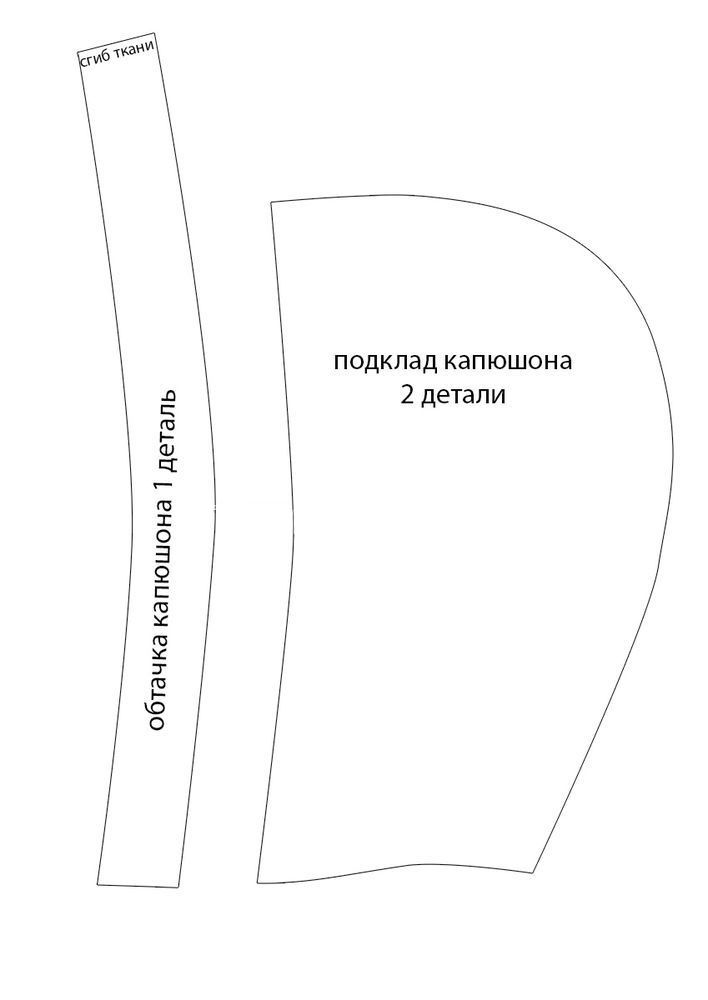
Sew the jacket — corduroy on the outside, with a cotton chintz lining — and the pants from denim fabric, following the included patterns.
Finish and variations
Finish
Dress your finished baby doll
You can dress the finished Antoshka baby doll in its sewn outfit — underwear, turtleneck, jacket, and pants — and it's ready to play with or give as a gift.
Variations
Sitting or standing leg option
The patterns offer two leg options — pick the sitting or standing version depending on how you plan to use the doll.
After firm stuffing, the doll looks disproportionately plump.
Likely cause
The fabric is a stretchy knit, and firm stuffing overstretches it.
How to fix it
Use a non-stretch fabric instead of knit — that way stuffing won't overstretch the material and the doll keeps its intended proportions.
The doll can't stand well on its feet
Problem
The finished knit-fabric doll can't stand steadily.
Likely cause
The legs weren't stuffed firmly enough to compensate for the knit's stretchiness.
How to fix it
If you're using knit fabric, stuff the legs as firmly as possible, or switch to a non-stretch fabric — either way makes the doll stand more steadily.
The doll's head wobbles or doesn't hold steady
Problem
After sewing it on, the doll's head sits unsteadily on the neck.
Likely cause
A cardboard tube wasn't inserted into the neck before attaching the head.
How to fix it
Always insert a cardboard tube into the neck before fitting on and sewing the head — this gives it stability.
The button joint on the arms or legs loosens over time
Problem
The hidden button joint on the limbs loosens over time.
Likely cause
The thread knot inside wasn't reinforced, or a simple button joint was used without cotter pins.
How to fix it
Secure the thread knot with super glue for extra durability, and if you want a sturdier result, attach the limbs with cotter pins instead of a plain button joint.
?FAQ
What fabric works best for the baby doll?
The author recommends a non-stretch fabric rather than knit — knit stretches a lot and makes stuffing and stability harder.
How tall is the finished doll?
A doll sewn from these patterns stands 50 cm tall.
Why insert a cardboard tube into the neck?
For head stability, before fitting the head onto the body and sewing it on.
How do the doll's arms and legs attach?
With a hidden button-joint method: a button goes inside the limb, and thread is pulled tight through the body and the opposite limb; cotter pins give an even more secure result.
What clothes come with the Antoshka baby doll?
Underwear and a turtleneck made from knit fabric, a corduroy jacket with a cotton chintz lining, and denim pants.
Your project
Log in to track your project, attach photos, and publish your result into the shared feed.
 IntermediateFree