A step-by-step crochet pattern for a Chibi Fox amigurumi: prepare orange, peach, brown, and white yarn; crochet the head, white muzzle, orange cap with muzzle overlay, two ears, body, white tail overlay, and tail; then embroider the details and assemble the toy.
IntermediateFree
Translated
Things you will learn
You will need orange, peach, brown, and white yarn, a No. 2.0-2.5 hook, markers, fiberfill, black embroidery thread, and a tapestry needle.
The head and cap are worked up to 54 stitches, and the muzzle overlay on the cap continues in turned rows.
The ears are made as two pieces: start with brown yarn, then switch to orange.
The tail consists of an orange main piece and a white overlay that is slipped onto the tail and sewn on with invisible stitches.
The discussion notes that several body rows may be missing from the translated source pattern; the exact missing rows were not identified.
What you will make
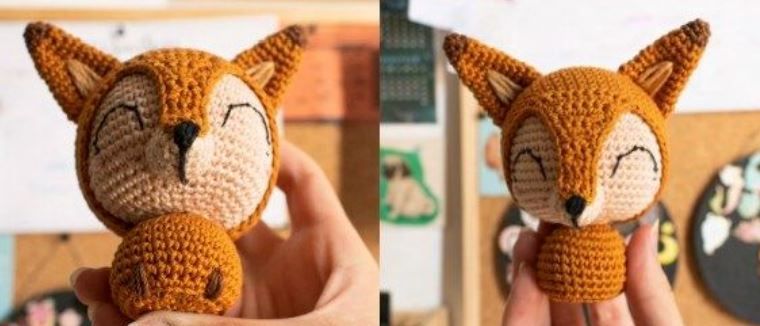
You will make a crocheted Chibi Fox. The source shows a version with a long tail, embroidered eyes and nose; the tail can be connected to the body with split metal rings.
Materials and tools
Materials
Yarn, orange, peach, brown, and white
Fiberfill, for stuffing the head, body, and tail
Black embroidery thread, for the eyes and nose
Split metal rings, optional, for connecting the tail and body
Tools
No. 2.0-2.5 crochet hook, hook size from the source pattern
Stitch markers, for tracking rounds and the beginning of the round
Tapestry needle, for sewing the parts together with invisible stitches
Files and resources
Alternate pattern translationLink from the discussion: it was suggested after users reported that the body stitch counts did not work and suspected missing rows in the translation.
Preparation
Check the abbreviations
The pattern uses: sc - single crochet, inc - increase, dec - decrease, ch - chain stitch, sl st - slip stitch, hdc - half double crochet, dc - double crochet, and a stitch with 4 yarn overs for the tallest stitches in the tail overlay.
Check the body pattern before assembly
Several commenters say the body stitch counts do not work and that the translation may be missing rows. The exact missing rows are not named in the discussion.
Head, muzzle, and cap
The head is crocheted with peach yarn and stuffed as you work. The white muzzle and orange cap are made separately.
Crochet the head with peach yarn
Work with peach yarn and add fiberfill as you crochet. Rnd 1: 6 sc in an amigurumi ring = 6. Rnd 2: inc x 6 = 12. Rnd 3: (1 sc, inc) x 6 = 18. Rnd 4: (2 sc, inc) x 6 = 24. Rnd 5: (3 sc, inc) x 6 = 30. Rnd 6: (4 sc, inc) x 6 = 36. Rnd 7: (5 sc, inc) x 6 = 42. Rnd 8: 42 sc = 42. Rnd 9: (6 sc, inc) x 6 = 48. Rnd 10: 48 sc = 48. Rnd 11: (7 sc, inc) x 6 = 54. Rnds 12-20: 54 sc = 54. Rnd 21: (7 sc, dec) x 6 = 48. Rnd 22: 3 sc, dec, (6 sc, dec) x 5, 3 sc = 42. Rnd 23: (5 sc, dec) x 6 = 36. Rnd 24: 2 sc, dec, (4 sc, dec) x 5, 2 sc = 30. Rnd 25: (3 sc, dec) x 6 = 24. Rnd 26: 1 sc, dec, (2 sc, dec) x 5, 1 sc = 18. Rnd 27: (1 sc, dec) x 6 = 12. Fasten off and cut the yarn, leaving a long tail for sewing.
The head, white muzzle, and orange cap form the fox face.
Crochet the white muzzle
Work with white yarn. Rnd 1: 6 sc in an amigurumi ring = 6. Rnd 2: (1 sc, inc) x 3 = 9. Rnd 3: 2 sc, inc, 1 sc, 2 inc, 1 sc, inc, 1 sc = 13. Rnd 4: 13 sc = 13. Rnd 5: 9 sc, dec, 2 sc = 12. Fasten off and cut the yarn, leaving a long tail for sewing.
Crochet the top of the cap
Work with orange yarn. Rnd 1: 6 sc in an amigurumi ring = 6. Rnd 2: inc x 6 = 12. Rnd 3: (1 sc, inc) x 6 = 18. Rnd 4: (2 sc, inc) x 6 = 24. Rnd 5: (3 sc, inc) x 6 = 30. Rnd 6: (4 sc, inc) x 6 = 36. Rnd 7: (5 sc, inc) x 6 = 42. Rnd 8: 42 sc = 42. Rnd 9: (6 sc, inc) x 6 = 48. Rnd 10: 48 sc = 48. Rnd 11: (7 sc, inc) x 6 = 54. Rnds 12-20: 54 sc = 54.
Continue the muzzle overlay in turned rows
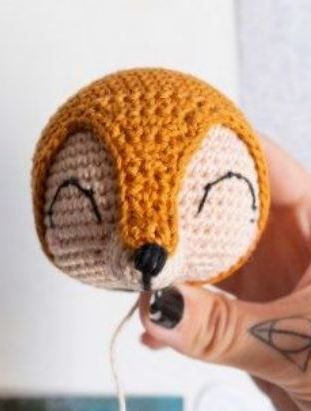
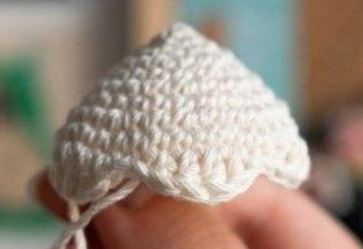
Next, work the muzzle overlay in turned rows. Row 21: 10 sc, 1 ch, turn. Row 22: dec, 6 sc, dec = 8; 1 ch, turn. Row 23: 8 sc = 8; 1 ch, turn. Row 24: dec, 4 sc, dec = 6; 1 ch, turn. Row 25: 6 sc; 1 ch, turn. Row 26: dec, 2 sc, dec = 4; 1 ch, turn. Row 27: 4 sc = 4; 1 ch, turn. Row 28: 2 dec; 1 ch, turn. Rows 29-31: 2 sc = 2. Place the muzzle overlay against the head and check the length. If it fits properly, make the final decrease: Row 32: dec.
Row 25 stitch count
The source lists row 25 as “6 sc (= 8)”. After row 24 there are 6 stitches, so this translation preserves the action “6 sc” without adding unlisted increases.
Edge the cap, embroider the face, and sew the parts on
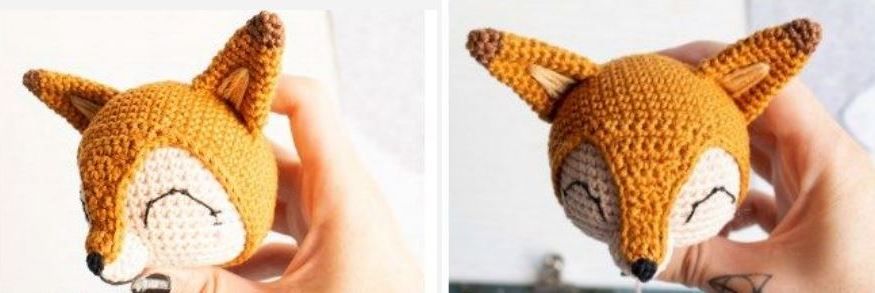
Rnd 33: join the yarn to round 20 to edge the cap and work: 9 sc, dec, 4 sc, dec, 8 sc, dec, 4 sc, dec, 3 sc, dec, 4 sc. Then edge the muzzle overlay with single crochet up to the tip of the nose. Before putting the cap on, embroider the eyes with black thread. Then place the cap on the head, fix it in the correct position, and sew it on with invisible stitches. Embroider the nose with black thread.
The cap is fixed to the head with invisible stitches, then the nose is embroidered.
Ears and body
The ears are made as two pieces with a color change. The body is preserved from the source pattern, with the discussion warning kept next to it.
Crochet two ears
Make two pieces. Start with brown yarn. Rnd 1: 4 sc in an amigurumi ring = 4. Rnd 2: (1 sc, inc) x 2 = 6. Rnd 3: (inc, 1 sc) x 3 = 9; on the last sc, change to orange yarn. Rnd 4: 9 sc = 9. Rnd 5: (2 sc, inc) x 3 = 12. Rnds 6-7: 12 sc = 12. Rnd 8: (3 sc, inc) x 3 = 15. Rnds 9-10: 15 sc = 15. Rnd 11: (4 sc, inc) x 3 = 18. Rnd 12: (5 sc, inc) x 3 = 21. Fasten off and cut the yarn, leaving a long tail for sewing.
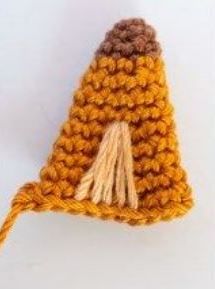
Five peach stitches are embroidered inside each ear.
Embroider the inside of the ears
On the inside of each ear, make five peach yarn stitches as shown in the photo.
Crochet the body from the source pattern
Work with orange yarn and add fiberfill as you crochet. Rnd 1: 6 sc in an amigurumi ring = 6. Rnd 2: inc x 6 = 12. Rnd 3: inc x 12 = 24. Rnd 4: (2 sc, inc) x 8 = 32. Rnd 5: 32 sc = 32. Rnd 6: (8 sc, dec) x 8 = 24. Rnd 7: dec x 12 = 12. Embroider the paws with brown yarn and sew the body to the head.
The discussion includes a warning about possible missing rows in the body pattern.
Known source issue
In the discussion, users wrote that the body stitch counts do not work and that the translation probably missed several rows. The exact rows are not given, so no invented corrections were added here.
Tail and assembly
The tail is made from a white overlay and an orange piece. The metal rings are optional.
Crochet the white tail overlay
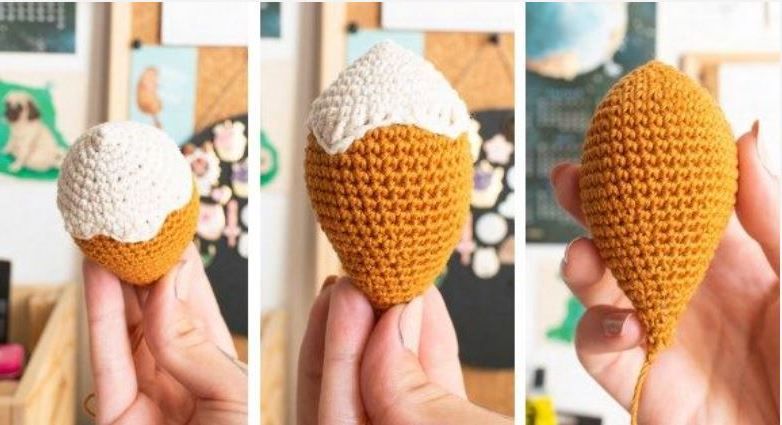
Work with white yarn. Rnd 1: 4 sc in an amigurumi ring = 4. Rnd 2: (1 sc, inc) x 2 = 6. Rnd 3: inc x 6 = 12. Rnd 4: (1 sc, inc) x 6 = 18. Rnd 5: 18 sc = 18. Rnd 6: (1 sc, inc) x 9 = 27. Rnd 7: 27 sc = 27. Rnd 8: (2 sc, inc) x 9 = 36. Rnd 9: 36 sc = 36. Rnd 10: 2 hdc, 4 dc, 1 hdc, 1 sc, sl st, 1 hdc, dc, 2 stitches with 4 yarn overs, dc, hdc, 3 sl st, 2 hdc, 2 dc, 1 hdc, 2 sl st, dc, 2 stitches with 4 yarn overs, dc, 2 sl st, 1 hdc, dc, stitch with 4 yarn overs, dc, hdc, sl st = 36. Fasten off and cut the yarn, leaving a long tail for sewing.
The white overlay is slipped onto the orange tail and sewn on.
Crochet the orange tail
Work with orange yarn and add fiberfill as you crochet. Rnd 1: 4 sc in an amigurumi ring = 4. Rnd 2: (1 sc, inc) x 2 = 6. Rnd 3: inc x 6 = 12. Rnd 4: (1 sc, inc) x 6 = 18. Rnd 5: 18 sc = 18. Rnd 6: (1 sc, inc) x 9 = 27. Rnd 7: 27 sc = 27. Rnd 8: (2 sc, inc) x 9 = 36. Rnds 9-16: 36 sc = 36. Rnd 17: (4 sc, dec) x 6 = 30. Rnd 18: 30 sc = 30. Rnd 19: (3 sc, dec) x 6 = 24. Rnds 20-21: 24 sc = 24. Rnd 22: (2 sc, dec) x 6 = 18. Rnd 23: 18 sc = 18. Rnd 24: (1 sc, dec) x 6 = 12. Rnds 25-26: 12 sc = 12. Rnd 27: dec x 6 = 6. Rnd 28: 6 sc = 6.
The tail is crocheted separately, stuffed, and finished with the white overlay.
Slip on and sew the white overlay
Slip the white overlay onto the tail and sew it in place with invisible stitches.
Connect the tail and body
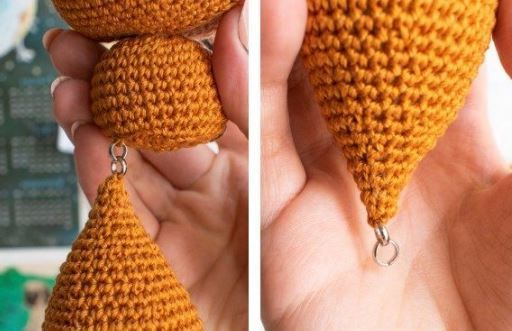
If you use metal rings, pass the tail yarn through the ring before fastening it off, then close and secure it. Attach the second ring to the body and connect the pieces. The toy is finished.
The rings are optional and can be used to connect the tail and body.
Finish and variations
Finish
Check the face
The eyes should be embroidered before the cap is placed on the head, and the nose should be embroidered with black thread after the cap is fixed in place.
Check the tail
The white overlay should be slipped onto the orange tail and sewn with invisible stitches; use the rings only if you chose that attachment method.
Variations
With or without rings
The metal rings are optional. If you do not use them, assemble the parts in the usual way with invisible stitches.
Reader-made toy
The discussion includes a photo of a finished reader project. It confirms that the toy was made from the pattern, but it does not correct the disputed body rows.
After the body rounds, the stitch count or the height of the piece does not match what you expect.
Likely cause
The discussion says this is a translation and that several body rows may be missing.
How to fix it
Do not add rows at random. Compare the body with the alternate translation from the discussion or make a test body first, because the exact missing rows are not identified in the comments.
The cap muzzle overlay does not fit the head
Problem
The orange overlay is longer or shorter than the area it should cover on the head.
Likely cause
Your gauge is different, or row 25 with the disputed count was read as an increase row.
How to fix it
After rows 29-31, place the overlay on the head and check the length as the source instructs. Work the final decrease of row 32 only if everything fits properly.
Round 10 of the white overlay is hard to follow
Problem
It is easy to lose your place in round 10 of the white overlay because it mixes half double crochet, double crochet, and stitches with 4 yarn overs.
Likely cause
The row contains a long sequence of different stitches without an additional chart.
How to fix it
Use a marker and check the sequence group by group. At the end of the round, the source description should still give 36 stitches.
The head, body, or tail loses its shape
Problem
The pieces look flat or skewed.
Likely cause
The stuffing was added too late or distributed unevenly.
How to fix it
The source asks you to stuff the head, body, and tail as you crochet. Add fiberfill gradually and distribute it before closing the openings.
The tail is hard to connect with rings
Problem
The ring does not hold inside the tail or the connection looks unreliable.
Likely cause
The yarn was fastened off before it was passed through the ring.
How to fix it
If you use rings, first pass the tail yarn through the ring, then close and secure it. Attach the second ring to the body.
?FAQ
What yarn do I need for the fox?
The source lists yarn in four colors: orange, peach, brown, and white.
What hook should I use?
The source specifies a No. 2.0-2.5 crochet hook.
Are the metal rings required?
No. They are listed as optional. If you use rings, pass the tail yarn through the ring before fastening it off completely.
What should I do if the body does not work out?
This is a known issue from the discussion: users wrote that rows may be missing from the translation. The exact rows are not named, so it is safer to compare the body with the alternate translation linked in the discussion.
When should I embroider the eyes and nose?
Embroider the eyes with black thread before placing the cap on the head. After the cap is placed, fixed, and sewn on, embroider the nose with black thread.
Your project
Log in to track your project, attach photos, and publish your result into the shared feed.

 IntermediateFree