Women’s knitted neck warmer for beginners: 2 methods
Two ways to knit a women’s neck warmer: stockinette with raglan increases and 2 x 2 ribbing with a rounded lower edge, including stitch calculations, photos, and a video.
BeginnerFree
Translated
Things you will learn
The neck warmer is knitted in the round on size N3 circular needles, with no seaming.
For the stockinette version, the calculation starts with 82 stitches: after setting aside 4 raglan stitches, 78 stitches remain to be divided into 3 parts.
For the 2 x 2 ribbed version, cast on a stitch count divisible by 4.
If you need a fastening, decide that before you start: the original instructions are for a seamless neck warmer that slips over the head.
What you’ll make
The result is a practical neck warmer for cold weather: it covers the neck, works well under a coat or jacket with a V-neck opening, and can replace a scarf. The source gives two methods: a smoother stockinette version with raglan increases, and a 2 x 2 ribbed version with a rounded lower edge.
Materials and tools
Materials
Medium-weight yarn, 100 g, wool or wool blend; if your skin is sensitive, use a soft acrylic
Tools
Size N3 circular needles with a cable, the main tool for knitting in the round
Needle for binding off, for a neat, elastic edge in the 2 x 2 ribbed version
If you want clean raglan lines, use the stockinette version. If you prefer a rounded lower edge and the texture of ribbing, choose the 2 x 2 version.
Decide on any fastening before you start
Both methods in the source are knitted in the round and pulled on over the head. The discussion notes that a fastening may be needed for someone with a high hairstyle, but this master class does not include calculations for one.
Measurements, materials, and chart
Before you begin, compare the desired size with the source chart and prepare your yarn and needles.
Check the size chart
The source chart gives approximate measurements: neckline width 20-22 cm, total height 36-39 cm, and lower edge 52-56 cm. Use these numbers as a guide for your calculations and adjust the collar height to your own measurements.
Chart measurements: neckline 20-22 cm, height 36-39 cm, lower edge 52-56 cm.
Prepare the yarn and needles
Take 100 g of medium-weight yarn: wool or a wool blend. If your skin is very sensitive, use a soft acrylic. Knit in the round on size N3 circular needles with a cable, without seaming afterward.
Method 1: stockinette with raglan increases
This version begins with a 1 x 1 ribbed collar, then the lower section widens with raglan increases.
Knit the collar in 1 x 1 ribbing
Cast on 82 stitches on circular needles and work 18 cm in 1 x 1 ribbing. This makes a fold-over collar; if that height is too much for your measurements, knit a shorter collar.
Divide the stitches for the raglan lines
Subtract 4 raglan-line stitches from the total of 82 stitches. This leaves 78 stitches: divide 78 by 3 to get 26. Use 26 stitches plus 1 raglan stitch for the back, 26 stitches plus 1 raglan stitch for the front, and 13 stitches for each side section.
Check the calculation
If you change the cast-on number, first subtract the 4 raglan stitches, then divide the remaining stitches.
Knit the lower section with increases
Work the lower section in stockinette. On both sides of the central raglan stitch, increase by 1 knit stitch on every second row.
Stockinette version with raglan shaping.
Finish with garter stitch
When the lower section reaches 15 cm in height, switch to garter stitch, work 4 rows, and bind off all stitches.
Method 2: 2 x 2 ribbing with a rounded lower edge
This method is also suitable for beginners: the upper part is worked in ribbing, and the rounded shape is created by gradual increases in the lower section.
Cast on a multiple of 4 stitches
Cast on a stitch count divisible by 4 on circular needles. Work the upper section in 2 x 2 ribbing to the height you need; the collar can be folded over or left unfolded.
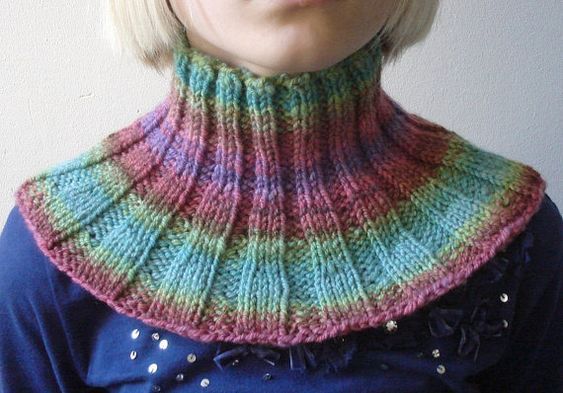
Example of the 2 x 2 ribbed version with a rounded lower edge.
Start widening the lower section
Round 1: k2, p2, k2, knit one additional stitch from the last stitch, p2. Repeat this pattern repeat to the end of the round.
Round 2 and all even-numbered rounds: work the stitches as they appear.
Work the odd-numbered rounds from the instructions
Round 3: k2, p2, k3, p2.
Round 5: k2, knit one additional stitch from the second stitch, p2, k3, p2. Repeat the pattern repeat.
Round 7: work the stitches as they appear.
Round 9: k3, p2, make 1 purl increase, k3, p2.
Round 11: work the stitches as they appear.
Round 13: k3, p3, k3, p2, make 1 purl increase.
Round 15: work the stitches as they appear.
Continue the increases and bind off
Continue making increases in the same way on every 4th round. When the neck warmer measures 15 cm from the neckline, bind off all stitches. It is best to bind off with a needle so the edge stays neat and elastic.
Finish and variations
Finish
Elastic lower edge
For the 2 x 2 ribbed version, binding off with a needle helps keep the edge even and stretchy. For the stockinette version, work 4 rows of garter stitch before binding off.
Variations
Solid, marled, or self-striping yarn
You can knit the neck warmer from a solid yarn. Marled or self-striping yarn makes the accessory brighter and helps it coordinate with clothing in different colors.
The finished neck warmer needs to go on without ruining the wearer’s hairstyle.
Likely cause
The described versions are knitted in the round without a fastening.
How to fix it
Decide before you begin. If you need a fastening, that is a different construction: the source master class does not include calculations for a button band, buttons, or an opening.
The 2 x 2 rib repeat stops lining up
Problem
The lower section no longer follows the rib pattern.
Likely cause
The cast-on stitch count is not divisible by 4.
How to fix it
For the 2 x 2 ribbed version, start with a stitch count divisible by 4, and work the even-numbered rounds as the stitches appear.
The raglan division does not add up
Problem
The front, back, and side sections end up with the wrong number of stitches.
Likely cause
The 4 raglan-line stitches were not subtracted before dividing.
How to fix it
For a cast-on of 82 stitches, first subtract the 4 raglan stitches: 82 - 4 = 78. Then divide 78 by 3: 26 stitches each for the front and back, and 13 stitches for each side section.
The collar comes out too high
Problem
The 18 cm height does not match your measurements or feels awkward under outerwear.
Likely cause
The 18 cm in the source is for a fold-over collar.
How to fix it
Knit a shorter collar if you do not want a fold-over edge or if your measurements call for less height.
The lower edge pulls in the ribbing
Problem
After binding off, the edge loses its stretch.
Likely cause
The stitches were bound off too tightly in the usual way.
How to fix it
For the 2 x 2 ribbed version, bind off with a needle: the source specifically recommends this method for a neat, elastic edge.
?FAQ
How much yarn do I need for a women’s neck warmer?
The source lists about one 100 g skein of medium-weight yarn.
What needles do I need for this neck warmer?
You need size N3 circular needles with a cable, because both versions are knitted in the round.
Do I need to sew the neck warmer after knitting?
No. The source instructions state that the piece does not need to be sewn: it is knitted in the round.
How do I divide 82 stitches for the stockinette version?
Subtract 4 raglan-line stitches from 82 stitches, leaving 78. Then divide 78 by 3: 26 stitches each for the front and back, and 13 stitches for each side section.
How many stitches should I cast on for the 2 x 2 ribbed version?
The exact number depends on your measurements, but it must be divisible by 4 so the 2 x 2 rib repeat stays consistent.
Can I make this neck warmer with a fastening?
This master class does not describe a fastening: both methods are designed to be knitted in the round and pulled on over the head. The discussion recommends deciding on a fastening before you start if it matters for the wearer.
Your project
Log in to track your project, attach photos, and publish your result into the shared feed.
I once knitted a dickey collar as a custom order for a coworker. It was not difficult, but when I had already finished it, she suddenly asked: “How am I supposed to put it on? I’ll ruin my hairstyle!” It turned out she had expected the collar to have a fastening from the start, so keep that in mind.

 BeginnerFree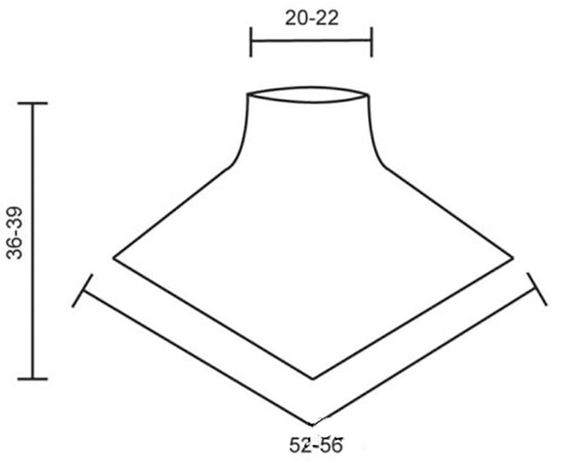


I once knitted a dickey collar as a custom order for a coworker. It was not difficult, but when I had already finished it, she suddenly asked: “How am I supposed to put it on? I’ll ruin my hairstyle!” It turned out she had expected the collar to have a fastening from the start, so keep that in mind.