A detailed tutorial for a bead-embroidered whale brooch: transfer the design onto felt, set the tail and front flipper with rhinestones, embroider the belly and back outlines with beads in different shades, cut out the figure from felt, reinforce it with a cardboard backing and a leather back piece with a clasp, then finish the edge with a beaded border.
Beginner2 hrFree
Translated
Things you will learn
For the brooch you'll need blue, gray, or light blue felt, beads in three colors, four sew-on teardrop rhinestones in a matching size and color, a small piece of leather or faux leather for the backing, and a clasp.
Transfer the whale design onto the felt — any design you like will do; start the work with the rhinestones, setting the tail and front flipper, and make the eye with a bead, a black half-bead, or a French knot embroidered stitch.
Embroider the belly outline with light gray beads and the back outline and bottom of the tail with dark blue beads, setting the largest teardrop rhinestone into the back.
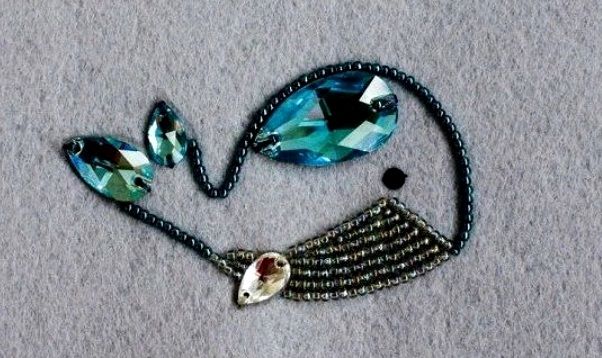
Embroider the belly with nearly straight lines that mimic the whale's real belly stripes, not forgetting the small bit of "belly" behind the lower flipper; fill the main body more randomly with beads, while still keeping a certain staggered pattern.
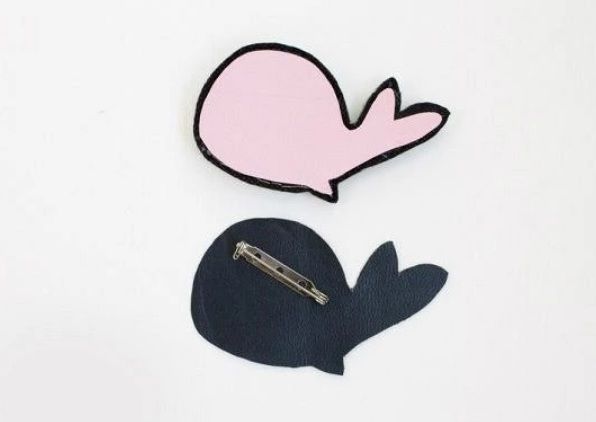
After embroidering, cut the figure out of the felt, reinforce it with a cardboard backing, make a leather back piece with slits for the clasp and glue it to the back of the figure, then finish the edge by threading beads through the leather backing and every layer using a specific technique.
What you'll get
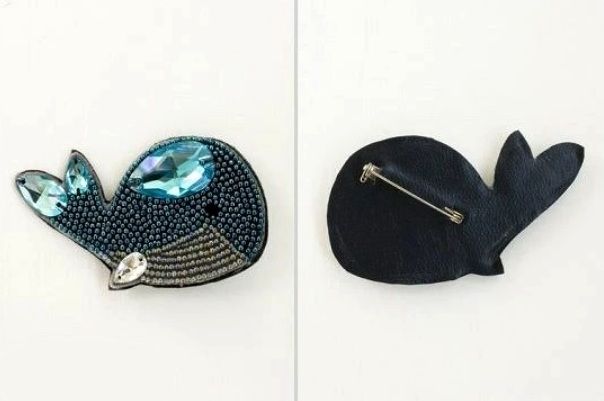
You'll get a bead-embroidered whale brooch with rhinestones on a felt base, finished with a leather backing and a clasp — a great summer accessory for light-colored clothes.
Materials and tools
Materials
Felt (blue, gray, or light blue), used as the base for embroidering the figure
Beads (3 colors), used for embroidering the outlines, the belly, and the main part of the figure
Sew-on teardrop rhinestones, 4 pieces, 4 pcs, chosen to match in size and color — used for the tail, front flipper, and back
A small piece of leather or faux leather, used for the brooch's backing
Clasp, inserted into the leather backing to turn the figure into a brooch
Cardboard backing, reinforces the felt base before the backing is glued on
Tools
Beading needle, needed for every stage of the embroidery and the edge finishing
Thread (monofilament or fishing line), needed for sewing on the beads and rhinestones
Scissors, needed for cutting the figure out of the felt
Glue, needed for gluing on the leather backing and securing the thread's end
Preparation
Gather your materials
I strongly recommend stocking up on everything you'll need: felt (blue, gray, or light blue), beads (3 colors), any sew-on teardrop rhinestones in a matching size and color — 4 pieces. To turn the whale into a brooch, you'll also need a small piece of leather or faux leather and a clasp.
Transfer the design onto the felt
Sketch out the design — it doesn't have to be this exact one: there are plenty of similar figures online, so pick a little whale you like. Transfer it onto the felt.
Set the tail, flipper, and eye
The work starts with the rhinestones, and the eye is made using one of a few methods.
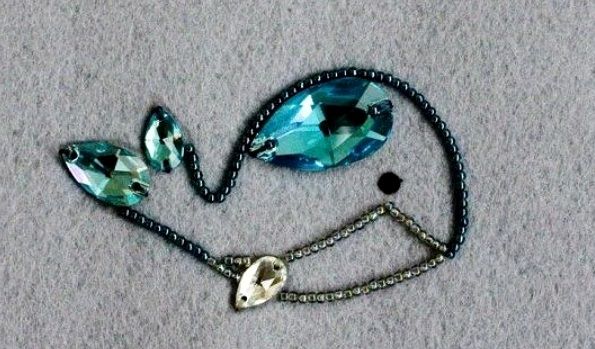
Set the tail and front flipper with rhinestones
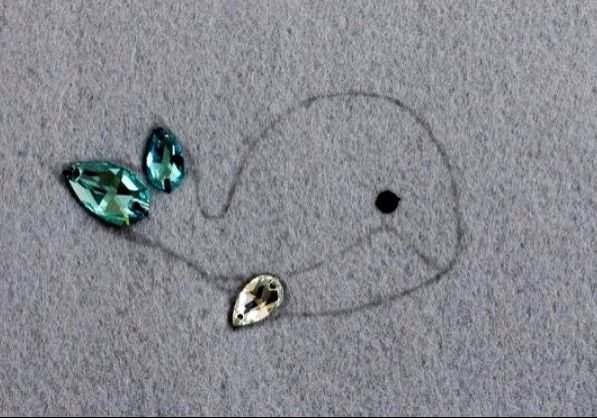
Start with the rhinestones — set the tail and front flipper.
The whale sketch
Make the eye
You can make the eye with a bead, a black half-bead, or by embroidering a French knot.
Starting with the rhinestones
Embroider the belly outline
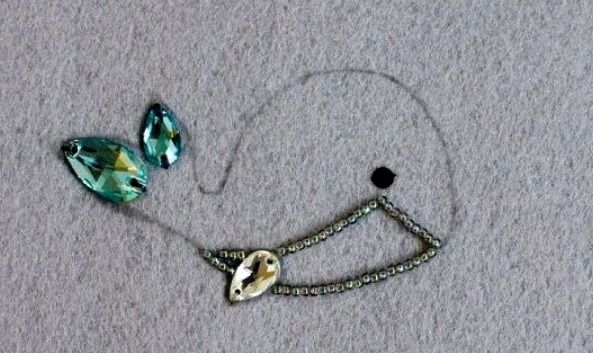
The belly outline is embroidered with light gray beads.
Embroider the belly outline with light gray beads
Embroider along the belly outline — use light gray beads for this.
The outline with the first elements
Review the basic beading rules
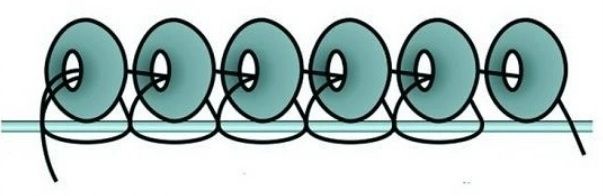
For anyone new to beadwork, here's a reminder of the basic sewing rules — it's not complicated.
Diagram of the beading technique
Embroider the back outline
The back outline and the bottom of the tail are embroidered with dark blue beads, and a rhinestone is set into the back.
Embroider the back outline with dark blue beads
Sew the back outline and the bottom of the tail with dark blue beads. Then set the largest teardrop rhinestone into the back.
The nearly finished brooch
Embroider the belly and the main body
The belly is embroidered with nearly straight lines, and the main part of the figure is filled with beads in a staggered pattern.
Embroider the belly's stripes
Now for the belly: sew nearly straight lines that mimic the whale's real belly stripes. There's a small bit of "belly" behind the lower flipper too — don't miss it.
The finished embroidered brooch
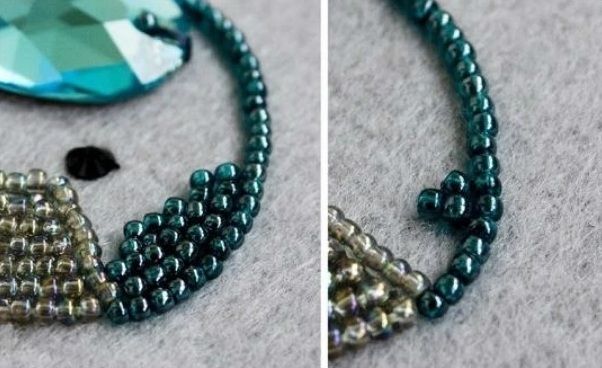
Fill in the main part of the figure
Now for the main body embroidery — place the beads more randomly here, while still keeping a certain staggered pattern.
The edge in close-up
Cut out the figure and make the backing
After the embroidery, the figure is cut out of the felt and reinforced with a cardboard backing and a leather back piece with a clasp.
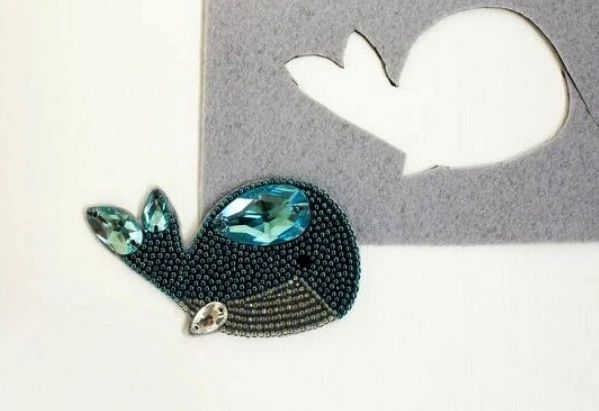
Cut the figure out of the felt
Cut our little cutie out of a solid piece of felt, carefully following right along the edge of the embroidery.
The piece next to the paper pattern
Reinforce the felt and make a leather back piece
Reinforce the felt with a cardboard backing, and make a back piece out of leather or faux leather — mark out the slits for the clasp on it right away.
The pattern and the dark pieces
Insert the clasp and glue on the backing
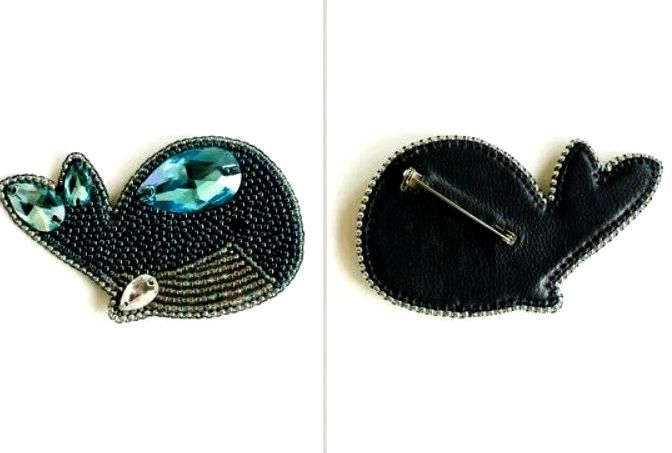
Insert the clasp into the leather backing and glue it to the back of the figure.
The brooch, front and back
Finish the edge with a beaded border
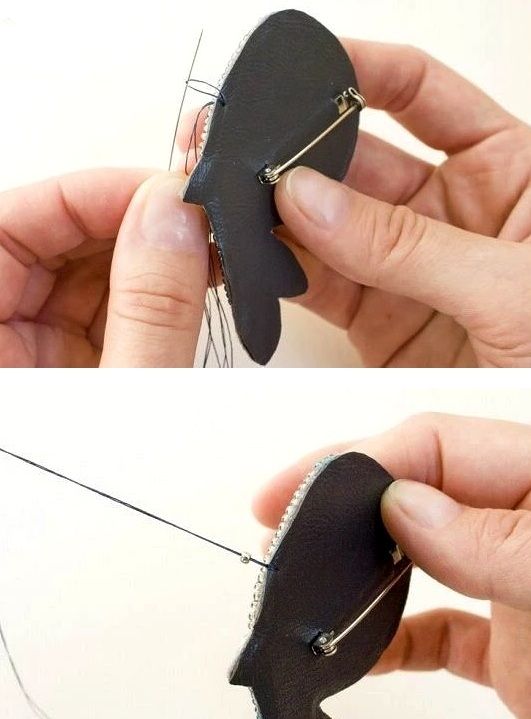
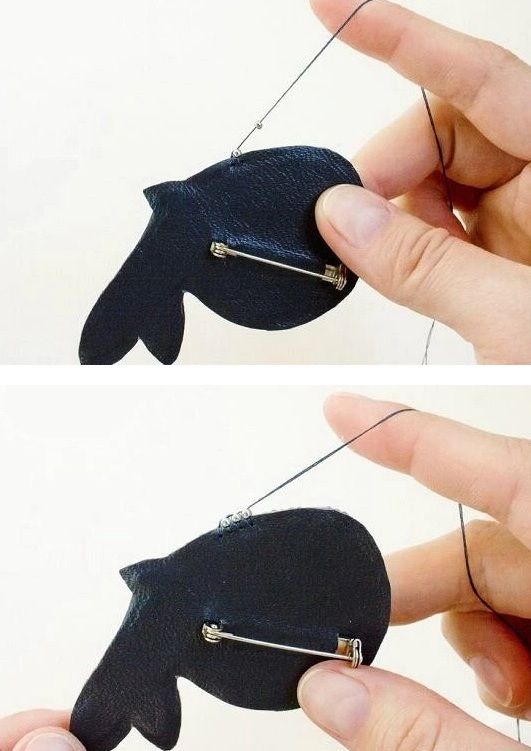
The edge of the figure is finished with a beaded border by threading a needle through every layer using a specific technique.
Secure the thread and thread the first bead
All that's left is to finish the edges: secure the thread with a loop, and thread on the first bead.
Sewing on the dark piece
Pierce through the layers and rethread the bead
Pierce the needle through the leather backing and every layer after it, then thread it back through the bead.
Hand-sewing in close-up
Repeat with each next bead
Thread the second (third, and so on) bead onto the needle and do the same thing.
Hand-sewing the wrong side
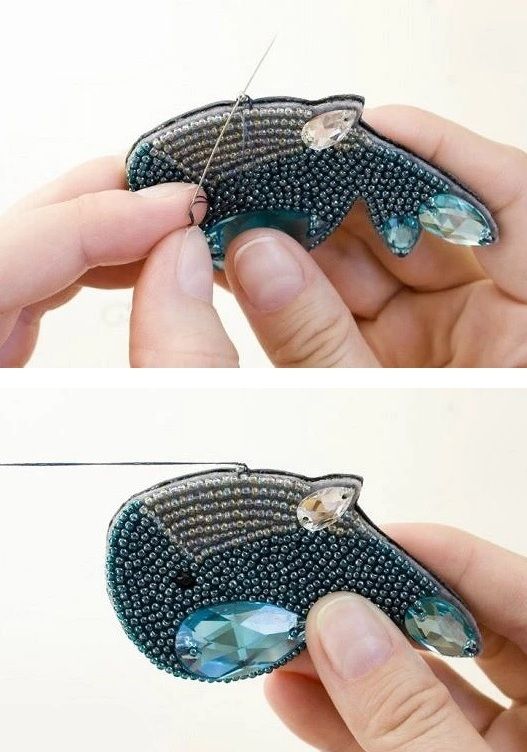
Secure and trim the thread
Secure the thread and trim it — you can dab the end with clear glue from the wrong side just to be safe.
The brooch, front and back
Finish and variations
Finish
The magic is complete
And... the magic is complete — the whale is ready to carry us off to distant seas!
Variations
Pick any design you like
You don't have to copy this exact whale design — there are plenty of similar figures online, so feel free to pick a little whale you like.
Wear the brooch on other things
The whale doesn't have to go on clothing — it looks just as good on a handbag, a beach bag, or even a hat.
After finishing the edge with beads, the row comes out uneven, with some beads falling out of line.
Likely cause
The final thread wasn't passed back through all the edge beads in one straight line after they were placed.
How to fix it
Once you've placed all the edge beads, pass the final thread through every one of them in a single straight line — this evens out the edge and pulls any stray beads back into line.
The main body looks either too random or too uniform
Problem
After embroidering the main body, the beads end up with no order at all, or they look monotonous.
Likely cause
A staggered arrangement wasn't kept while filling in the main body.
How to fix it
Place the beads on the main body more randomly by color, but still keep a certain staggered pattern to their arrangement.
There aren't enough beads of a matching gauge
Problem
When embroidering with Chinese beads, some of them turn out to be a different gauge, which spoils how neat the row looks.
Likely cause
Lower-quality Chinese beads were used without sorting them by gauge first.
How to fix it
Sort through the Chinese beads and pick out ones of a matching gauge, tossing the mismatched ones, or, if you can afford it, use Czech beads instead — they're much nicer to sew with.
?FAQ
What materials do I need for the whale brooch?
Felt (blue, gray, or light blue), beads in three colors, four sew-on teardrop rhinestones in a matching size and color, a small piece of leather or faux leather for the backing, and a clasp.
How do I make the whale's eye?
With a bead, a black half-bead, or by embroidering a French knot.
What kind of thread is best for bead embroidery?
Monofilament — it cinches into knots well, is very sturdy despite being thin, and lets you rethread the same bead more than once, even a very small one (size 15); fishing line doesn't work as well for this, even though it's thicker and sturdier and is usually used for beaded jewelry weaving.
How do I get a neat edge on the brooch?
Once all the edge beads are placed, pass the final thread through all of them in one straight line — this evens out the edge and pulls any stray beads back into line.
Which beads should I choose — Chinese or Czech?
Chinese beads of decent quality can be sorted and used if you toss out the mismatched ones (roughly a third), but if you can afford it, Czech beads are much nicer to sew with.
Your project
Log in to track your project, attach photos, and publish your result into the shared feed.
Super neat work! The border is especially impressive — laying the beads out that evenly must take some experience. I've tried making brooches myself, it's a lot of fun, but I can't get that level of quality yet. I feel like the whale would look great not just on clothes, but on a handbag too.
I'd also add that you need the right thread. I don't have much experience making brooches, but thin fishing line and monofilament behave very differently. Any tips on what you used? And I also want to praise the author of this one))) The little crystals are just mesmerizing — only 3 elements, and the brooch looks so expensive! I still can't bring myself to place an order, though — good materials are the key to a good result, you're not going to embroider a whale like this with mismatched Chinese beads!Show full quoteCollapse
I'd also add that you need the right thread. I don't have much experience making brooches, but thin fishing line and monofilament behave very differently. Any tips on what you used? And I also want to praise the author of this one))) The little crystals are just mesmerizing — only 3 elements, and the brooch looks so expensive! I still can't bring myself to place an order, though — good materials are the key to a good result, you're not going to embroider a whale like this with mismatched Chinese beads!
Thanks for the kind words! 😍 Yes, monofilament and fishing line are both good, but each in their own way: fishing line is thicker and sturdier, and holds its shape well — it's usually used for weaving jewelry pieces (rings, bracelets, chokers, keychains). But monofilament is better for embroidery: it cinches into knots nicely when you need it to, and is very sturdy despite being thin. In fact, it's precisely because it's thin that you can rethread it through the same bead more than once, even a very small one (size 15). That trick doesn't work with fishing line 😉
. In fact, it's precisely because it's thin that you can rethread it through the same bead more than once, even a very small one (size 15). That trick doesn't work with fishing line 😉
That's such an important point! If you need to secure a bead or go over the outline twice, you need a very fine needle and thread. By the way, monofilament is also sturdier than regular spool thread, which is why I stocked up on some))

 Beginner2 hrFree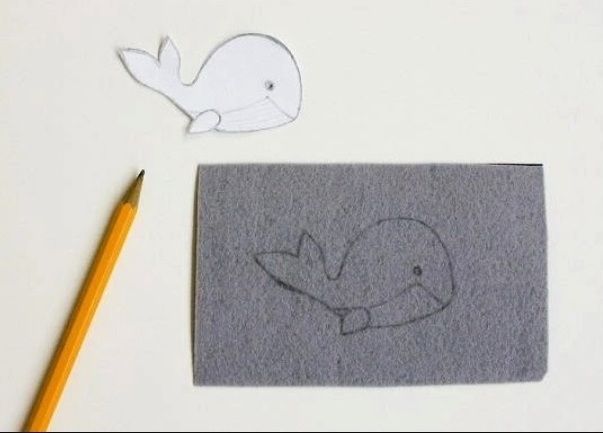


I'd also add that you need the right thread. I don't have much experience making brooches, but thin fishing line and monofilament behave very differently. Any tips on what you used? And I also want to praise the author of this one))) The little crystals are just mesmerizing — only 3 elements, and the brooch looks so expensive! I still can't bring myself to place an order, though — good materials are the key to a good result, you're not going to embroider a whale like this with mismatched Chinese beads!Show full quoteCollapse