A step-by-step tutorial for knitting a headband: choosing your yarn, using size 3 needles, casting on 28 stitches, knitting the cabled strip to the length you need, seaming it with a flat seam, and knitting the bow separately.
BeginnerFree
Translated
Things you will learn
You'll need 70-100 g of medium-weight yarn for the headband; the exact amount depends on the size.
The stitch count in this pattern isn't recalculated for every size: the author suggests fitting the length by trying it on.
The main strip starts with 28 stitches and is knit following a cable chart.
The bow isn't knit together with the headband — it's made separately and threaded through one of the cables.
The knotted edge from the discussion can be used deliberately: it's neat and dense, but less stretchy.
What you'll get
The finished headband covers your ears, pairs well with a hood, and can be a warm wool or down accessory. If you knit it in cotton or acrylic, you get a more decorative version for a photoshoot or a festive look.
Materials and tools
Materials
Medium-weight yarn, 70-100 g, the amount depends on the size; wool or down suits a warm version, cotton or acrylic suits a decorative one
A bead or a brooch, optional; can be used to secure the finished bow
Tools
Size 3 needles, the main tool from the source
An extra needle, for crossing 6 stitches in cable round 11
A tapestry needle, for seaming the strip along its short edge with a flat seam
Preparation
Decide on the headband's purpose
For a warm headband, use wool or down. For photoshoots and festive outfits, the source suggests cotton or acrylic: that version will be more decorative.
Plan to fit the length by trying it on
This pattern doesn't need a separate stitch calculation for every size. The stitch count comes from the pattern itself, and you check the strip's length against your head by trying it on.
The Chart and Choosing a Pattern
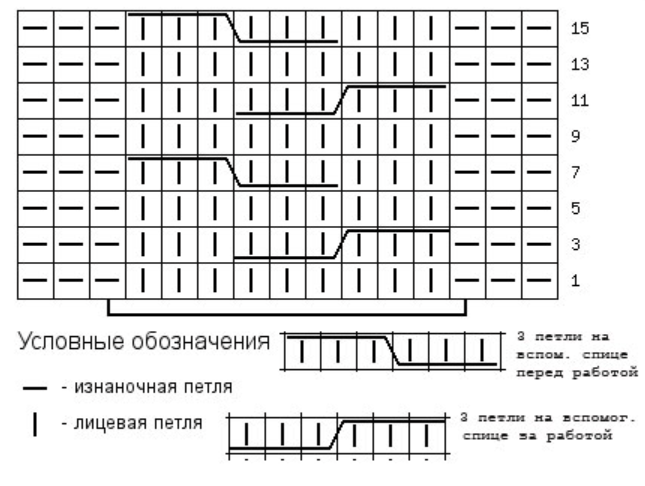
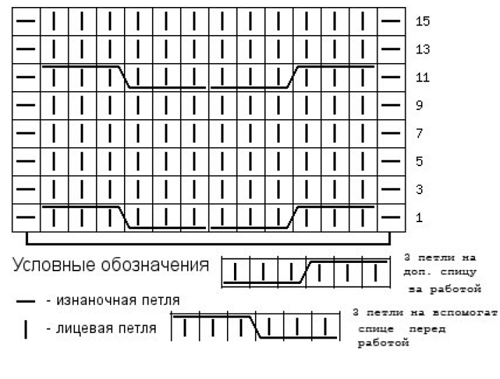
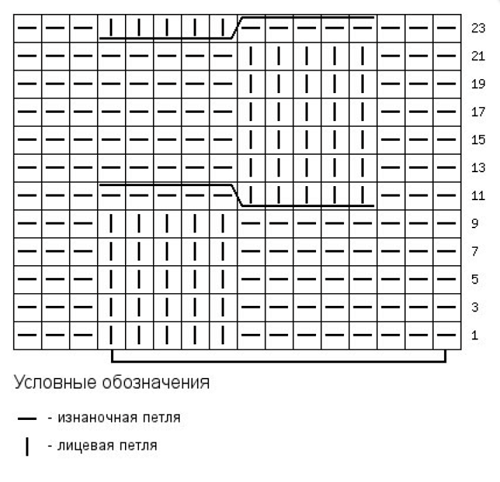
The source shows a basic cable chart along with a few more elaborate aran options.
Use the cable chart as your guide
For this pattern, you need to cast on the number of stitches that matches the pattern. Further down, the instructions specify casting on 28 stitches; use the chart as a visual reference for the center cable.
The basic cable chart from the source tutorial.
Choose a more elaborate cable if you like
If the basic cable already makes sense to you, you can pick one of the more elaborate aran or cable options instead. In that case, the stitch count needs to match the chart you chose, rather than mechanically repeating the basic cast-on.
One of the cable pattern options for the headband.An additional pattern option with more crossings.A more elaborate chart option for anyone who wants to swap out the basic cable.
Don't mix charts
The row-by-row instructions below apply to the basic pattern. For a different aran, recalculate your cast-on based on the chart you picked.
The Headband Base
Knit the strip with the center cable, trying it on to check the length against your head.
Cast on 28 stitches
Cast on 28 stitches on size 3 needles. This count is given for the basic pattern from the source.
Check it against the chart
The source text may have a slight inconsistency in how the stitches for row 1 add up. Keep the 28-stitch cast-on from the source, and check the stitch layout against the chart you're using.
Knit row 1
Row 1: slip the edge stitch, knit 6, purl 2, knit 12, purl 2, knit 5, purl the edge stitch. The source specifies that the first edge stitch is always slipped on every row, and the last one is always purled.
Knit row 2
On row 2, knit the first and last 6 stitches, forming a garter-stitch border on each edge. Work the remaining stitches following the pattern.
Repeat the rows up to the cable cross
Knit rows 3-9 the same as row 1, and rows 4-10 the same as row 2. In practice, this alternates the right side with the wrong side before the row where the cable crosses.
Work the cable on row 11
On row 11, knit 6, purl 2. Then slip 6 stitches onto an extra needle and hold them in front of the work, knit the next 6 stitches, then knit the stitches from the extra needle, followed by purl 2, knit 5, and the edge stitch.
Repeat the pattern to the length you need
Keep repeating the pattern until the strip reaches the length you need. For a child, the author suggests trying it on to check the fit against the head.
Seam the strip with a flat seam
Once the length works, seam the headband along its short edge with a flat seam. The seam should stay stretchy, so the headband doesn't press too tight.
Tip from the discussion
You can work the top and bottom edges with a knotted edge instead: slip the first edge stitch knitwise through the back loop with the working yarn held down and back, and knit the last one through the front loop as usual. This edge is less stretchy, though, so check the fit first.
The Bow
The bow is knit separately, so the construction is simpler than it looks in the finished piece.
Cast on 20 stitches for the bow
Cast on 20 stitches and knit 4 rows in garter stitch.
Knit the middle of the bow
Split the stitches like this: knit the first and last 3 stitches in garter stitch on every row, and the middle 14 stitches in stockinette stitch. Knit 20 rows total in this section.
Finish the bow in garter stitch
After the middle section, knit 4 more rows in garter stitch and bind off.
Thread the bow through the cable
Thread the finished bow through one of the cables on the headband. If you like, secure it with a bead or a nice brooch.
Finish and variations
Finish
Check the seam and the bow's position
After seaming, make sure the flat seam doesn't press too tight and the bow sits evenly on the cable. If you're using a bead or a brooch, attach it neatly and without adding much weight.
Where the idea came from
In the original material, the author noted that she found the idea for the post on the Vjazalochka website; there's no direct link in the imported text.
Variations
A warm headband
For walks and cold weather, choose wool or down: this version works better as an alternative to a hat under a hood.
A decorative headband
Cotton or acrylic suits photoshoots and festive outfits, where the look and the shape of the bow matter more.
The knotted edge from the discussion
On Tatyana's suggestion, you can knit the top and bottom edges with a knotted edge: it looks denser and neater, but is less stretchy, so it doesn't suit every fit.
The length wasn't checked by trying it on before seaming.
How to fix it
Try the strip on against your head before the flat seam, and keep repeating the pattern until you reach the length you need. The source directly suggests checking the fit by trying it on.
The stitch layout doesn't add up
Problem
When knitting row 1, the stitches don't lay out the way the instructions describe.
Likely cause
The source description may have a slight inconsistency in the stitch total, and different charts may have a different pattern repeat.
How to fix it
Keep the 28-stitch cast-on for the basic pattern, but check the stitch layout against the chart you're using. If you picked a different aran, cast on the stitch count for that specific chart.
The cable leans the wrong way
Problem
The cable cross looks different from the chart.
Likely cause
The 6 slipped stitches weren't held in front of the work, or the knitting order got mixed up.
How to fix it
On row 11, slip 6 stitches onto an extra needle and hold them in front of the work, then knit the next 6 stitches, and only after that knit the stitches from the extra needle.
The knotted edge pulls tight
Problem
The edge looks neat, but it's become less stretchy.
Likely cause
The knotted edge from the discussion really is less stretchy than a regular edge.
How to fix it
Use it only if you want a snugger fit. The discussion notes that the seam's stretch and the give in the cables partly make up for how dense the edge is, but it's best to check the fit on a swatch or by trying it on.
The bow shifts out of place
Problem
The separate bow doesn't stay put on the chosen cable.
Likely cause
It's only threaded through the cable, not secured.
How to fix it
The source suggests securing the finished bow with a bead or a nice brooch. Choose a fastening that won't weigh down a child's headband.
?FAQ
What yarn do I need for the headband?
The source calls for medium-weight yarn. For a warm headband, you can use wool or down; for a decorative version, cotton or acrylic.
How much yarn will I need?
The tutorial's reference point is 70-100 g of medium-weight yarn. The exact amount depends on the size and length of the headband.
Do I need to calculate stitches for my head size?
For this pattern, the author doesn't suggest a separate stitch calculation: the stitch count comes from the pattern itself, and the headband's length is fitted by trying it on.
Is the bow knit together with the headband?
No. The bow is knit separately on 20 stitches, then threaded through one of the cables. The discussion made the same point: the construction is simpler than it looks in the finished piece.
Is it worth doing the knotted edge?
That's an optional tip from the discussion. The knotted edge is denser and neater, but less stretchy, so it's best chosen after checking the fit.
Your project
Log in to track your project, attach photos, and publish your result into the shared feed.
Won't the knotted edge pull the headband too tight? It's not as stretchy as a regular edge.
Yes, you're right, the knotted edge isn't as stretchy. But the headband will still be seamed with a stretchy seam. And the pattern itself keeps the fabric from being stiff. Cables in general have good give. Still, with the knotted edge, you're guaranteed a snug fit. And it does stretch a little, after all.
Headbands like this are really handy in our weather, especially since almost all jackets have hoods. If it suddenly turns cold, you can bundle up. The only thing is, I'd do the top and bottom with a knotted edge. It's sturdier and looks more interesting. There's nothing complicated about it — the first edge stitch is knit through the back loop, with the working yarn held down and back. And the last edge stitch is knit as a classic knit stitch, through the front loop.Show full quoteCollapse
Headbands like this are really handy in our weather, especially since almost all jackets have hoods. If it suddenly turns cold, you can bundle up. The only thing is, I'd do the top and bottom with a knotted edge. It's sturdier and looks more interesting. There's nothing complicated about it — the first edge stitch is knit through the back loop, with the working yarn held down and back. And the last edge stitch is knit as a classic knit stitch, through the front loop.
Won't the knotted edge pull the headband too tight? It's not as stretchy as a regular edge.
Headbands like this are really handy in our weather, especially since almost all jackets have hoods. If it suddenly turns cold, you can bundle up. The only thing is, I'd do the top and bottom with a knotted edge. It's sturdier and looks more interesting. There's nothing complicated about it — the first edge stitch is knit through the back loop, with the working yarn held down and back. And the last edge stitch is knit as a classic knit stitch, through the front loop.

 BeginnerFree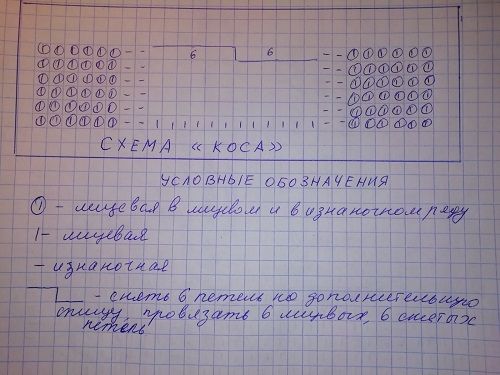


Headbands like this are really handy in our weather, especially since almost all jackets have hoods. If it suddenly turns cold, you can bundle up. The only thing is, I'd do the top and bottom with a knotted edge. It's sturdier and looks more interesting. There's nothing complicated about it — the first edge stitch is knit through the back loop, with the working yarn held down and back. And the last edge stitch is knit as a classic knit stitch, through the front loop.Show full quoteCollapse