Knitted Collar: Calculating Stitches, Turtleneck, and Cowl
A guide to choosing a knitted collar shape, calculating stitches from head circumference and gauge, picking up stitches around the neckline, and knitting a turtleneck or cowl.
IntermediateFree
Translated
Things you will learn
The collar shape depends on fit: a turtleneck sits close to the neck, a cowl widens toward the bottom, a stand collar is shorter, and folded-down or lace versions work more as decorative details.
The calculation is based on head circumference, swatch gauge, and a stretch factor; the source's example works out to 105 stitches.
For a deep neckline, the ease is increased not by 3-4 cm but by 6-8 cm, so the collar doesn't pull the neckline tight.
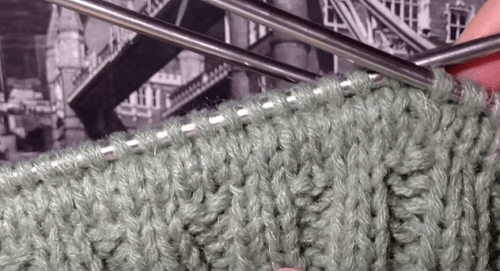
The photos with a crochet hook and circular needles relate to picking up stitches around the neckline, not to the stitch calculation.
What You'll Make
Once you've done the calculation, you can finish the neckline of a sweater or cardigan with a neat collar: a tall turtleneck, a cowl, a stand collar, or a folded-down or lace version. The tutorial doesn't give a universal stitch count for every project: you need to knit a swatch in the same pattern first, measure the stretch, and only then fit the collar to your specific neckline.
Materials and tools
Materials
Collar yarn, the same yarn used for the main piece, or one of a compatible thickness; knit the swatch in the same pattern the collar will be worked in
Contrasting thread, a short length, needed for temporary rows before sewing the collar to the neckline
Tools
Circular needles with a cable, for picking up stitches around the neckline and knitting the collar in the round
Needles a size up or down, for the turtleneck, the source recommends going half a size smaller; for a flared cowl, switching to half a size larger
Crochet hook, one way to pick up stitches along the neckline edge
Tape measure or ruler, for head circumference, collar height, the swatch, and the stretch factor
Iron and a pressing cloth, for lightly pressing the bottom part of the collar before removing the contrasting thread
Files and resources
Video tutorial: beginner scarf-cowlThe source attached this at the end of the older article as a separate lesson on the scarf-cowl.Video tutorial: beginner scarf-cowl
Preparation
Choose a collar shape
A turtleneck is worked tall and close-fitting around the neck. A cowl is worked on a similar principle but flares toward the bottom; in warm garments it can replace a scarf. A stand collar is shorter and can be single or double. Folded-down, ruffled, and lace collars depend more on the overall garment style.
Check the neckline fit
Before calculating, it's important to know whether your head fits through, whether the collar will fold over, what height you need, and how deep the neckline is. These factors affect the ease and whether the collar will stick out awkwardly.
Knit a swatch specifically for the collar
Gauge isn't measured from the whole garment, but from a swatch worked in the same stitch pattern the collar will use: ribbing, stockinette, or whatever pattern you've chosen.
Calculate Stitches for the Collar
The source gives a calculation for a stand collar, a classic folded-down collar, and a turtleneck. For a deeper neckline, the ease allowance is increased.
Measure your head circumference
Take your head circumference, since the collar needs to fit over your head. In the source's example, head circumference is 54 cm.
Calculate your swatch gauge
Knit a swatch in the pattern the collar will be worked in, and count how many stitches fit in 1 cm. In the source's example, the gauge is 2.5 stitches per cm.
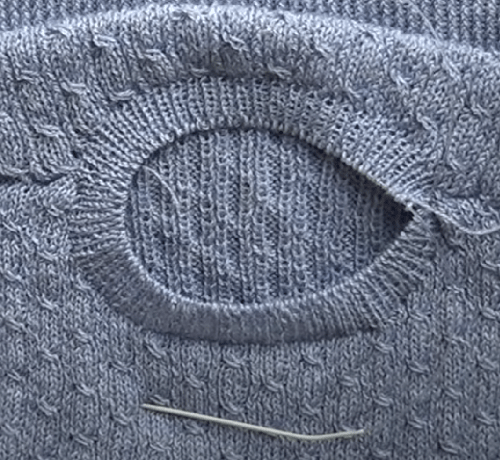
Before picking up stitches, check the neckline shape and swatch gauge.
Find the stretch factor
Measure the swatch both relaxed and stretched to its maximum. Divide the first value by the second: for example, 7 cm / 10 cm = 0.7. That's your stretch factor.
Calculate the working circumference of the collar
Multiply your head circumference by the stretch factor: 54 x 0.7 = 37.8 cm, round to 38 cm. The source adds another 3-4 cm for ease, giving 42 cm in the example.
For a deep neckline, add more
If the neckline is deeper, the source recommends adding 6-8 cm of ease instead of 3-4 cm.
Convert centimeters to stitches
Multiply the working circumference by the gauge: 42 cm x 2.5 stitches/cm = 105 stitches. Use this number as the base for a stand collar, turtleneck, or classic folded-down collar.
Pick Up Stitches Around the Neckline
The method you choose depends on the construction: you can pick up stitches directly from the neckline, pick them up with a crochet hook and transfer them to needles, or knit the piece separately for grafting.
Pick up a stitch with a hook through the edge
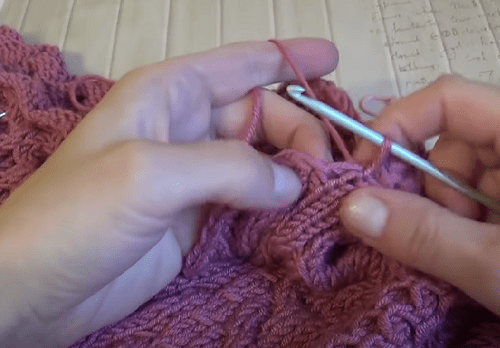
For a knitted-in-one-piece neckline, insert the hook front to back through both halves of the edge stitch, catch the working yarn, and pull the stitch through.
First pick-up method: the hook passes through both halves of the edge stitch.
Transfer the stitches to circular needles
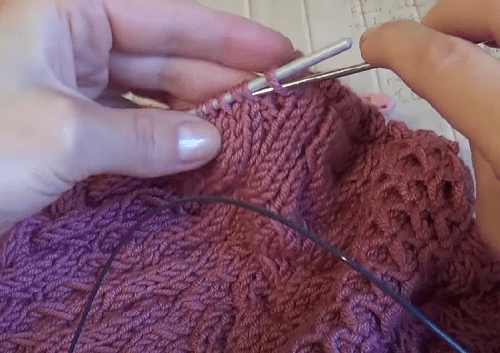
Keep picking up stitches the same way and gradually slip them onto circular needles with a cable, so the row doesn't twist and fits comfortably on the needles.
It's easiest to slip the stitches onto circular needles gradually.
Alternate how you catch the yarn when picking up with needles
If you're picking up stitches directly with circular needles, pick up one stitch catching the yarn in front of the cable, then the next behind the cable. This gives you an even pick-up row with no holes and not too much stretch.
Alternating the catch helps produce an even row without holes.
For a separate collar, knit the top part first
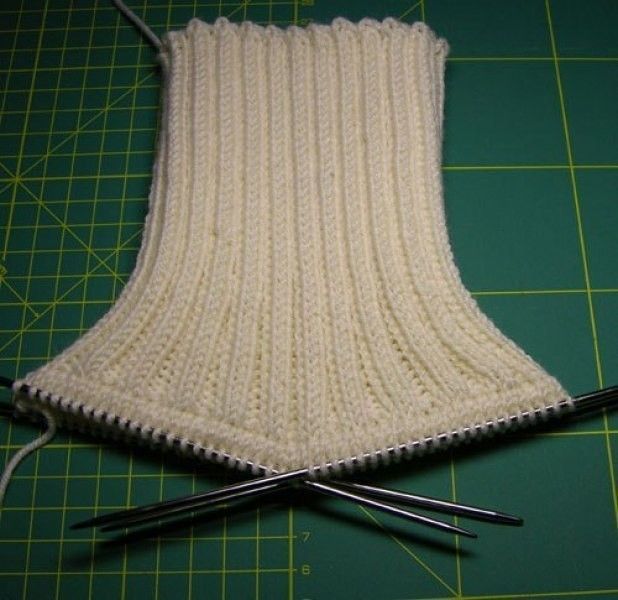
Cast on the calculated number of stitches onto circular needles and work in 1x1 or 2x2 ribbing to the height you need. This lets you prepare a fold-over turtleneck or a stand collar that you'll join to the garment afterward.
A separate piece for the turtleneck or stand collar, before sewing it onto the neckline.
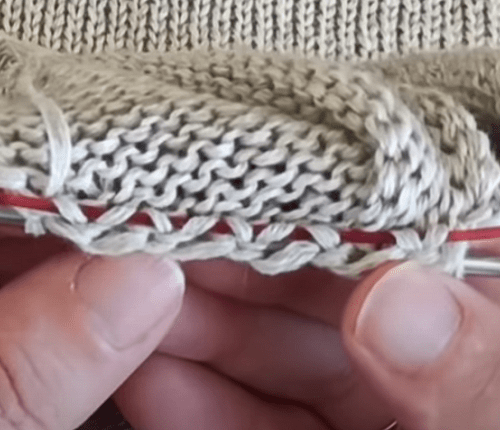
Work a hollow rib before grafting
For the bottom part, work about 2 cm of hollow rib: row 1 - 1 yarn over toward you, 1 knit stitch; row 2 - purl the yarn overs through the front loop, slip the knit stitches; row 3 - knit the knit stitches, slip the purl stitches with the yarn held in front. Then repeat rows 2 and 3.
The hollow rib forms an edge that will later be sewn to the neckline.
Return to your original stitch count
After the hollow rib, knit 2 stitches together through the front loop. The live stitches are then sewn to the neckline using the grafting method.
Knit a Turtleneck Collar
The turtleneck is one of the simplest collars, but a neat result depends on gauge, needle size, and the first round.
Use needles slightly thinner than for the main piece
The source recommends going half a size smaller than the needles used for the sweater itself. This keeps the collar from stretching out as much and gives it a neater look.
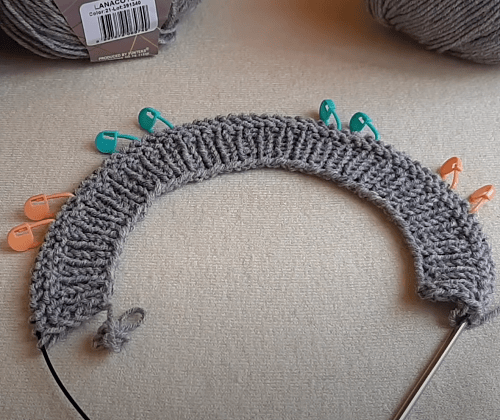
Stitches picked up around the neckline before knitting the turtleneck collar.
Choose a rib pattern for the turtleneck
Classic 1x1 ribbing, twisted ribbing, or 2x2 ribbing all work well for a turtleneck. Height is determined by the size you want; if the collar will fold over, double the height.
Make a neat first round
To avoid a visible jog where the round joins, the source recommends swapping the last and first stitch before knitting in the round.
Prepare the edge for sewing
Work the collar in ribbing to the height you need. Then work 4-6 rows in stockinette stitch, switch to contrasting thread, work another 4 rows with it, and bind off. Lightly press the bottom part through a cloth and remove the contrasting thread: the stitches will slip less when you sew the collar on.
Knit a Cowl Collar
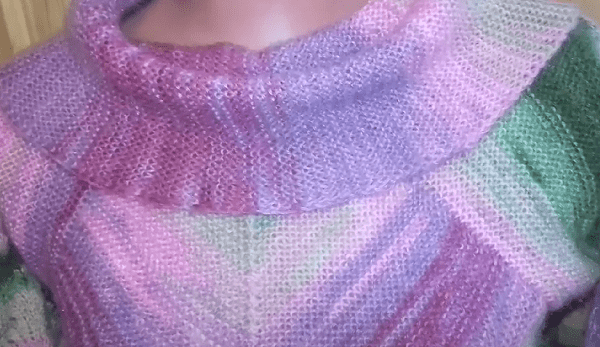
A cowl can be straight, angled toward the front, small, or oversized. The source describes three versions: a simple one worked from the neckline, one knitted separately in stockinette, and a scarf-cowl.
Knit a simple cowl upward from the neckline
Pick up the number of stitches you need using whichever method is convenient, work about 5 cm in ribbing or another pattern, then switch to needles half a size larger. Keep changing needle size every 5-7 cm until the collar reaches the length you want.
An example of a soft cowl that drapes loosely at the neckline.
For a separate cowl, calculate the bottom from shoulder circumference
If the cowl is knitted separately in stockinette stitch and needs to drape loosely over the shoulders, you'll need shoulder circumference, cowl height, and the neckline stitch count. Multiply shoulder circumference by gauge and subtract the number of stitches needed for the collar at the neckline.
Distribute the decreases across the height
In the source's example, the cowl bottom is 75 cm, the height is 25 cm, the gauge is 2.5 stitches/cm, and the neckline needs 105 stitches. 75 x 2.5 = 187 stitches; 187 - 105 = 82 stitches need to be decreased. The decreases are spread out as 6 stitches every 4th row, 15 times in the example.
Knit the scarf-cowl as a separate strip
For the scarf version, cast on stitches for the width you need and knit a strip in English rib or another loose rib pattern, long enough to fit the neckline circumference. Sew the short sides together so the seam ends up at the back, then sew the collar onto the sweater's neckline.
The video applies to this version
The attached YouTube lesson in the source is provided as a separate tutorial for the scarf-cowl.
Finish and variations
Finish
Check the fit after joining
The finished collar should let your head through, not pull the neckline tight, and not stick out awkwardly. If it will fold over, check the fit specifically in its folded state.
Choose a bound-off or live edge depending on assembly
For a separately knitted cowl, you can bind off the last row and sew it to the neckline, or leave the stitches live and graft them on, as the source describes.
Variations
Turtleneck with a fold-over
The height of this collar is calculated as your desired height multiplied by 2.
A flared cowl worked from the neckline
For a gentle flare, switch to needles half a size larger every 5-7 cm.
Scarf-cowl
A separate strip is knitted to the collar width and the length of the neckline circumference, then the short sides are sewn together and it's sewn onto the neckline.
The collar is calculated too narrow and loses its practicality.
Likely cause
Head circumference, the stretch factor, or ease weren't accounted for.
How to fix it
Calculate from head circumference and the swatch: head circumference x stretch factor, then add 3-4 cm. For a deep neckline, use a 6-8 cm allowance instead.
Holes appear around the neckline
Problem
The pick-up row looks loose or has gaps.
Likely cause
Stitches were picked up unevenly, or only part of the edge stitch was caught.
How to fix it
When picking up with a hook, insert it through both halves of the edge stitch. When picking up with circular needles, alternate catching the yarn in front of and behind the cable.
A jog is visible in the first round
Problem
A step appears where the round meets.
Likely cause
The first and last stitch were joined without adjusting for the jog.
How to fix it
Before knitting in the round, swap the last and first stitch, as the source recommends for a neat first round.
The turtleneck stretches out quickly
Problem
The collar doesn't hold its shape and looks flimsy.
Likely cause
The same needles, or needles too thick, were used for the collar as for the main fabric.
How to fix it
For a turtleneck, use needles half a size smaller and 1x1, twisted, or 2x2 ribbing.
Stitches slip while sewing
Problem
It's hard to sew the live edge to the neckline neatly.
Likely cause
The temporary rows weren't stabilized before removing them.
How to fix it
Work 4 rows with contrasting thread, bind off, lightly press the bottom part through a cloth, and only then remove the contrasting thread.
The cowl doesn't sit right on the shoulders
Problem
A separately knitted cowl comes out too narrow at the bottom.
Likely cause
The bottom was calculated using only the neckline, without shoulder circumference.
How to fix it
For a loose cowl, use shoulder circumference: multiply it by the gauge, compare it with the stitch count needed for the neckline, then distribute the decreases across the height.
?FAQ
How is a turtleneck collar different from a cowl?
A turtleneck is tall and fits closely around the neck, like a tube. A cowl is worked on a similar principle but flares toward the bottom and can be more voluminous.
What formula do I use to calculate collar stitches?
The source's calculation works like this: multiply head circumference by the stretch factor, add the ease allowance, and then multiply the resulting centimeters by the gauge.
How many centimeters should I add for ease?
For a stand collar, turtleneck, and classic folded-down collar, the source adds 3-4 cm. If the neckline is deep, the allowance is increased to 6-8 cm.
What pattern should I use for a turtleneck collar?
The source recommends ribbing: classic 1x1, twisted, or 2x2.
What needle size should I use for a turtleneck and a cowl?
For a turtleneck, it's best to use needles half a size smaller than for the sweater. For a simple cowl worked from the neckline, on the other hand, you can gradually switch to needles half a size larger every 5-7 cm.
How do I pick up stitches around the neckline without holes?
You can insert the hook through both halves of the edge stitch, or pick up with circular needles while alternating the yarn catch in front of and behind the cable.
How do I calculate the height of a fold-over turtleneck?
Measure the desired height of the finished collar and multiply it by 2 if the collar will fold over.
Can I knit a cowl separately as a scarf?
Yes. The source describes a scarf-cowl version: knit a strip of the width you need and long enough to fit the neckline circumference, sew the short sides together with the seam at the back, and sew it onto the neckline.
Your project
Log in to track your project, attach photos, and publish your result into the shared feed.

 IntermediateFree