Knitted Children's Hat for Beginners: Yarn, Stitch Patterns, and Ear Flaps
A breakdown of a knitted children's hat for beginners: what yarn you need, which stitch patterns won't press on the child, how to place the ear flaps, and how to knit a simple example for a 1-year-old.
BeginnerFree
Translated
Things you will learn
For a children's winter hat, soft yarn, no scratchy fibers, and a stitch pattern without raised elements that could press on the child all matter.
For little ones, ties, ear flaps, a double-layer hat, a tall snug fold-over brim, or a fleece lining are all useful.
The ear flaps aren't placed at the center of the hat, but about 2 cm back from the fold; the source casts on 14-18 stitches for them.
In the simple example for a 1-year-old, you cast on 76 stitches, knit rows 2-50 in moss stitch or another simple pattern, and then decrease the stitches in 4 sections.
What You'll Make
Once you're prepared, you can knit a warm children's hat with a simple stitch pattern and ear flaps. This tutorial explains how to choose yarn and tools, which stitch patterns suit children, how to knit the ear flaps, and how to make a basic hat for a 1-year-old. It's specifically noted that the source's questionable measurement needs to be checked before casting on.
Materials and tools
Materials
Medium-weight yarn, 80 g, For the simple hat for a 1-year-old from the source; knitted with 2 strands held together.
Soft winter yarn, 1-2 skeins, The source lists Alize Merino Royal, Gazzal Baby Wool, and Lana Cashemere Wool. For angora/mink-down yarn, a main strand is used along with an extra matching-color spool.
Tools
2 pairs of circular needles, The two pairs differ by 0.5-1 size.
Double-pointed needles, The same thickness as the main needles; needed for neatly binding off stitches and for the ear flaps.
Stitch markers, Help divide the fabric and keep track of the decreases.
A yarn needle or tapestry needle, A large-eye needle is needed for securing the yarn ends.
Crochet hook, For weaving the yarn end to the wrong side, securing it firmly, and working the seam.
Before casting on, take the actual head circumference and factor in whether the hat will go over a kerchief or bonnet. If the hat will be worn over an extra layer, the design should be roomier.
Prepare Materials and Choose the Yarn
For a children's hat, choose a natural, soft yarn that doesn't irritate the skin, doesn't pill from washing and wearing, and suits the stitch pattern you've chosen.
Gather your tools
Prepare two pairs of circular needles that differ by 0.5-1 size, double-pointed needles of the same thickness, markers, a large-eye yarn or tapestry needle, and a crochet hook for weaving in and securing the yarn ends.
Choose a soft winter yarn
Alize Merino Royal is 100% wool with no fuzz, in pastel shades, but the piece may take 2 skeins. Gazzal Baby Wool contains cashmere and merino wool, suits children with sensitive skin, and doesn't cause irritation. Lana Cashemere Wool is a thin cashmere yarn with a long yardage that can be knitted with 2 strands held together.
If you're using mink-down yarn
The main skein usually comes with an extra spool of matching-shade thread.
Account for Children's Hat Specifics
Add cold protection
For an active child, the hat needs to stay on well, so ties or ear flaps make sense. For winter, you can knit a double-layer hat, a tall snug fold-over brim, or add a fleece lining.
Avoid pressure on the head
For infants and newborns, it's better to knit hats in the round or use a flat seam, so it doesn't press on the head. For very young children, avoid raised motifs, bobbles, and bulky cables.
Choose a Simple Stitch Pattern
Simple patterns with no bulky raised parts work well for a children's hat. The source gives three options: moss stitch, slip-stitch tracks, and honeycomb.
Moss Stitch (Rice Stitch)
Row 1: alternate 1 knit and 1 purl stitch. Row 2: work in a checkerboard pattern — purl over the knit stitches and knit over the purl stitches. You can also alternate the stitches every 2 rows instead.
Moss stitch, or rice stitch, works well for simple children's hats.
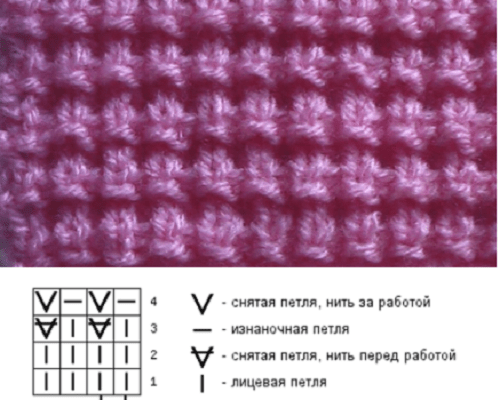
Slip-Stitch Tracks
The pattern repeat is 4 rows. Row 1 — knit. Row 2 — knit. Row 3 — 1 knit, slip 1 stitch with the yarn held in front. Row 4 — purl over the knit stitches, slip the same stitch again with the yarn held in back.
The repeat of the slip-stitch tracks pattern is 4 rows.
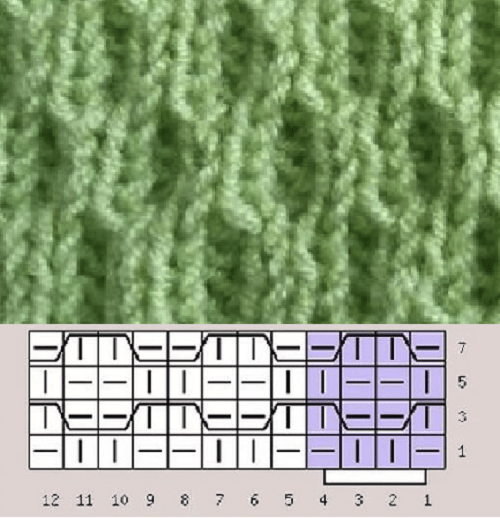
Honeycomb
A hat in the honeycomb pattern comes out more textured and doesn't stretch much. The source suggests knitting this version from a chart.
The honeycomb pattern adds texture and stretches less.
Check the stretch
Since honeycomb doesn't stretch much, it's worth knitting a swatch and checking the fit before casting on.
Make the Ear Flaps
The ties should not only hold the hat in place but also cover the ears. That's why it's important to position the ear flaps correctly and not place them exactly at the center.
Mark the ear flap placement
Place the ear flaps not at the center of the hat, but about 2 cm back from the fold. Then cast on 14-18 stitches.
Ear flaps help cover the child's ears better.
Start the double-layer ear flaps
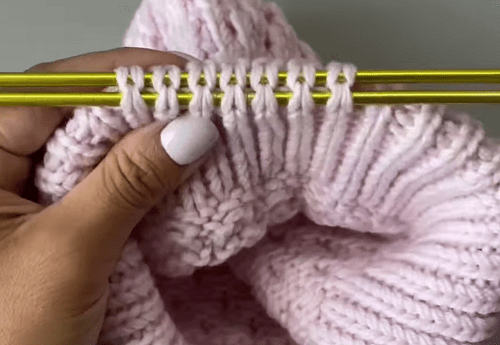
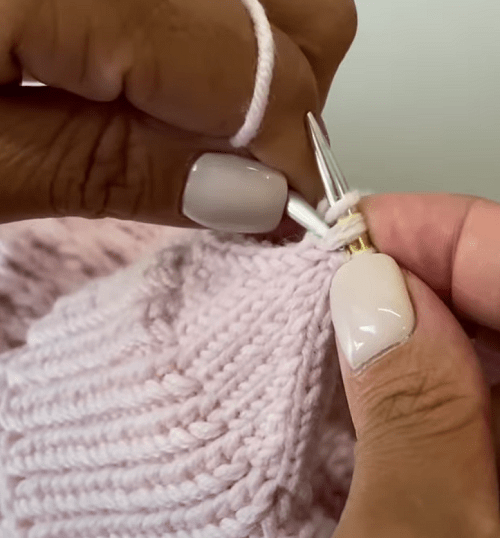
For double-layer ear flaps, cast the stitches straight onto 2 double-pointed needles, slip them onto circular needles, and knit 2-4 rounds in knit stitch, decreasing gradually at the sides.
Stitches for double-layer ear flaps are cast on with double-pointed needles.
Work the decreases
Row 1: 1 knit, k2tog, 9 knit, k2tog, 1 knit; repeat for the second half of the ear flap. Row 2 — knit. From row 3 onward, keep decreasing the same way until 3 stitches remain on each of the 2 needles.
The decreases are worked at the sides of the ear flap.
Knit the ear flap to the length you need
After the decreases, knit straight in knit stitch to the ear flap length you need. Then carefully secure the yarn end and weave it to the wrong side.
After the decreases, the ear flap is knitted in knit stitch to the length you need.
Knit a Simple Hat for a 1-Year-Old
The source specifies: medium-weight yarn, size 3.5 needles, 80 g used, knitted with 2 strands held together. Head circumference is given as 16 cm, so be sure to check your child's actual measurement before starting.
Cast on stitches
Row 1: cast on 76 stitches onto circular needles.
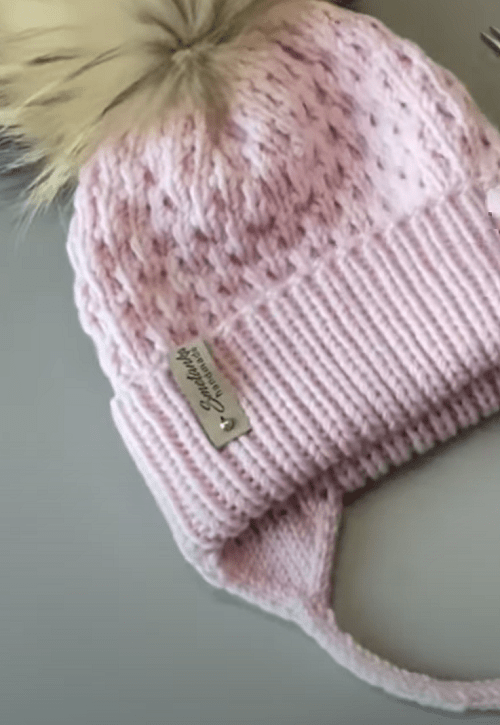
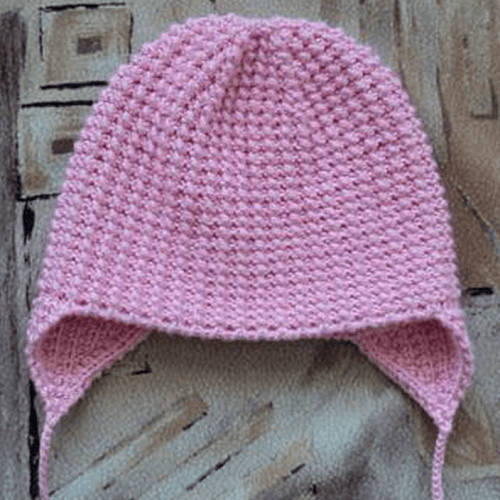
An example of a simple hat with ear flaps.
Knit the main fabric
Knit rows 2-50 in moss stitch or another simple pattern.
Decrease the crown
From here, work decreases in the even rows: divide all the stitches into 4 sections, and in each section knit 3 stitches together, counting the center stitch.
Gather the remaining stitches
Gather the remaining 12 stitches onto a length of yarn, secure it, and hide it on the wrong side. Knit the ear flaps from 15 stitches following the method described above.
Finish and variations
Finish
Securing the Yarn
After gathering the crown and knitting the ear flaps, secure the yarn ends, weave them to the wrong side with a hook or a needle, and check that there are no rough knots on the inside.
Variations
Fleece Lining
For winter, the source suggests a version with a fleece lining: it adds warmth and doesn't irritate sensitive skin. A detailed video tutorial is provided for more experienced knitters.
Ear Flaps from the Bottom Up
From the discussion: you can start with the double-layer ear flaps at the bottom, then gather them onto circular needles and cast on stitches between the ear flaps. This is an alternative method, not the main order given in the article.
The simple example gives a head circumference of 16 cm, but that figure can look atypical for a 1-year-old.
Likely cause
The source may have a typo or an incomplete sizing reference.
How to fix it
Don't cast on based on this figure alone. Take your child's actual head circumference, knit a swatch in your chosen pattern, and recalculate the stitch count for your own gauge.
The pattern presses or bothers the child
Problem
The hat is uncomfortable, especially when the child is lying down or moving around a lot.
Likely cause
A raised motif, bobbles, or bulky cables were chosen.
How to fix it
For young children, choose simple, flat stitch patterns: moss stitch, slip-stitch tracks, or another gentle pattern without raised elements.
The ear flaps don't cover the ears well
Problem
There are ties, but the child's ears stay exposed.
Likely cause
The ear flaps are placed at the center instead of set back from the fold.
How to fix it
Mark the ear flaps about 2 cm back from the hat's fold, and cast on 14-18 stitches, as the source specifies.
You want a seamless fabric with no jogs at the ear flaps
Problem
Knitting the ear flaps from the top or from under the brim leaves visible jogs.
Likely cause
The ear flaps are added after the main part of the hat.
How to fix it
The discussion suggests an alternative method: knit from the bottom up — first make the double-layer ear flaps, then gather them onto circular needles and cast on stitches between the ear flaps for the front and back sections. This gives you a seamless fabric with no jogs.
?FAQ
What yarn should I choose for a children's winter hat?
The source recommends a soft, natural yarn that doesn't irritate the skin and doesn't pill. The examples given include Alize Merino Royal, Gazzal Baby Wool, and Lana Cashemere Wool.
What tools do I need for this project?
You need two pairs of circular needles that differ by 0.5-1 size, double-pointed needles of the same thickness, markers, a large-eye yarn or tapestry needle, and a crochet hook.
What stitch patterns are good for beginners?
For young children, it's better to choose simple, flat stitch patterns without bobbles or bulky cables. The source gives moss stitch, slip-stitch tracks, and honeycomb.
Where do I place the ear flaps on a children's hat?
The ear flaps aren't placed at the center of the hat, but about 2 cm back from the fold. The source then casts on 14-18 stitches.
Can I knit the 1-year-old example exactly by the numbers given?
It's better to double-check the measurement. The source gives a head circumference of 16 cm, so before casting on 76 stitches, take your child's actual circumference and recalculate the stitches from your own swatch.
Can I knit the ear flaps from the bottom and then gather the hat onto circular needles?
Yes, this option was suggested in the discussion: first knit the double-layer ear flaps, then gather them onto circular needles and cast on stitches between the ear flaps for the front and back sections. This is an alternative method that's convenient for a seamless fabric.
Your project
Log in to track your project, attach photos, and publish your result into the shared feed.
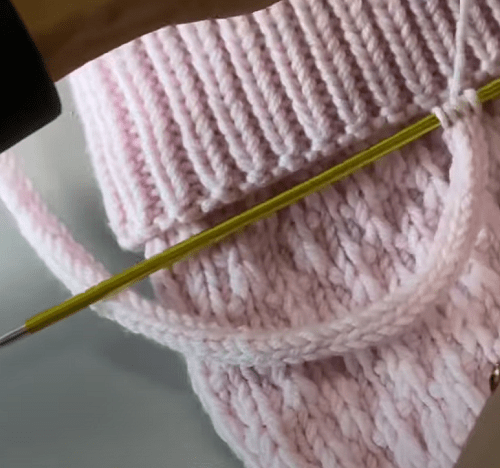
Interesting way to do the ear flaps on the powder-pink hat. So it's a double fold-over brim, with the ear flaps underneath? That's definitely easier to knit. And it's easier to work out where the ear flaps should go that way too. Plus decreases are less tricky than increases. That said, I'd still knit it from the bottom up myself. Start with the ear flaps, and make them double-layer. Then you need to gather everything onto one set of circular needles, casting on stitches between the ear flaps for the front and back sections. That gives you a seamless fabric, with no jogs.

 BeginnerFree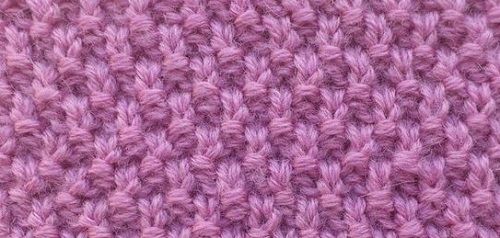


Interesting way to do the ear flaps on the powder-pink hat. So it's a double fold-over brim, with the ear flaps underneath? That's definitely easier to knit. And it's easier to work out where the ear flaps should go that way too. Plus decreases are less tricky than increases. That said, I'd still knit it from the bottom up myself. Start with the ear flaps, and make them double-layer. Then you need to gather everything onto one set of circular needles, casting on stitches between the ear flaps for the front and back sections. That gives you a seamless fabric, with no jogs.