A step-by-step tutorial for sewing a knotted headband: measure the plastic base, draft a pattern for the fabric cover with extra length for the knot, cut stretch fabric across the grain, sew and turn the cover right side out, slide it onto the base, and tie the knot through the slits.
Beginner40 minFree
Translated
Things you will learn
A knotted headband is easy to make — the only tricky part is drafting the cover's pattern yourself, based on the measurements of your own headband base.
The color of the plastic base doesn't matter, since the fabric cover hides it completely; measure the headband's length along the inside edge and add extra length for the knot.
Measure the pattern's width at the widest point (the center of the headband) and at the narrowest point, adding a 1 cm seam allowance on each side.
It's important to cut the fabric so it stretches across the grain rather than along it — this matters especially for stretch fabrics like stretch velvet or velour; the fabric shouldn't be too slippery, so the headband holds your hair well.
Once the cover is sewn and turned right side out, slide it onto the base through the open edge, form the knot through dedicated slits, and hand-sew the narrow end closed.
What you'll get
You'll get a stylish fabric headband finished with an eye-catching knot that fully hides the plastic base underneath.
Materials and tools
Materials
Plastic headband base, it's best to buy a ready-made base made of medium-width flexible plastic; the base's color doesn't matter, since the cover hides it completely
Stretch fabric (such as stretch velvet or velour), the fabric should stretch across the grain rather than along it, and shouldn't be too slippery, so the headband holds your hair well
Tools
Measuring tape, for taking measurements from the headband base
Pins, for pinning the pieces together before sewing
Sewing machine, for stitching the cover
Needle, for hand-sewing the cover's narrow end closed
Iron, for pressing the cover once it's turned right side out
Preparation
Measure the headband base
Measure the headband (it's best to buy a base made of medium-width flexible plastic). The base's color doesn't matter, since we'll be making a "cover" that hides the plastic base completely.
Calculate the pattern's length
Measure the headband along the inside edge — in this example, the length is 36 cm. Divide that figure by 2 (16 cm). So the total length of the headband cover comes to: 16 cm + 16 cm (the base's size) + 16 cm extra for tying the knot.
Calculate the pattern's width
Measure the fabric at its widest point (the center of the headband) and at its narrowest point, adding a 1 cm seam allowance. So 3.8 cm + 1 cm — the pattern's width rounds up to 5 cm, and 1.5 cm + 1 cm — the pattern's narrowest point comes to 1.2 cm.
Cut the cover piece
The fabric is cut to the calculated measurements, taking the stretch direction of the material into account.
Mind the fabric's stretch direction when cutting
It's important to cut the fabric correctly — in this case, it should stretch across the grain rather than along it. This matters especially for stretch materials like stretch velvet or velour. It also matters that the fabric shouldn't be too slippery — choose fabric that lets the headband hold your hair well.
The paper pattern piece
Sew the cover
The piece is folded in half, marked, and sewn, leaving technical slits open.
Fold the piece in half and transfer the markings
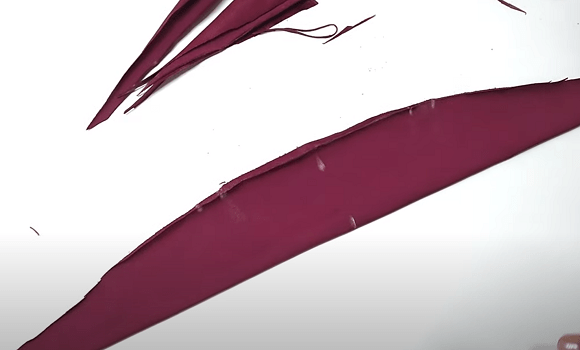
Fold the cut piece in half and transfer the markings onto it.
The cut fabric piece
Sew the piece, leaving the slits open
Stitch the seam, leaving 2 lines marked "slit" unsewn. Fold the narrow edge on one side seam-side up and stitch it closed.
Pinned before sewing
Turn the cover right side out and press it
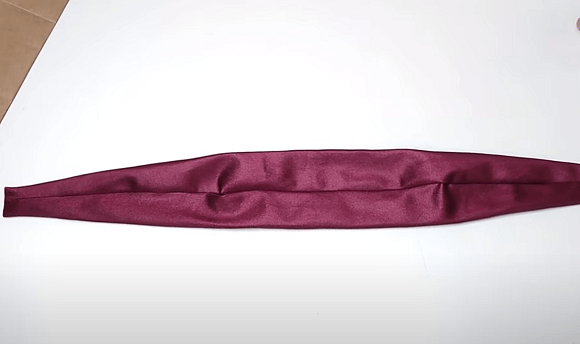
Turn the cover right side out and press it.
The sewn cover
Tie the knot on the headband
The finished cover slides onto the base, and then a decorative knot is formed through the slits.
Form the knot
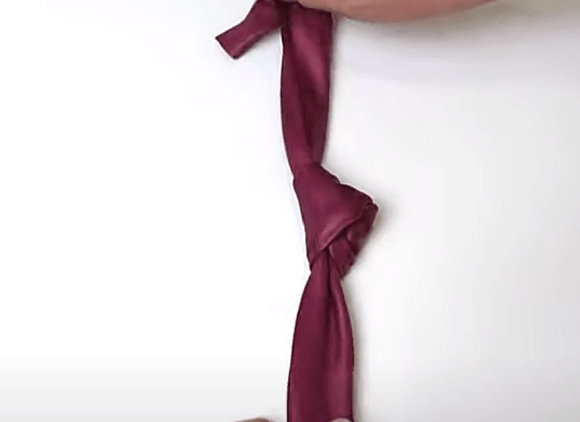
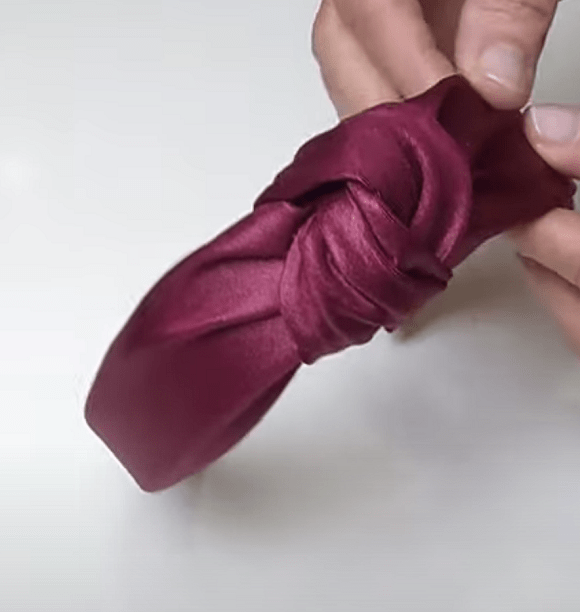
To tie a neat knot, fold the fabric in half lengthwise, form a small knot, and smooth out the folds.
Tying the knot
Thread the base through the cover and sew the edge closed
Thread the headband through the open edge, bring it out under the knot through the slit, feed it back into the cover through the second slit, and pull it all the way through. Hand-sew the narrow side closed.
Shaping the knot
Finish and variations
Finish
Enjoy your new accessory
Your knotted headband is ready — an eye-catching accessory for long hair that's a perfect finishing touch for a summer look.
Variations
Embellish the headband with beads
You can embellish the finished headband with beads for extra decoration.
Make the cover wider in the center
You can make the cover wider in the center section so it resembles a scarf tied around the hair.
The headband doesn't hold hair well because the fabric is too slippery
Problem
The finished knotted headband slides off the hair and doesn't hold it well.
Likely cause
A fabric that's too slippery was chosen for the cover.
How to fix it
Choose a fabric for the cover that isn't too slippery and holds hair well, even if it's a stretch fabric.
The cover's fabric puckers or pulls after sewing
Problem
After sewing and turning it right side out, the cover looks uneven, and the fabric puckers or pulls to one side.
Likely cause
The fabric was cut along the stretch direction instead of across it.
How to fix it
Cut the piece so the fabric stretches across the grain rather than along it — this matters especially for stretch materials like stretch velvet or velour.
The base doesn't fit through the cover's open edge
Problem
When trying to thread the plastic base through the cover, it gets stuck or won't go all the way through.
Likely cause
The cover's length was calculated without enough extra length for tying the knot.
How to fix it
When calculating the cover's length, add at least 16 cm extra for tying the knot, on top of the base's own length.
?FAQ
How do I figure out the length of the headband cover's pattern?
Measure the base along the inside edge, divide that figure by 2, then double the result and add about 16 cm for tying the knot.
What fabric should I choose for a knotted headband?
Stretch fabric works well, such as stretch velvet or velour — the main thing is that it stretches across the grain rather than along it, and isn't too slippery.
Does the color of the plastic base matter?
No, the base's color doesn't matter, since the fabric cover hides it completely.
How do I form the knot on the headband?
Fold the fabric in half lengthwise, form a small knot, and smooth out the folds, then thread the base through the open edge and the slits.
How else can I decorate a finished headband?
You can embellish it with beads or make the cover wider in the center so it resembles a scarf tied around the hair.
Your project
Log in to track your project, attach photos, and publish your result into the shared feed.
I don't wear headbands myself — they press behind my ears and give me a headache. So I prefer a hair wrap, and this particular version really caught my eye 🥰
I've got all kinds of headbands already, but I've never made a knotted one! I definitely have to try it — I've got the bases ready, and my daughter's been asking for a beaded headband.

 Beginner40 minFree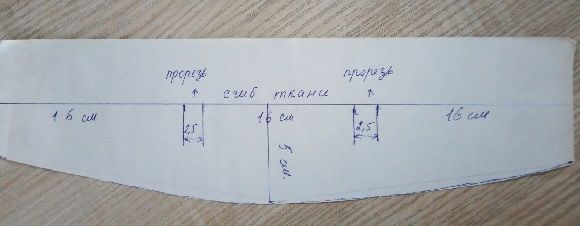


I don't wear headbands myself — they press behind my ears and give me a headache. So I prefer a hair wrap, and this particular version really caught my eye 🥰