How to Knit a Warm Kids' Hat. An Owl Hat for a Girl and a Boy
A tutorial for knitting a kids' owl hat: cast on and knit the brim in stockinette stitch, divide the stitches with markers into front and back halves, work the owl from a chart on the middle section of the front, continue in garter stitch or 2x2 ribbing depending on the version, then close the crown with a seamless technique on the needles. There are two versions — a girl's version in stockinette with garter stitch, and a boy's version in 2x2 ribbing — plus charts for a large and a small owl and sizing tips for preschoolers.
Beginner4 hrFree
Translated
Things you will learn
The hat knits up very quickly — literally in 2 evenings: the design is simply a rectangle with no crown decreases, and the chunky owl motif makes it look festive and suits girls and boys equally.
For younger children, it's worth knitting ties as well, so the hat covers the child's ears well.
Version 1 (girl, 2-3 years): cast on 93 stitches with medium-weight yarn on size 3 needles and knit 3 cm in stockinette stitch for the brim, then divide the stitches with markers into front and back halves, and divide the front half into 3 sections, setting aside the middle 24 stitches for the owl; work the main body in garter stitch (knit every stitch on both right-side and wrong-side rows).
Version 2 (boy, 2-3 years): worked in 2x2 ribbing, which pulls the fabric in more, so cast on a few more stitches — 98; work the first 4 cm in ribbing in the round, then work the owl on the front using any of the charts given here, including the small owl versions; finish knitting at a height of 24 cm.
For version 1, once the owl is finished, knit 10 more rounds in garter stitch, then close the crown with a seamless technique on the needles: turn the hat inside out, transfer the stitches from needle 1 and needle 2 alternately onto one needle, then purl the whole row together in pairs of 2; for version 2, simply bind off all the stitches and sew them together. You can also finish the owl with blanket stitch, sew on button eyes and a beak, and add tassels.
What you'll get
You'll get a warm kids' hat, simply rectangular in shape, with a chunky owl motif and a seamless crown — in two versions, for a girl and for a boy.
Materials and tools
Materials
Medium-weight yarn, choose any color you like; the version with 2x2 ribbing needs a few more stitches cast on because that fabric pulls in more
Tools
Size 3 knitting needles, used for version 1 (the girl's hat); you'll also need needles for knitting in the round
Stitch markers, for dividing the stitches into front and back halves, and the front half into 3 sections
Sewing needle, for sewing on the button eyes and beak, and for finishing the owl with blanket stitch
In this tutorial, you'll find charts for the owl motif — a large one and a small one — plus a detailed video tutorial to help beginner knitters. The one thing worth adding for younger children is a pair of ties, so the hat covers the child's ears well.
Version 1: cast on and knit the brim
The girl's hat, for ages 2-3, starts with a stockinette-stitch brim.
Cast on and knit the brim
Cast on 93 stitches with medium-weight yarn on size 3 needles and knit 3 cm in stockinette stitch. This gives you the brim.
Divide the stitches with markers
Next, divide the stitches with markers as follows: half for the back, half for the front, and divide the front further into 3 sections, setting aside the middle section (24 stitches) for the motif to come.
Version 1: work the owl and the main body
The main body is worked in garter stitch, with the owl worked from a chart on the middle section of the front.
Work the main body in garter stitch
On both the right-side and wrong-side rows of the main body, knit every stitch to produce garter stitch. On the middle section of the front half of the hat, work the little owl from the chart.
The knitting chart for the owl
Knit 10 more rows after the owl
Once the owl is finished, knit 10 more rows in garter stitch in the round.
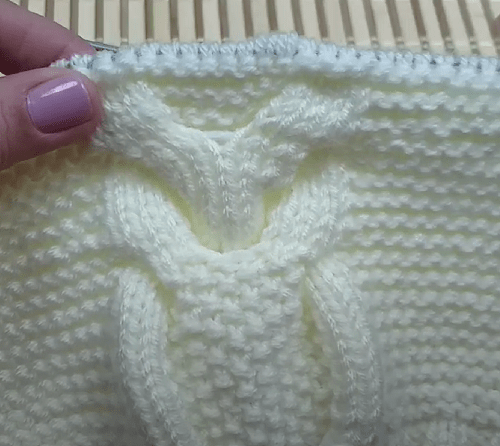
The owl motif in close-up
Version 1: close the crown without a seam
The crown is closed using a special technique on the needles so the seam is invisible.
Transfer the stitches onto one needle
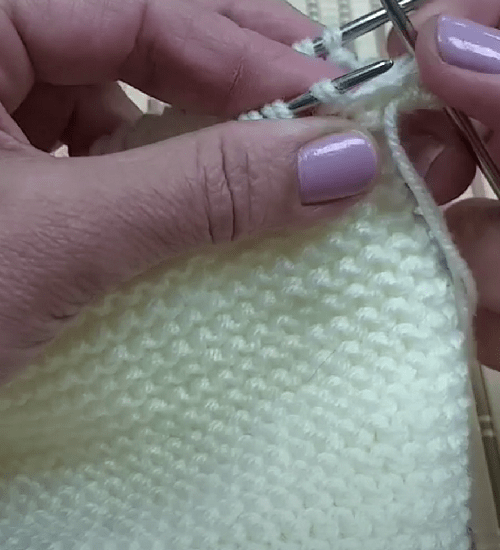
Now let's move on to the seam, which is easiest to do with the needles. Turn the hat inside out, and transfer the stitches alternately — one from needle 1, one from needle 2 — onto a single needle.
Stitches on the needles
Purl the whole row together in pairs of 2
Now purl the entire row together in pairs of 2. The girl's seamless hat is ready — you can decorate it with tassels made from the same yarn or a similar shade.
Version 2: knit the boy's hat in ribbing
The boy's hat is worked in 2x2 ribbing, which pulls the fabric in more.
Cast on and work the ribbing
This version is worked in 2x2 ribbing, which pulls the fabric in more, so cast on a few more stitches — 98. Work the first 4 cm in ribbing in the round, then work the owl on the front section.
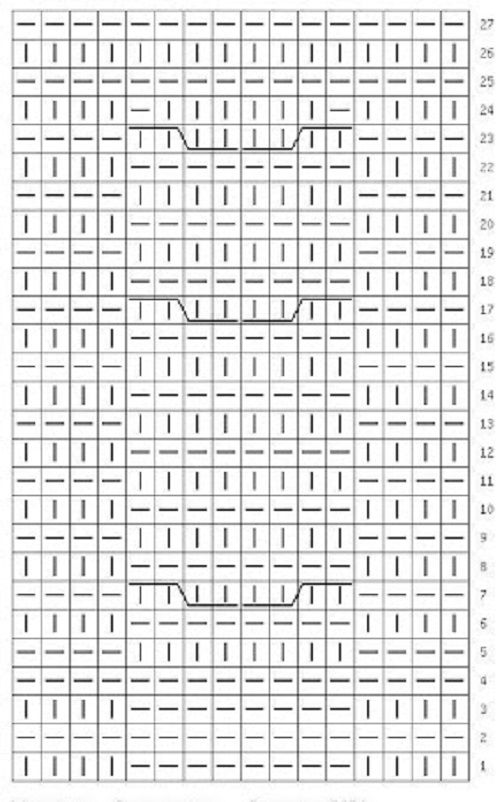
Choose an owl chart
For the owl, you can choose any of the charts given in this tutorial, including the small owl versions.
A chart for the owl hatThe owl motif chart
Finish knitting and bind off
At a height of 24 cm, finish knitting, then bind off and sew all the stitches together. The hat comes out seamless, doesn't press on the head, and looks very neat. You can also knit a matching pair of mittens with the same motif.
A gray owl-motif kids' hat
Finish the owl with extra details
The finished owl can be embellished further with stitching and small details.
Add blanket stitch and details to the owl
You can also finish the owl on the piece with blanket stitch — it looks lovely if you sew on button eyes and a beak, and add tassels too. You'll find a detailed video tutorial on knitting the owl motif linked in the description.
Finish and variations
Finish
Knit a larger size for preschoolers
For preschoolers, cast on more stitches for the hat and increase its height, and to keep the owl centered, increase the height of the lower section (the brim) by a few centimeters.
Variations
Add tassels to the girl's hat
The girl's seamless hat can be decorated with tassels made from the same yarn or a similar shade.
Knit a matching pair of mittens
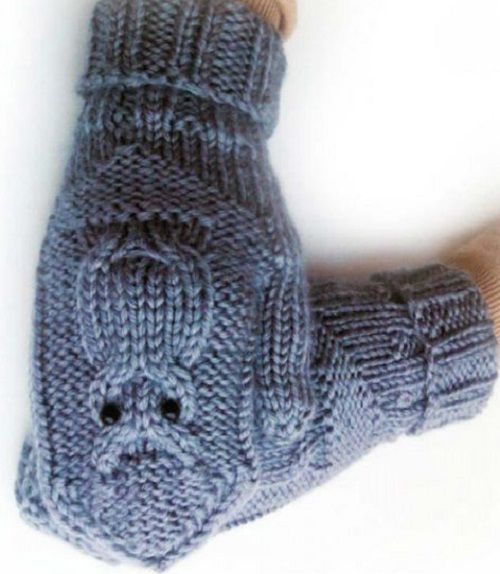
As a matching set for the boy's hat, you can also knit a pair of mittens with the same owl motif.
Add dimensional details to the owl
The owl on the piece can be finished with blanket stitch, button eyes, a beak, and tassels.
After knitting the owl, the motif ends up shifted and isn't centered on the front of the hat.
Likely cause
The stitches on the front half weren't correctly divided with markers into 3 equal sections before starting the motif.
How to fix it
Before working the owl, be sure to divide the stitches on the front half into 3 sections with markers, setting the middle section (24 stitches) exactly at the center.
The crown of the girl's hat pulls in unevenly
Problem
After closing the crown with the seamless technique, the fabric pulls in unevenly, with a skewed look.
Likely cause
The stitches from the two needles weren't transferred onto one needle in strict alternation, which threw off the pattern when purling them together in pairs of 2.
How to fix it
Transfer the stitches from needle 1 and needle 2 onto one needle in strict alternation, then purl the entire row together in pairs of 2 — this gives you an even, seamless closure.
The boy's ribbed hat comes out too loose or too tight
Problem
The finished 2x2 ribbed hat fits too loosely, or on the contrary, pulls too tightly on the head.
Likely cause
The usual stitch count was cast on without accounting for how much more 2x2 ribbing pulls the fabric in.
How to fix it
For the 2x2 ribbed version, cast on a few more stitches than for the garter-stitch version — in this example, that's 98 stitches instead of 93.
?FAQ
How long does this hat take to knit?
Literally 2 evenings — the design is simply a rectangle with no crown decreases.
How many stitches do I cast on for the girl's and boy's versions?
For the girl's version (garter stitch) — 93 stitches on size 3 needles; for the boy's version (2x2 ribbing) — 98 stitches, since the ribbing pulls the fabric in more.
How do I divide the stitches for the owl motif?
Set aside half the stitches for the back and half for the front, then divide the front half into 3 sections, setting aside the middle section (24 stitches) for the owl.
How do I close the crown of the hat without a seam?
Turn the hat inside out, transfer the stitches from both needles onto one needle in alternation, and purl the entire row together in pairs of 2.
How do I size up the hat for preschoolers?
Cast on more stitches, increase the hat's height, and increase the height of the brim by a few centimeters so the owl stays centered.
Your project
Log in to track your project, attach photos, and publish your result into the shared feed.
Owls are a classic! Always look so lovely) But for some reason I like the small owls better. Big ones look a bit rough on little kids somehow. Especially for hats, small ones work better.

 Beginner4 hrFree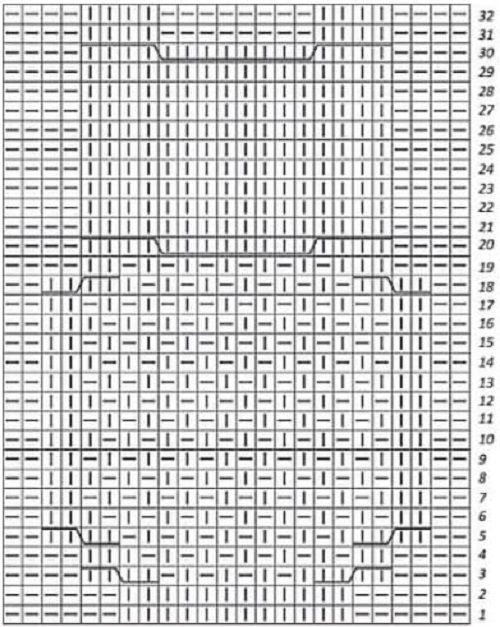


Owls are a classic! Always look so lovely) But for some reason I like the small owls better. Big ones look a bit rough on little kids somehow. Especially for hats, small ones work better.