Making DIY tassel earrings is very simple. There are 2 different earrings in the photo. They are made using the same principle, and the difference in design is achieved through different findings. You can use whatever findings you like. For tools
BeginnerFree
Translated
DIY Tassel Earrings with End Caps
Making DIY tassel earrings is very simple. There are 2 different earrings in the photo. They are made using the same principle, and the difference in design is achieved through different findings. You can use whatever findings you like. For tools
Files and resources
another post
Main Steps
Step 1
Making DIY tassel earrings is very simple. There are 2 different earrings in the photo. They are made using the same principle, and the difference in design is achieved through different findings. You can use whatever findings you like.
Step 2
For tools, you will need needle-nose pliers, flat-nose pliers, scissors, a new razor blade, a piece of cardboard, a piece of heat-shrink tubing, and, if possible, a hot glue gun.
Step 3
Materials: • fishing line or monofilament; • sewing thread; • viscose thread for tassels; • findings—ear wires or leverbacks, an end cap, beads or bicones; • wire.
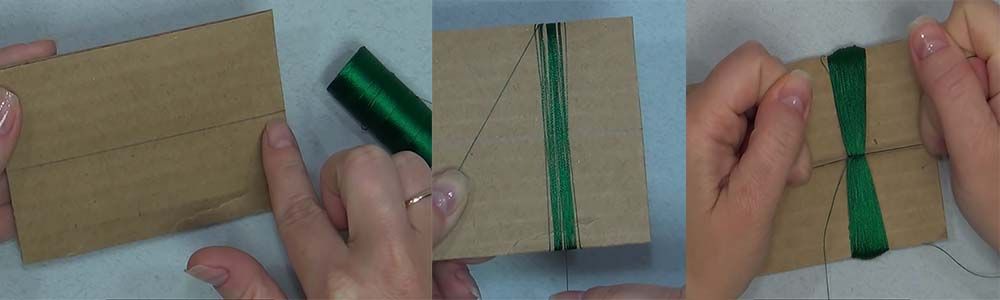
First, take a 10x7 cm piece of cardboard; we will wrap the viscose thread for the tassels around it. Draw a horizontal line across the center of the cardboard. Wind the viscose thread around the cardboard. There should be quite a lot of it, and you need to wind it very tightly. On the reverse side (where there is no line), tie the viscose threads in the center of the cardboard with regular sewing thread and secure it well with several knots.
Step 4
Flip the cardboard over and cut the threads with the razor blade right along the line. Simply apply light pressure to the threads with the blade, and they will cut easily.
Step 5
Do not cut the thread you used to tie the tassel; it should stay long. You may notice that the tassel is uneven and very fluffy. To fix this, the tassel needs to be steamed. It is very easy to do: tie the tassel by its thread to a stick of some kind (so you don't burn your hands) and hold it over steam—above a boiling pot, for example.
Step 6
Now the tassels need to be trimmed evenly. To do this, take a piece of heat-shrink tubing of a suitable diameter. Cut a piece of tubing equal to the desired length of the tassel. Insert the tassel into it so that the knot is right at the edge of the cut tube. If you don't have heat-shrink tubing, you can adapt something similar.
Step 7
Trim the excess threads with the razor blade and remove the tassel from the tube. For added security, you can dab a little glue onto the tip.
Step 8
Now all that's left is to add the findings. Make a small loop on a short piece of wire and hook it onto the threads that tie the tassel together, then slide the end cap and bead over it. Cut off the excess wire with wire cutters. Use needle-nose pliers to form a small loop. Attach the ear wire to this loop and close it.
Step 9
There is also a second way to make a tassel, but that will be covered in another post.

 BeginnerFree