Crochet Fingerless Mitts for Beginners: Rectangle and Thumb
Crocheting simple fingerless mitts: taking hand measurements, working a rectangle to the right height and circumference, seaming it with a thumb opening, and finishing the thumb with three rounds.
BeginnerFree
Translated
Things you will learn
The source's example is sized for a 5-year-old child: hand circumference 15 cm, mitt height 12 cm.
The base of the mitt is a rectangle: one side equals the height of the piece, the other equals hand circumference minus 1 cm for a snug fit.
The main stitch is single crochet worked through the back loop only, which is why the ribbed texture runs across the mitt.
The thumb opening is left while seaming the rectangle, and the thumb is then finished with 3 rounds of single crochet.
What You'll Make
You'll get a pair of classic fingerless mitts, crocheted with a simple cross-wise texture. The design works for a child or an adult: the source gives a child's measurement, but the recalculation principle depends on your own hand circumference and the height you want.
Materials and tools
Materials
YarnArt Jeans yarn, 35 g, the source's author notes that this is even more than needed for a child's pair
Tools
2.5 mm crochet hook, the hook size used in the source
Tape measure, for hand circumference and the height of the finished mitt
Preparation
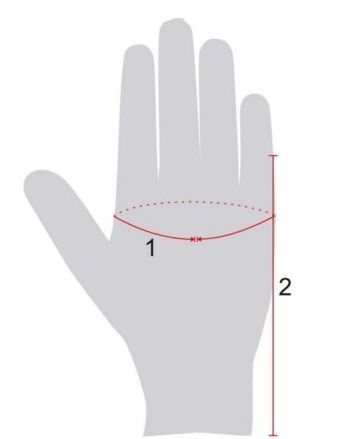
Take two measurements
Measure your hand circumference and decide what mitt height you want. In the author's example: hand circumference 15 cm, mitt height 12 cm.
Determine the rectangle size
One side of the rectangle should equal the mitt height, the other should equal hand circumference minus 1 cm, so the piece fits more snugly.
Take Measurements and Plan the Rectangle
This design has no complicated pattern piece: the fit is built from two measurements and a single rectangle.
Measure hand circumference and mitt height
For the child's example, the author uses a hand circumference of 15 cm and a mitt height of 12 cm. Substitute your own values for your size.
Fingerless mitts need hand circumference and the height of the finished piece.
Build in a snug fit
Calculate the rectangle's width as hand circumference minus 1 cm. This is a source-derived rule from the tutorial: it makes the mitt sit more snugly on the hand.
Don't reduce it too much
The source specifies exactly minus 1 cm. It's best not to reduce it by more than that without a swatch, or the mitt may end up too tight.
Crochet the Rectangle in a Cross-Wise Pattern
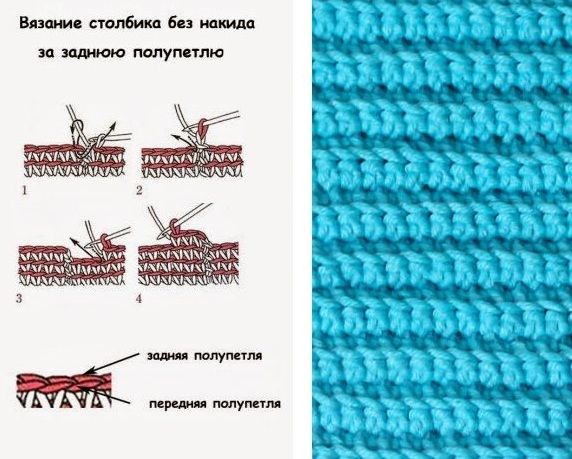
The main stitch pattern in the source is single crochet worked through the back loop only. It creates a textured, cross-wise ridge pattern.
Work through the back loop only
Work the single crochet stitches through the back loop only. The pattern should run cross-wise, as shown in the photo and diagram.
The main stitch pattern: single crochet through the back loop only.
Chain loosely
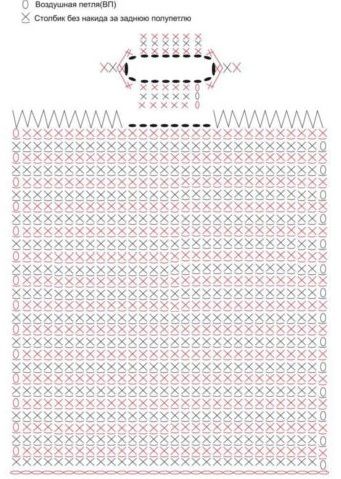
For the author's example, chain 30 stitches plus 1 turning chain. Keep the chain slightly loose so the edge doesn't pull the rectangle in.
Crochet to the height you need
In the example, 32 rows are worked plus 1 finishing row. For a different size, don't go by the row count in the example — go by the mitt height you need.
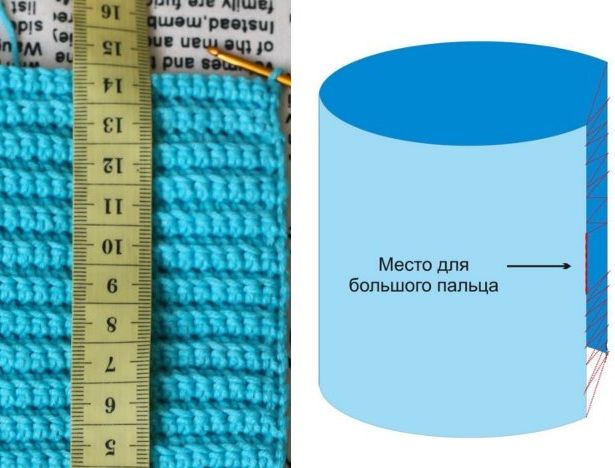
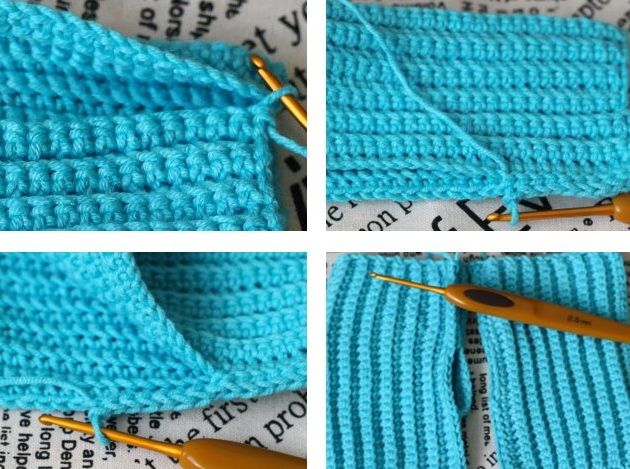
The base of the mitt is a rectangle with the thumb opening marked out.
Fold the Rectangle and Leave a Thumb Opening
The thumb opening isn't created by crocheting a complicated piece, but by the way the rectangle is seamed.
Fold the rectangle in half
Fold the crocheted rectangle in half, matching up the edges. Then seam it following the pattern from the source.
Before seaming, check the height and the position of the thumb opening.
Seam following the 11 - 8 - 11 pattern
First work 11 stitches with a chain stitch seam, then work 8 stitches in slip stitch on one side only — this leaves the thumb opening. After that, work another 11 stitches with a chain stitch seam.
The rectangle is seamed with a gap left for the thumb.
Check the opening
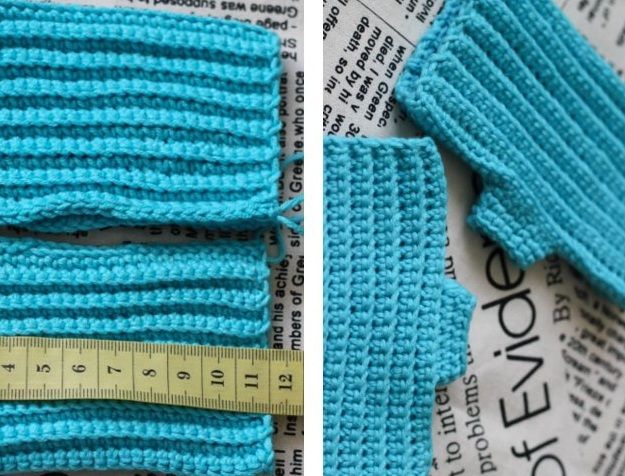
After seaming, there should be a neat opening for the thumb, and the ridges of the pattern should run across the hand.
Finish the Thumb and the Second Mitt
The final part is short: you just need to work an edge around the opening and repeat everything for the pair.
Crochet the thumb in three rounds
Around the thumb opening, work 3 rounds of regular single crochet.
The thumb is finished with three rounds of single crochet.
Crochet the second mitt the same way
Repeat the same steps for the other hand. You'll end up with a pair of simple fingerless mitts that you can pair with a scarf, cowl, or hat in the same yarn.
The finished pair of classic crochet fingerless mitts.
Finish and variations
Finish
Check the fit on your hand
The mitt should fit snugly without pressing. Check the circumference, the height, and how freely the thumb moves.
Make a matching set
The author suggests crocheting a whole matching set the same way: a scarf, a cowl, and a hat in the same color as the mitts.
Variations
A different color for a boy or a girl
The source points out that the classic design suits both girls and boys: the result changes simply with the yarn color you choose.
A different size
For a different age or an adult hand, take your own circumference and height, then recalculate the rectangle using the same rule.
The rectangle comes out puckered along the first row.
Likely cause
The chain stitches were made too tight.
How to fix it
The source specifically warns: make the chain of 30 stitches plus 1 turning chain slightly loose.
The mitt fits too loosely
Problem
The finished piece slides down or doesn't hug the hand.
Likely cause
The rectangle's width was made equal to hand circumference without reducing it.
How to fix it
In the source, the rectangle's width equals hand circumference minus 1 cm. Check your calculation and your own gauge.
The ribbed texture runs the wrong way
Problem
The pattern looks different and doesn't match the intended fit.
Likely cause
The rectangle was worked in the wrong direction, or the stitches weren't worked through the back loop only.
How to fix it
Work the single crochet stitches through the back loop only, and keep the pattern running cross-wise on the mitt.
The thumb opening turned out uncomfortable
Problem
The thumb doesn't fit through, or the opening is misplaced.
Likely cause
The 11 - 8 - 11 seaming pattern wasn't followed correctly.
How to fix it
Check against the pattern: 11 stitches with a chain stitch seam, 8 stitches for the thumb zone, then another 11 stitches with a chain stitch seam.
The thumb came out too tall
Problem
The edging gets in the way of moving the thumb freely.
Likely cause
More rounds were worked than in the original version.
How to fix it
In the source, the thumb is finished with three rounds of regular single crochet.
?FAQ
What size is the example made for?
The author crochets for her 5-year-old daughter: hand circumference 15 cm, mitt height 12 cm.
What yarn do I need?
The source uses YarnArt Jeans yarn, about 35 g, and the author notes that this is even more than needed.
What hook size should I use?
The original tutorial uses a 2.5 mm hook.
What stitch pattern should I use for the mitts?
The main stitch is single crochet worked through the back loop only. It creates a cross-wise ribbed texture.
How many chain stitches do I make in the example?
In the example, you chain 30 stitches plus 1 turning chain. The chain should be made slightly loose.
How many rows are worked for the child's mitt?
The source specifies 32 rows plus 1 finishing row. For your own size, go by the mitt height you need.
How do I leave the thumb opening?
The folded rectangle is seamed following the pattern: 11 stitches with a chain stitch seam, 8 stitches for the thumb zone, then another 11 stitches with a chain stitch seam.
How do I finish the thumb?
Around the thumb opening, work 3 rounds of regular single crochet.
Your project
Log in to track your project, attach photos, and publish your result into the shared feed.

 BeginnerFree