Crochet a Market Bag from Jute, Cord, or T-shirt Yarn
A step-by-step tutorial for crocheting a market bag: work a round base in single crochet, move on to a mesh body in a simple chain-stitch pattern, work in rounds to the desired height, and finish the handles — sturdy crocheted ones, thin flat ones, or leather ones on carabiners.
Beginner1 hr 30 minFree
Translated
Things you will learn
The market bag pattern is the same no matter which material you use — jute, polyester cord, or thick T-shirt yarn — only the hook size and stitch count change.
For a market bag made from cord you'll need 250 g of polyester cord and a size 6 hook; the work starts with a round base worked in rounds.
The base is worked in 2 rounds: in round 1, chain 14 and single crochet around the chain, working 3 single crochets into each end stitch; in round 2, repeat the pattern with increases at the turning points.
The bag's main body is worked without increases in a simple mesh stitch: 1 single crochet, chain 3, skip 2 base stitches, repeat — worked in rounds up to the desired height.
The handles can be crocheted (sturdy or thin and flat) or made from leather attached with carabiners; for crocheted handles, place stitch markers to mark the sections between them and chain the desired length.
What you'll get
You'll get a crocheted market bag in a simple mesh stitch — a sturdy, reusable bag with either crocheted or leather handles.
Materials and tools
Materials
Jute, one option for the bag's material
Polyester cord, 250 g, the cord version calls for a size 6 hook
Thick T-shirt yarn, another option for the bag's material
Tools
Size 6 crochet hook, the hook size and stitch count depend on the material you choose
Stitch markers, for marking the handle sections
Carabiners, needed if you decide to make leather handles instead of crocheted ones
Preparation
Choose your material
Plastic shopping bags are gradually becoming a thing of the past, so it's a great time to crochet a market bag. You can pick a material based on what you already have at home: thick T-shirt yarn, polyester cord, or jute. The pattern for the market bag is the same for every option — only the hook size and stitch count change.
Crochet the base
The bag's base is worked in rounds in single crochet.
Work round 1
Chain 14. Work 1 turning chain, then single crochet to the end of the row, working 3 single crochets into the last stitch. Continue single crocheting along the other side of the chain the same way. Work 3 single crochets into the last stitch.
Work round 2
Work the same way, but at the turning points work: 2 single crochets into the second-to-last stitch, 1 single crochet, then 2 more single crochets. The base is done.
Close-up of the base's edge
Crochet the mesh body
The bag's main body is worked without increases in a simple mesh stitch.
Work the body's stitch pattern
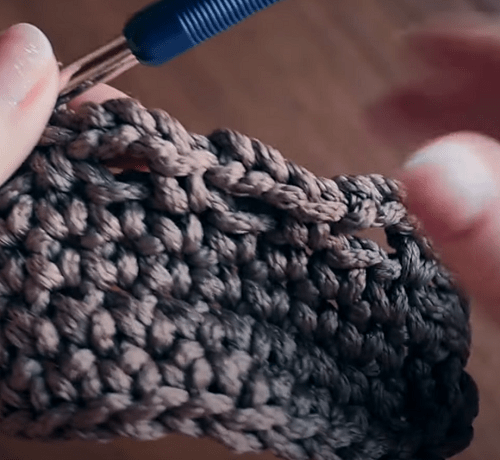
Now move on to the body. It's worked without increases in a very simple stitch: 1 single crochet, chain 3, skip 2 base stitches, 1 single crochet.
Working the mesh stitch
Work the body up to the desired height
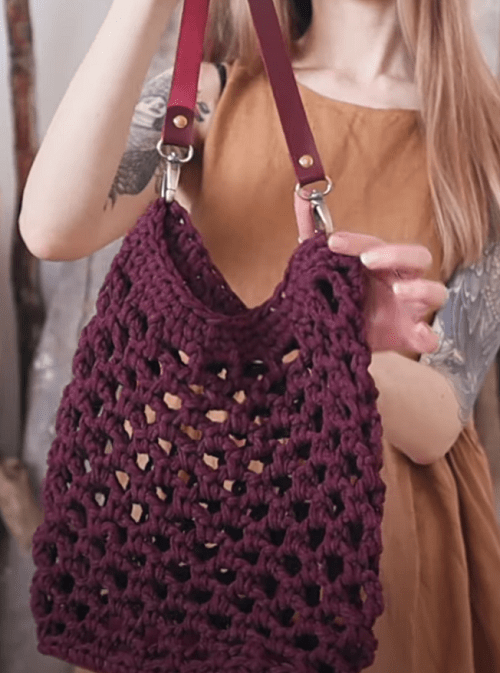
Work in rounds up to the desired height. In the last round, work single crochet into every stitch. You can stop here if you'd like to make interesting handles, such as leather ones — these are attached to the bag with carabiners.
Finished burgundy market bag
Crochet the handles
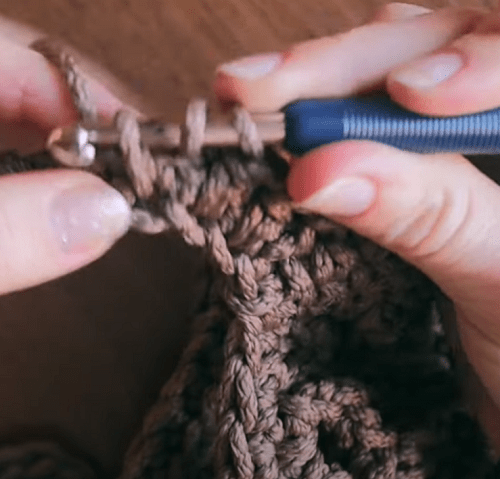
Crocheted handles are formed right out of the bag's body with the help of stitch markers.
Place the stitch markers
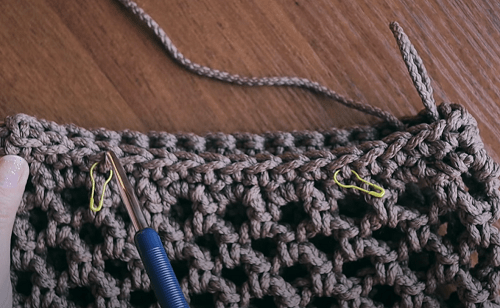
For crocheted handles, place stitch markers, dividing each half of the bag into roughly 3 sections.
The mesh pattern at the top edge
Work the handle band
Now single crochet around, but over the section between the markers, chain the desired length instead (as you like). To make the handle sturdier, work the second row not in single crochet but in double crochet, into the first row's stitches.
Working a handle
Try the thin, flat handle option
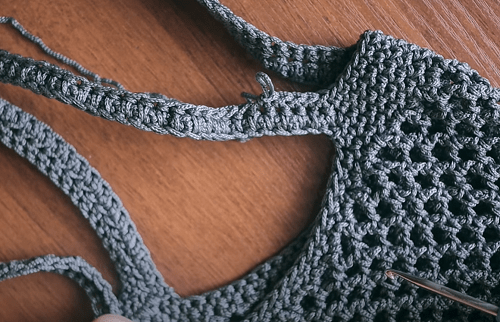
You can also choose a more elegant option with a thin, flat handle.
Thin flat handle variation
Finish and variations
Finish
Care for your finished bag
It's worth crocheting a few of these bags — they hold up well whether you wash them by hand or in the washing machine.
A note of thanks
Huge thanks to Dasha Golubeva for the tips and photos.
Variations
Leather handles on carabiners
You can stop after the last round of single crochet and make interesting handles, such as leather ones — these are attached to the bag with carabiners.
Thin, flat handle
A more elegant option is a thin, flat handle instead of a sturdy crocheted one.
After working the base, it comes out uneven, with the edge rippling instead of lying flat.
Likely cause
The 3-single-crochet increases at the end stitches on the turning points weren't worked consistently between rounds.
How to fix it
Work the increases at the turning points exactly as described — 3 single crochets into the end stitch in round 1, and the 2+1+2 single crochet split in round 2 — to keep the base lying flat.
The handles come out too thin and stretch under weight
Problem
The bag's crocheted handles stretch easily and can tear if the bag is loaded with something heavy.
Likely cause
The handles were worked only in single crochet without any extra reinforcement.
How to fix it
To make the handle sturdier, work the handle's second row in double crochet instead of single crochet.
It's unclear where to stop if you're planning leather handles
Problem
It's unclear at what point in working the body you should stop in order to attach leather handles later.
Likely cause
The body was worked further instead of being finished with a final round of single crochet.
How to fix it
If you want leather handles on carabiners, finish the body with a final round of single crochet and stop there.
?FAQ
What material should I choose for a market bag?
Jute, polyester cord, or thick T-shirt yarn all work — the pattern stays the same, only the hook size and stitch count change.
How much cord do I need for the bag, and what hook should I use?
For the polyester cord version, you'll need 250 g of material and a size 6 hook.
Where does the market bag pattern start?
The work starts with a round base: in round 1, chain 14 and single crochet around it, with increases at the ends.
What stitch pattern is used for the main body?
A simple mesh stitch worked without increases: 1 single crochet, chain 3, skip 2 base stitches, repeated in rounds.
How can I finish the handles on a market bag?
You can crochet sturdy handles, thin flat handles, or attach leather handles with carabiners.
Your project
Log in to track your project, attach photos, and publish your result into the shared feed.
Today I came across an idea for dressing up a plain market bag. On the left is a photo from a Prada collection, on the right is handmade )))
Making it isn't hard at all. You braid or crochet the bag itself and leave long tails of cord or T-shirt yarn instead of handles. You glue them one by one onto a ready-made braided leather handle with hot glue. Make one tail a bit longer. Then wrap the whole thing tightly with nylon thread.
Next, use the long tail to wrap a few coils around it. This hides the attachment point, and you tuck away the yarn's tip too.
And now for the magic trick. Take an ordinary drawstring pouch bag. It sews up in 10 minutes. The main thing is that it fits the right size.
A market bag with a leather strap looks great! 👍 I like that option much better than crocheted handles — and honestly, crocheted ones don't look so great after being used for a while 🤪
True, but I don't think it's a good idea to attach carabiners directly to the mesh. The stitch is open and lacy, stretches easily, and could even tear if you load the bag up — so that needs to be planned for, and the spot where the handles attach needs to be reinforced. But visually, I agree, the bag becomes a completely different thing. You can carry more than just potatoes in it )))
A market bag with a leather strap looks great! (y) I like that option much better than crocheted handles — and honestly, crocheted ones don't look so great after being used for a while 🤪

 Beginner1 hr 30 minFree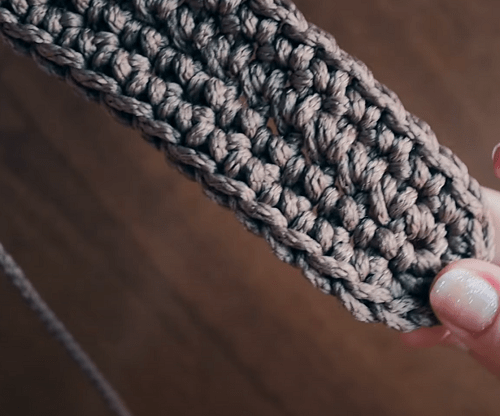


Today I came across an idea for dressing up a plain market bag. On the left is a photo from a Prada collection, on the right is handmade )))
Making it isn't hard at all. You braid or crochet the bag itself and leave long tails of cord or T-shirt yarn instead of handles. You glue them one by one onto a ready-made braided leather handle with hot glue. Make one tail a bit longer. Then wrap the whole thing tightly with nylon thread.
Next, use the long tail to wrap a few coils around it. This hides the attachment point, and you tuck away the yarn's tip too.
And now for the magic trick. Take an ordinary drawstring pouch bag. It sews up in 10 minutes. The main thing is that it fits the right size.
Slip it inside and tie it to the market bag.
Our trendy super-accessory is ready )))