
Hoops instead of frames – a simple way to display embroidery
Classic framing for finished embroidery usually involves a trip to a professional framer, where a specialist helps you choose a frame color, matting, and dimensions. However, framers can be quite particular, and it's worth asking about their methods before ordering. In some shops, for instance, they simply trim the embroidery and glue it down 😕 Or they staple the fabric tightly to the stretcher bars. If you ever want to remove the embroidery and change the framing, it will be impossible.
In short, after visiting several such questionable "workshops," my husband and I learned how to mount pieces ourselves using two of the gentlest methods: double-sided tape and thread lacing. But the simplest way turned out to be using embroidery hoops 😉 I'm sharing my experience—in case anyone is still stitching and just tucking their work away in a drawer.
So, the work is finished, the embroidery is still in the hoop, but what to do with the excess edges?

Leaving about 1-1.5 cm from the edge of the Aida, sew a running stitch around the circumference.

It should look like this (with the loose ends of the gathering thread at the bottom):

Take the ends of the thread and gently pull them toward you, gathering the fabric.
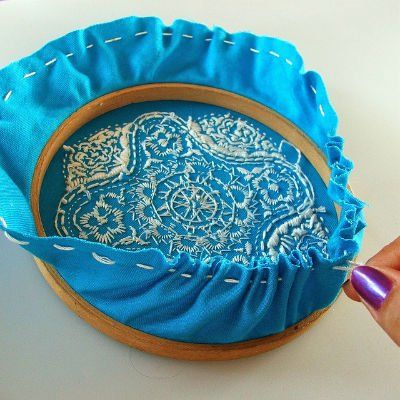
Distribute all the gathers evenly at the back and tie the threads in a knot. That's basically it 😉 If you like, you can make a round backing out of fabric, thin plywood, or heavy cardstock.

There is another cute way to make a backing at the same time as mounting 👍 For this, pick any thin printed fabric, preferably linen or cotton.

Place the "backing" fabric in the hoop first, and then the embroidery. This creates a double-layered "mount."

Trim the backing fabric flush with the hoop. The seam allowance on the embroidery fabric should be long enough to fold completely inside the frame.

Apply PVA glue to the inside of the hoop. It is the most sensible choice: if needed, it dissolves perfectly in water, and the embroidery can be removed later.

Glue the fabric along the entire inner perimeter of the hoop—it looks neat, nothing sticks out, and no extra backing is needed 👍

And for those who are annoyed by the wooden hoop rim over the embroidery, there are a couple of simple solutions. First, you can simply paint the rim with a matching shade of acrylic paint, or find a long ribbon from fabric scraps and wrap the rim before mounting.

Secure the ends of the ribbon with any clear glue.

I always love how the prints on the rim harmonize with the overall picture. Isn't it just lovely? 😍


I've been wanting to make a small hoop picture for the kitchen for a long time. The version with the colored fabric rim just won me over, now I'll definitely carry out my project! Added to my collection. Thanks!